Note
This plugin is for Vue 3. Check out the docs for Vue 2 version.
Kickstart a new project
Are you eager to dive into coding? Follow these steps to kickstart a new project with Storyblok and Vue, and get started in just a few minutes!
5-minute Tutorial
Are you looking for a hands-on, step-by-step tutorial? The Vue 5-minute Tutorial has you covered! It provides comprehensive instructions on how to set up a Storyblok space and connect it to your Vue project.
Installation
Install @storyblok/vue
npm install @storyblok/vue
Warning
This SDK uses the Fetch API under the hood. If your environment doesn't support it, you need to install a polyfill like isomorphic-fetch. More info on storyblok-js-client docs.
Register the plugin on your application (usually in main.js), add the apiPlugin and add the access token of your Storyblok space:
import { createApp } from "vue";
import { StoryblokVue, apiPlugin } from "@storyblok/vue";
import App from "./App.vue";

const app = createApp(App);

app.use(StoryblokVue, {
  accessToken: "YOUR_ACCESS_TOKEN",
  use: [apiPlugin],
});
That's it! All the features are enabled for you: the Api Client for interacting with Storyblok CDN API, and Storyblok Bridge for real-time visual editing experience.
Note
You can enable/disable some of these features if you don't need them, so you save some KB. Please read the "Features and API" section.
From a CDN
Install the file from the CDN and access the methods via window.storyblokVue:
<script src="https://unpkg.com/@storyblok/vue"></script>
Getting started
@storyblok/vue does three actions when you initialize it:
- Provides a
storyblokApi object in your app, which is an instance of storyblok-js-client
- Loads Storyblok Bridge for real-time visual updates
- Provides a
v-editable directive to link editable components to the Storyblok Visual Editor
Short Form
Load globally the Vue components you want to link to Storyblok in your main.js file:
import Page from "./components/Page.vue";
import Teaser from "./components/Teaser.vue";

app.use(StoryblokVue, {
  accessToken: "<your-token>",
  use: [apiPlugin],
});

app.component("Page", Page);
app.component("Teaser", Teaser);
The simplest way is by using the useStoryblok one-liner composable. Where you need to pass as first parameter the slug, while the second and third parameters, apiOptions and bridgeOptions respectively, are optional:
Note
The resolveRelations and resolveLinks from bridgeOptions can be excluded if you're already defining them as resolve_relations and resolve_links in apiOptions, we will add them by default. But you will always be able to overwrite them.
<script setup>
import { useStoryblok } from "@storyblok/vue";
const { story, fetchState } = useStoryblok(
"path-to-story",
{ version: "draft", resolve_relations: "Article.author" },
{ resolveRelations: ["Article.author"], resolveLinks: "url" }
);
</script>
<template>
<StoryblokComponent v-if="story" :blok="story.content" />
</template>
Check the available apiOptions in our API docs and bridgeOptions passed to the Storyblok Bridge.
Long Form
1. Fetching Content
Inject storyblokApi when using Composition API:
<template>
<div>
<p v-for="story in stories" :key="story.id">{{ story.name }}</p>
</div>
</template>
<script setup>
import { useStoryblokApi } from "@storyblok/vue";
const storyblokApi = useStoryblokApi();
const { data } = await storyblokApi.get(
"cdn/stories/home",
{ version: "draft", resolve_relations: "Article.author" }
);
</script>
Note
You can skip using apiPlugin if you prefer your own method or function to fetch your data.
2. Listen to Storyblok Visual Editor events
Use useStoryBridge to get the new story every time is triggered a change event from the Visual Editor. You need to pass the story id as first param, and a callback function as second param to update the new story:
<script setup>
import { onMounted } from "vue";
import { useStoryblokBridge, useStoryblokApi } from "@storyblok/vue";
const storyblokApi = useStoryblokApi();
const { data } = await storyblokApi.get(
"cdn/stories/home",
{ version: "draft", resolve_relations: "Article.author" }
);
const state = reactive({ story: data.story });
onMounted(() => {
useStoryblokBridge(state.story.id, story => (state.story = story));
});
</script>
You can pass Bridge options as a third parameter as well:
useStoryblokBridge(
state.story.id,
(story) => (state.story = story),
{
resolveRelations: ["Article.author"],
resolveLinks: "url",
}
);
3. Link your components to Storyblok Visual Editor
For every component you've defined in your Storyblok space, add the v-editable directive with the blok content:
<template>
<div v-editable="blok"></div>
</template>
Where blok is the actual blok data coming from Storblok's Content Delivery API.
Check out the playground for a full example.
Features and API
You can choose the features to use when you initialize the plugin. In that way, you can improve Web Performance by optimizing your page load and save some bytes.
useStoryblok(pathToStory, apiOptions = {}, bridgeOptions = {})
This example of useStoryblok:
<script setup>
import { useStoryblok } from "@storyblok/vue";
const story = await useStoryblok(
"blog",
{ version: "draft", resolve_relations: "Article.author" },
{ resolveRelations: ["Article.author"], resolveLinks: "url" }
);
</script>
Is equivalent to the following, using useStoryblokBridge and useStoryblokApi:
<script setup>
import { onMounted } from "vue";
import { useStoryblokBridge, useStoryblokApi } from "@storyblok/vue";
const storyblokApi = useStoryblokApi();
const { data } = await storyblokApi.get(
"cdn/stories/blog",
{ version: "draft", resolve_relations: "Article.author" },
);
const state = reactive({ story: data.story });
onMounted(() => {
useStoryblokBridge(
state.story.id,
story => (state.story = story),
{ resolveRelations: ["Article.author"], resolveLinks: "url" }
);
});
</script>
Check the available apiOptions (passed to storyblok-js-client) and bridgeOptions (passed to the Storyblok Bridge).
Storyblok API
You can use an apiOptions object. This is passed down to the storyblok-js-client config object.
app.use(StoryblokVue, {
accessToken: "<your-token>",
apiOptions: {
cache: { type: "memory" },
},
use: [apiPlugin],
});
If you prefer to use your own fetch method, just remove the apiPlugin and storyblok-js-client won't be added to your application.
app.use(StoryblokVue);
Region parameter
Possible values:
eu (default): For spaces created in the EUus: For spaces created in the USap: For spaces created in Australiaca: For spaces created in Canadacn: For spaces created in China
Full example for a space created in the US:
app.use(StoryblokVue, {
  accessToken: "<your-token>",
  use: [apiPlugin],
  apiOptions: {
    region: "us",
  },
});
Important
For spaces created in the United States or China, the region parameter must be specified.
Storyblok Bridge
You can conditionally load it by using the bridge option. Very useful if you want to disable it in production:
app.use(StoryblokVue, {
  bridge: process.env.NODE_ENV !== "production",
});
In case you need it, you have still access to the raw window.StoryblokBridge:
const sbBridge = new window.StoryblokBridge(options);
sbBridge.on(["input", "published", "change"], (event) => {
});
Using Fallback components
By default, @storyblok/vue show a console.error if a component is not implemented. Setting enableFallbackComponent to true bypasses that behavior, rendering a fallback component in the frontend instead.
app.use(StoryblokVue, {
enableFallbackComponent: true,
});
You can also create and use a custom fallback component by setting customFallbackComponent: "MyCustomFallback".
import MyCustomFallback from "./components/MyCustomFallback.vue";
app.use(StoryblokVue, {
enableFallbackComponent: true,
customFallbackComponent: "MyCustomFallback",
});
app.component("MyCustomFallback", MyCustomFallback);
Rendering Rich Text
You can render rich text fields by using the StoryblokRichText component:
<script setup>
  import { StoryblokRichText } from "@storyblok/vue";
</script>

<template>
  <StoryblokRichText :doc="blok.articleContent" />
</template>
Or you can have more control by using the useStoryblokRichText composable:
<script setup>
import { useStoryblokRichText } from "@storyblok/vue";
const { render } = useStoryblokRichText({
});
const root = () => render(blok.articleContent);
</script>
<template>
<root />
</template>
For more incredible options you can pass to the useStoryblokRichText, please consult the Full options documentation.
Overriding the default resolvers
You can override the default resolvers by passing a resolver prop to the StoryblokRichText component, for example, to use vue-router links or add a custom codeblok component: :
<script setup>
import { type VNode, h } from "vue";
import { StoryblokRichText, BlockTypes, MarkTypes, type StoryblokRichTextNode } from "@storyblok/vue";
import { RouterLink } from "vue-router";
import CodeBlok from "./components/CodeBlok.vue";
const resolvers = {
[MarkTypes.LINK]: (node: StoryblokRichTextNode<VNode>) => {
return node.attrs?.linktype === 'STORY'
? h(RouterLink, {
to: node.attrs?.href,
target: node.attrs?.target,
}, node.text)
: h('a', {
href: node.attrs?.href,
target: node.attrs?.target,
}, node.text)
},
[BlockTypes.CODE_BLOCK]: (node: Node) => {
return h(CodeBlock, {
class: node?.attrs?.class,
}, node.children)
},
}
</script>
<template>
<StoryblokRichText :doc="blok.articleContent" :resolvers="resolvers" />
</template>
If you want to use the useStoryblokRichText composable, you can pass the resolvers via the options object:
<script setup>
import { type VNode, h } from "vue";
import { useStoryblokRichText, BlockTypes, MarkTypes, type StoryblokRichTextNode } from "@storyblok/vue";
import { RouterLink } from "vue-router";
const resolvers = {
[MarkTypes.LINK]: (node: StoryblokRichTextNode<VNode>) => {
return node.attrs?.linktype === 'STORY'
? h(RouterLink, {
to: node.attrs?.href,
target: node.attrs?.target,
}, node.text)
: h('a', {
href: node.attrs?.href,
target: node.attrs?.target,
}, node.text)
},
}
const { render } = useStoryblokRichText({
resolvers,
})
const root = () => render(blok.articleContent);
</script>
<template>
<root />
</template>
Legacy Rich Text Resolver
[!WARNING]
The legacy richTextResolver is soon to be deprecated. We recommend migrating to the new approach described above instead.
You can easily render rich text by using the renderRichText function that comes with @storyblok/vue and a Vue computed property:
<template>
  <div v-html="articleContent"></div>
</template>

<script setup>
  import { computed } from "vue";
  import { renderRichText } from "@storyblok/vue";

  const articleContent = computed(() => renderRichText(blok.articleContent));
</script>
You can set a custom Schema and component resolver globally at init time by using the richText init option:
import { RichTextSchema, StoryblokVue } from "@storyblok/vue";
import cloneDeep from "clone-deep";
const mySchema = cloneDeep(RichTextSchema);
app.use(StoryblokVue, {
accessToken: "YOUR_ACCESS_TOKEN",
use: [apiPlugin],
richText: {
schema: mySchema,
resolver: (component, blok) => {
switch (component) {
case "my-custom-component":
return `<div class="my-component-class">${blok.text}</div>`;
default:
return "Resolver not defined";
}
},
},
});
You can also set a custom Schema and component resolver only once by passing the options as the second parameter to renderRichText function:
import { renderRichText } from "@storyblok/vue";

renderRichText(blok.richTextField, {
  schema: mySchema,
  resolver: (component, blok) => {
    switch (component) {
      case "my-custom-component":
        return `<div class="my-component-class">${blok.text}</div>`;
        break;
      default:
        return `Component ${component} not found`;
    }
  },
});
Compatibility
This plugin is for Vue 3. Thus, it supports the same browsers as Vue 3. In short: all modern browsers, dropping IE support.
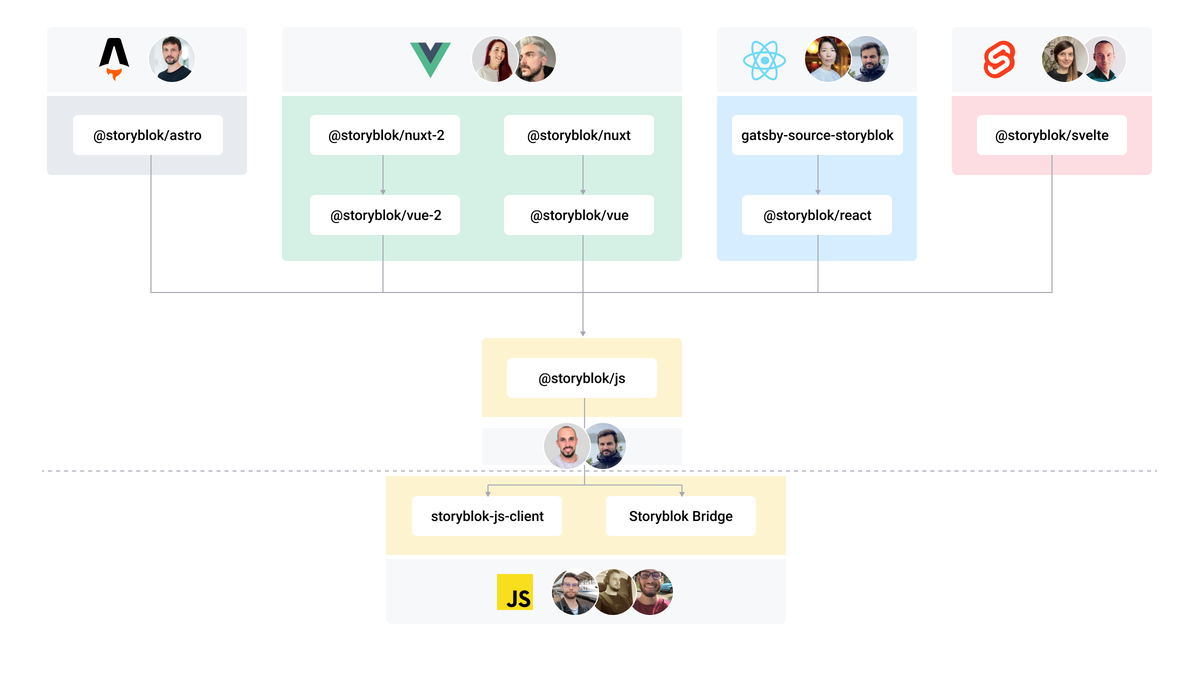
The Storyblok JavaScript SDK Ecosystem
Further Resources
Support
Contributing
Please see our contributing guidelines and our code of conduct.
This project use semantic-release for generate new versions by using commit messages and we use the Angular Convention to naming the commits. Check this question about it in semantic-release FAQ.