Research
Security News
Malicious npm Packages Inject SSH Backdoors via Typosquatted Libraries
Socket’s threat research team has detected six malicious npm packages typosquatting popular libraries to insert SSH backdoors.

koa-grace v1.x版本请移步: https://github.com/xiongwilee/Gracejs/tree/v1.0.4
Gracejs(又称:koa-grace v2) 是全新的基于koa v2.x的MVC+RESTful架构的前后端分离框架。
Gracejs是koa-grace的升级版,也可以叫koa-grace v2。
主要特性包括:
相比于koa-grace v1(以下简称:koa-grace):Gracejs完美支持koa v2,同时做了优化虚拟host匹配和路由匹配的性能、还完善了部分测试用例等诸多升级。当然,如果你正在使用koa-grace也不用担心,我们会把Gracejs中除了支持koa2的性能和功能特性移植到koa-grace的相应中间件中。
这里不再介绍“前后端分离”、“RESTful”、“MVC”等概念,有兴趣可参考趣店前端团队基于koajs的前后端分离实践一文。
Gracejs及前后端分离问题交流群:
xiongwilee 后(备注:城市-职业-姓名)拉你到“Gracejs及前后端分离交流”微信群 
xiongwilee 拉到微信群)注意:请确保你的运行环境中Nodejs的版本至少是v7.6.0
(或者你也可以考虑支持 Nodejs v4.x+ 的koa-grace v1.x)
执行命令:
$ git clone https://github.com/xiongwilee/Gracejs.git
$ cd Gracejs && npm install
BTW: 由于众所周知的原因,npm install可能不稳定,推荐使用cnpm安装。
然后,执行命令:
$ npm run dev
然后访问:http://127.0.0.1:3000 就可以看到示例了!
这里参考 https://github.com/xiongwilee/Gracejs 中app/demo目录下的示例,详解Gracejs的MVC+RESTful架构的实现。
此前也有文章简单介绍过Gracejs的实现( https://github.com/xiongwilee/Gracejs/wiki ),但考虑到Gracejs的差异性,这里再从目录结构、MVC模型实现、proxy机制这三个关键点做一些比较详细的说明。
Gracejs与koa-grace v1.x版本的目录结构完全一致:
.
├── controller
│   ├── data.js
│   ├── defaultCtrl.js
│   └── home.js
├── static
│   ├── css
│   ├── image
│   └── js
└── views
    └── home.html
其中:
controller用以存放路由及控制器文件static用以存放静态文件views用以存放模板文件需要强调的是,这个目录结构是生产环境代码的标准目录结构。在开发环境里你可以任意调整你的目录结构,只要保证编译之后的产出文件以这个路径输出即可。
如果你对这一点仍有疑问,可以参考: 前端构建-Boilerplate
为了满足更多的使用场景,在Gracejs中加入了简单的Mongo数据库的功能。
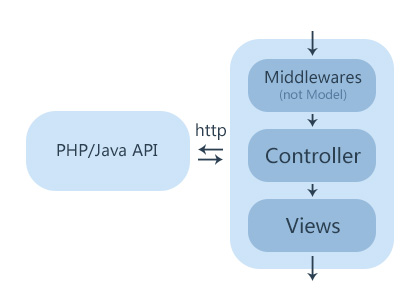
但准确的说,前后端的分离的Nodejs框架都是VC架构,并没有Model层。因为前后端分离框架不应该有任何数据库、SESSION存储的职能。

如上图,具体流程如下:
这里的第四步,proxy机制,就是Gracejs实现前后端分离的核心部分。
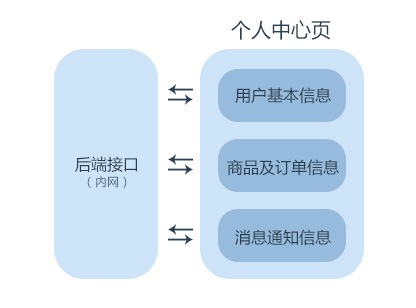
以实现一个电商应用下的“个人中心”页面为例。假设这个页面的首屏包括:用户基本信息模块、商品及订单模块、消息通知模块。
后端完成服务化架构之后,这三个模块可以解耦,拆分成三个HTTP API接口。这时候就可以通过Gracejs的this.proxy方法,去后端异步并发获取三个接口的数据。
如下图:

这样有几个好处:
那么,这么做是不是就完美了呢?肯定不是:
好消息是,这些问题在proxy中间件中都考虑过了。这里不再一一讲解,有兴趣可以看koa-grace-proxy的源码:https://github.com/xiongwilee/Gracejs/middleware/proxy 。
在看详细使用手册之前,建议先看一下Gracejs的主文件源码:https://github.com/xiongwilee/Gracejs/blob/master/src/app.js 。
这里不再浪费篇幅贴代码了,其实想说明的就是:Gracejs是一个个关键中间件的集合。
所有中间件都在middleware目录下,配置由config/main.*.js管理。
关于配置文件:
global.config里,方便读取。下面介绍几个关键中间件的作用和使用方法。
vhost在这里可以理解为,一个Gracejs server服务于几个站点。Gracejs支持通过host及host+一级path两种方式的映射。所谓的隐射,其实就是一个域名(或者一个域名+一级path)对应一个应用,一个应用对应一个目录。
注意:考虑到正则的性能问题,vhost不会考虑正则映射。
参考config/main.development.js,可以这么配置vhost:
// vhost配置
vhost: {
  '127.0.0.1':'demo',
  '127.0.0.1/test':'demo_test',
  'localhost':'blog',
}
其中,demo,demo_test,blog分别对应app/下的三个目录。当然你也可以指定目录路径,在配置文件中修改path.project配置即可:
// 路径相关的配置
path: {
  // project
  project: './app/'
}
Gracejs中生成路由的方法非常简单,以自带的demo模块为例,进入demo模块的controller目录:app/demo/controller。
文件目录如下:
controller
├── data.js
├── defaultCtrl.js
└── home.js
router中间件会找到模块中所有以.js结尾的文件,根据文件路径和module.exports生成路由。
例如,demo模块中的home.js文件:
exports.index = async function () {
  await this.bindDefault();
  await this.render('home', {
    title: 'Hello , Grace!'
  });
}
exports.hello = function(){
  this.body = 'hello world!'
}
则生成/home/index、/home、/home/hello的路由。需要说明几点:
/index结尾的话,Gracejs会"赠送"一个去掉/index的同样路由;exports.__controller__ = false,该文件就不会生成路由了;参考defaultCtrl.jsawait/async或generator函数,也可以是一个普通的函数;Gracejs中推荐使用await/async;app/blog中的controller文件;module.exports返回一个任意函数即可。最后,如果用户访问的路由查找不到,router会默认查找/error/404路由,如果有则渲染error/404页(不会重定向到error/404),如果没有则返回404。
将demo模块中的home.js扩展一下:
exports.index = async function () {
    ...
}
exports.index.__method__ = 'get';
exports.index.__regular__ = null;
另外,需要说明以下几点:
DELETE方法,则post.js中声明 exports.list.__method__ = 'delete'即可(不声明默认注入get及post方法);exports.list.__regular__ = '/:id';即可,然后在控制器中通过this.params.id获取ID值,更多相关配置请参看:koa-router#named-routes__regular__配置为正则表达式的话,则会生成当前控制器默认路由及正则可匹配的路由当然,如果路由文件中的所有控制器方法都是post方法,您可以在控制器文件最底部加入:module.exports.__method__ = 'post'即可,__regular__的配置同理。
注意:一般情况这里不需要额外的配置,为了保证代码美观,没有特殊使用场景的话就不要写__method__和__regular__配置。
将demo模块中的home.js的index方法再扩展一下:
exports.index = async function () {
  // 绑定默认控制器方法
  await this.bindDefault();
  // 获取数据
  await this.proxy(...)
  // 渲染目标引擎
  await this.render('home', {
    title: 'Hello , Grace!'
  });
}
它就是一个标准的控制器(controller)了。这个控制器的作用域就是当前koa的context,你可以任意使用koa的context的任意方法。
几个关键context属性的使用说明如下:
koa自带:
更多koa自带context属性,请查看koajs官网:http://koajs.com/
| context属性 | 类型 | 说明 |
|---|---|---|
this.request.href | String | 当前页面完整URL,也可以简写为this.href |
this.request.query | object | get参数,也可以简写为this.query |
this.response.set | function | 设置response头信息,也可以简写为this.set |
this.cookies.set | function | 设置cookie,参考:cookies |
this.cookies.get | function | 获取cookie,参考:cookies |
Gracejs注入:
| context属性 | 类型 | 中间件 | 说明 |
|---|---|---|---|
this.bindDefault | function | router | 公共控制器,相当于require('app/*/controller/defaultCtrl.js') |
this.request.body | object | body | post参数,可以直接在this.request.body中获取到post参数 |
this.render | function | views | 模板引擎渲染方法,请参看: 模板引擎- Template engine |
this.mongo | function | mongo | 数据库操作方法,请参看: 数据库 - Database |
this.mongoMap | function | mongo | 并行数据库多操作方法,请参看: 数据库 - Database |
this.proxy | function | proxy | RESTful数据请求方法,请参看:数据代理 |
this.fetch | function | proxy | 从服务器导出文件方法,请参看: 请求代理 |
this.backData | Object | proxy | 默认以Obejct格式存储this.proxy后端返回的JSON数据 |
this.upload | function | xload | 文件上传方法,请参看: 文件上传下载 |
this.download | function | xload | 文件下载方法,请参看: 文件上传下载 |
在控制器中,如果还有其他的异步方法,可以通过Promise来实现。例如:
exports.main = async function() {
  await ((test) => {
    return new Promise((resolve, reject) => {
      setTimeout(() => { resolve(test) }, 3000)
    });
  })('测试')
}
Gracejs支持两种数据代理场景:
下面逐一介绍两种代理模式的使用方法。
数据代理可以在控制器中使用this.proxy方法:
this.proxy(object|string,[opt])
this.proxy 方法返回的是一个Promise,所以这里你可以根据当前Controller的类型使用async/await或者Generator实现异步并发。例如:
async/await:
exports.demo = async function () {
  await this.proxy({ /* ... */ })
}
Generator:
exports.demo = function * () {
  yield this.proxy({ /* ... */ })
}
为了使语法更简便,可以在执行this.proxy之后,直接在上下文中的backData字段中获取到数据。例如:
exports.demo = async function () {
  await this.proxy({
    userInfo:'github:post:user/login/oauth/access_token?client_id=****',
    otherInfo:'github:other/info?test=test',
  })

  console.log(this.backData);
  /**
   *  {
   *    userInfo : {...},
   *    otherInfo : {...}
   *  }
   */
}
Generator方法亦然。
此外,如果要获取proxy的请求头信息,你可以在proxy方法返回的内容中获取到,例如:
exports.demo = async function (){
  let res = await this.proxy({
    userInfo:'github:post:user/login/oauth/access_token?client_id=****',
    otherInfo:'github:other/info?test=test',
  });

  console.log(res);
  /**
   *  {
   *    userInfo : {
   *      statusCode: {...} // 返回http status code
   *      request: {...}    // 请求体
   *      headers: {...}    // 响应头信息
   *      body: {...}       // 未处理的response body
   *    },
   *    otherInfo : {...}
   *  }
   */
}
可以发现,上文的案例就是多个数据同时请求的代理方案,这里也就是异步并发获取数据的实现。使用this.proxy方法实现多个数据异步并发请求非常简单:
exports.demo = async function (){
  await this.proxy({
    userInfo:'github:post:user/login/oauth/access_token?client_id=****',
    otherInfo:'github:other/info?test=test',
  });

  console.log(this.backData);
  /**
   *  {
   *    userInfo : {...},
   *    otherInfo : {...}
   *  }
   */
}
然后,proxy的结果会默认注入到上下文的this.backData对象中。
如果只是为了实现一个接口请求代理,可以这么写:
exports.demo = async function (){
  await this.proxy('github:post:user/login/oauth/access_token?client_id=****');
}
这样proxy请求返回的数据体会直接赋值给this.body,也就是将这个请求直接返回给客户端。
github:post:user/login/oauth/access_token?client_id=****说明如下:
github: 为在config/main.*.js的 api 对象中进行配置;post : 为数据代理请求的请求方法,该参数可以不传,默认当前用户请求的method;path: 后面请求路径中的query参数会覆盖当前页面的请求参数(this.query),将query一同传到请求的接口{userInfo:'https://api.github.com/user/login?test=test'}另外,this.proxy的形参说明如下:
| 参数名 | 类型 | 默认 | 说明 |
|---|---|---|---|
dest | Object | this.backData | 指定接收数据的对象,默认为this.backData |
conf | Obejct | {} | this.proxy使用requestjs实现,此为传给request的重置配置(你可以在这里设置接口超时时间:conf: { timeout: 25000 }) |
json | Object | {} | 指定json格式的数据,参考:requestjs json配置 |
form | Object | {} | 指定application/x-www-form-urlencoded格式的数据,requestjs form配置 |
body | Buffer|String|ReadStream | 无 | 参考:requestjs body配置 |
query | Object | 无 | 如果配置了query参数,则会替换ctx.query作为proxy参数 |
headers | Object | {} | 指定当前请求的headers |
onBeforeRequest | Function | 无 | 每个请求发送前的回调事件,作用域为当前上下文,有两个形参'proxy name','requestOpt',可以操作requestOpt以修改requestjs的参数 |
onAfterRequest | Function | 无 | 每个请求获取结果后的回调事件,作用域为当前上下文,有两个形参'proxy name','response',可以操作response以修改this.proxy的返回结果 |
如果以上配置中 json、form、body 的参数一个都不传,则默认会将当前客户端请求数据体传给后端接口,推荐使用默认proxy数据的方式;当然了,如果有特殊情况,自行配置数据也无妨。
除了在this.proxy的参数中进行配置外,在多个并发请求也可以这么写配置:
this.proxy({
  testInfo: {
    uri: 'github:other/info?test=test',
    form: {
      // formData
    },
    headers: {},
    // ... 其他配置亦可
  },
  otherInfo: {
    // 同上自定义配置
  }
})
这样就可以很灵活地实现接口级别的自定义配置。
关于this.proxy方法还有很多有趣的细节,推荐有兴趣的同学看源码:https://github.com/xiongwilee/Gracejs/middleware/proxy
文件代理可以在控制器中使用this.fetch方法:
this.fetch(string)
文件请求代理也很简单,比如如果需要从github代理一个图片请求返回到浏览器中,参考:http://feclub.cn/user/avatar?img=https://avatars.githubusercontent.com/u/1962352?v=3 , 或者要使用导出文件的功能:
exports.avatar = async function (){
  await this.fetch(imgUrl);
}
这里需要注意的是:在this.fetch方法之后会直接结束response, 不会再往其他中间件执行。
默认的模板引擎为swig,但swig作者已经停止维护;你可以在config/main.*.js中配置template属性想要的模板引擎:
// 模板引擎配置
template: 'nunjucks'
你还可以根据不同的模块配置不同的模板引擎:
template: {
  blog:'swig'
}
目前支持的模板引擎列表在这里:consolidate.js#supported-template-engines
在控制器中调用this.render方法渲染模板引擎:
exports.home = await function () {
  await this.render('dashboard/site_home',{
    breads : ['站点管理','通用'],
    userInfo: this.userInfo,
    siteInfo: this.siteInfo
  })
}
模板文件在模块路径的/views目录中。
注意一点:Gracejs渲染模板时,默认会将main.*.js中constant配置交给模板数据;这样,如果你想在页面中获取公共配置(比如:CDN的地址)的话就可以在模板数据中的constant子中取到。
此外,如果需要更个性化的配置,可以在/view目录中创建文件viewsConfig.js。例如,nunjucks模板引擎添加filter的功能:
/**
 * [nunjucks 个性化定制]
 * 参考:https://github.com/tj/consolidate.js#template-engine-instances
 *
 * @param  {Object} consolidate consolidate对象
 * @param  {Object} config      app.js中的views配置项
 *
 * @return
 */
module.exports = function(consolidate, config) {
  const nunjucks = require('nunjucks');
  consolidate.requires.nunjucks = nunjucks.configure(config.root);

  // 注入全局变量
  consolidate.requires.nunjucks.addGlobal('G', global);

  // 添加foo filter示例
  consolidate.requires.nunjucks.addFilter('foo', function () {
    return 'bar';
  });
}
以上可参考:middleware/views/example/views/viewsConfig.js。
静态文件的使用非常简单,将/static/**/或者/*/static/*的静态文件请求代理到了模块路径下的/static目录:
// 配置静态文件路由
app.use(Middles.static(['/static/**/*', '/*/static/**/*'], {
  dir: config_path_project,
  maxage: config_site.env == 'production' && 60 * 60 * 1000
}));
以案例中blog的静态文件为例,静态文件在blog项目下的路径为:app/blog/static/image/bg.jpg,则访问路径为http://127.0.0.1/blog/static/image/bg.jpg 或者 http://127.0.0.1/static/blog/image/bg.jpg
注意两点:
/static/**/或者/*/static/*形式的路由会是无效的;MOCK功能的实现其实非常简单,在开发环境中你可以很轻易地使用MOCK数据。
以demo模块为例,首先在main.development.js配置文件中添加proxy配置:
// controller中请求各类数据前缀和域名的键值对
api: {
 // ...
 demo: 'http://${ip}:${port}/__MOCK__/demo/'
 // ...
}
然后,在demo模块中添加mock文件夹,然后添加test.json:
文件结构:
.
├── controller
├── mock
|     └── test.json
├── static
└── views
文件内容(就是你想要的请求返回内容):
在JSON文件内容中也可以使用注释:
/*
 * 获取用户信息接口
 */
{
    code:0 // 这是code
}
然后,你可以打开浏览器访问:http://${ip}:${port}/__MOCK__/demo/test 验证是否已经返回了test.json里的数据。
最后在你的controller业务代码中就可以通过proxy方法获取mock数据了:
this.proxy({
    test:'demo:test'
})
注意:
可以参考这个:Gracejs中的mock功能的示例
考虑到用户路由完全由Nodejs托管以后,CSRF的问题也得在Nodejs层去防护了。此前写过一片文章:前后端分离架构下CSRF防御机制,这里就只写使用方法,不再详述原理。
在Gracejs中可以配置:
// csrf配置
csrf: {
  // 需要进行xsrf防护的模块名称
  module: []
}
然后,在业务代码中,获取名为:grace_token的cookie,以post或者get参数回传即可。当然,如果你不想污染ajax中的参数对象,你也可以将这个cookie值存到x-grace-token头信息中。
Gracejs监听到post请求,如果token验证失效,则直接返回错误。
请注意:不推荐在生产环境中使用数据库功能
在Gracejs中使用mongoDB非常简单,当然没有做过任何压测,可能存在性能问题。
在配置文件config/main.*.js中进行配置:
  // mongo配置
  mongo: {
    options:{
      // mongoose 配置
    },
    api:{
      'blog': 'mongodb://localhost:27017/blog'
    }
  },
其中,mongo.options配置mongo连接池等信息,mongo.api配置站点对应的数据库连接路径。
值得注意的是,配置好数据库之后,一旦Gracejs server启动mongoose就启动连接,直到Gracejs server关闭
依旧以案例blog为例,参看app/blog/model/mongo目录:
└── mongo
    ├── Category.js
    ├── Link.js
    ├── Post.js
    └── User.js
一个js文件即一个数据库表即相关配置,以app/blog/model/mongo/Category.js:
'use strict';

// model名称,即表名
let model = 'Category';

// 表结构
let schema = [{
  id: {type: String,unique: true,required: true},
  name: {type: String,required: true},
  numb: {type: Number,'default':0}
}, {
  autoIndex: true,
  versionKey: false
}];

// 静态方法:http://mongoosejs.com/docs/guide.html#statics
let statics = {}

// 方法扩展 http://mongoosejs.com/docs/guide.html#methods
let methods = {
  /**
   * 获取博客分类列表
   */
  list: function* () {
    return this.model('Category').find();
  }
}

module.exports.model = model;
module.exports.schema = schema;
module.exports.statics = statics;
module.exports.methods = methods;
主要有四个参数:
model , 即表名,最好与当前文件同名schema , 即mongoose schemamethods , 即schema扩展方法,推荐把数据库元操作都定义在这个对象中statics , 即静态操作方法在控制器中使用非常简单,主要通过this.mongo,this.mongoMap两个方法。
this.mongo(name)调用mongoose Entity对象进行数据库CURD操作
参数说明:
@param [string] name : 在app/blog/model/mongo中配置Schema名,
返回:
@return [object] 一个实例化Schema之后的Mongoose Entity对象,可以通过调用该对象的methods进行数据库操作
案例
参考上文中的Category.js的配置,以app/blog/controller/dashboard/post.js为例,如果要在博客列表页中获取博客分类数据:
// http://127.0.0.1/dashboard/post/list
exports.list = async function (){
  let cates = await this.mongo('Category').list();
  this.body = cates;
}
this.mongoMap(option)并行多个数据库操作
参数说明
@param [array] option
@param [Object] option[].model mongoose Entity对象,通过this.mongo(model)获取
@param [function] option[].fun mongoose Entity对象方法
@param [array] option[].arg mongoose Entity对象方法参数
返回
@return [array] 数据库操作结果,以对应数组的形式返回
案例
  let PostModel = this.mongo('Post');
  let mongoResult = await this.mongoMap([{
      model: PostModel,
      fun: PostModel.page,
      arg: [pageNum]
    },{
      model: PostModel,
      fun:PostModel.count,
      arg: [pageNum]
    }]);

  let posts = mongoResult[0];// 获取第一个查询PostModel.page的结果
  let page = mongoResult[1]; // 获取第二个查询PostModel.count的结果,两者并发执行
请注意:不推荐在生产环境中使用文件上传下载功能
与数据库功能一样,文件上传下载功能的使用非常简单,但不推荐在生产环境中使用。因为目前仅支持在单台服务器上使用数据库功能,如果多台机器的服务就有问题了。
如果需要在线上使用上传下载功能,你可以使用proxy的方式pipe到后端接口,或者通过上传组件直接将文件上传到后端的接口。
方法:
this.upload([opt])
示例:
exports.aj_upload = async function() {
  await this.bindDefault();

  let files = await this.upload();
  let res = {};

  if (!files || files.length < 1) {
    res.code = 1;
    res.message = '上传文件失败!';
    return this.body = res;
  }

  res.code = 0;
  res.message = '';
  res.data = {
    files: files
  }

  return this.body = res;
}
方法:
this.download(filename, [opt])
示例:
exports.download = async function() {
  await this.download(this.query.file);
}
Gracejs中几个核心的中间件都介绍完毕。此外,还有几个中间件不做详细介绍,了解即可:
this.request.body字段中;最后,关于Gracejs的运维部署在这里不再详述,推荐使用pm2,不用担心重启server期间服务不可用。
到这里,整个前后端服务的搭建都介绍完了。
在介绍如何结合Gracejs进行前端构建之前,先提一下:这种“更彻底”的前后端分离方案相比于基于MVVM框架的单页面应用具体有什么不同呢?
个人认为有以下几点:
当然Gracejs是只是服务端框架,前端架构如何选型,随你所愿。
目前已经有基于Vue和requirejs的boilerplate。
gulp-requirejs-boilerplate 
grace-vue-webpack-boilerplate 
grace-vue2-webpack-boilerplate 
这里以基于Vue的构建为例。
一个完整的依赖基于vue+Gracejs的目录结构推荐使用这种模式:
.
├── app
│   └── demo
│         ├── build
│         ├── controller
│         ├── mock
│         ├── static
│         ├── views
│         └── vues
└── server
    ├── app
    │    └── demo
    ├── middleware
    ├── ...
当然,server(即:Gracejs)允许你配置app目录路径,你可以放到任意你想要的目录里。
这里的demo模块比默认的server下的demo模块多出来两个目录:build和vues。
其实,到这里也能猜到如何进行构建了:build目录是基于webpack的编译脚本,vues目录是所有的.vue的前端业务文件。
webpack将vues下的vue文件编译之后产出到server/app/demo/static下;其他controller等没有必要编译的文件,直接使用webpack的复制插件复制到server/app/demo/的对应目录下即可。
有兴趣的同学,推荐看grace-vue-webpack-boilerplate下的build实现源码;当然,需要对webpack和vue有一定的了解。
欢迎同学们贡献基于React、Angular的boilerplate,以邮件或者ISSUE的形式通知我们之后,添加到Gracejs的官方文档中。
自此,洋洋洒洒1w多字,Gracejs终于介绍完毕;有兴趣的同学去github赏个star呗:https://github.com/xiongwilee/Gracejs 。
最后,欢迎大家提issue、fork;有任何疑问也可以邮件联系:xiongwilee[at]foxmail.com。
FAQs
A Nodejs SFB(Separation of Front and Back ends) framework, build with koa 2.x
The npm package gracejs receives a total of 6 weekly downloads. As such, gracejs popularity was classified as not popular.
We found that gracejs demonstrated a not healthy version release cadence and project activity because the last version was released a year ago. It has 1 open source maintainer collaborating on the project.
Did you know?

Socket for GitHub automatically highlights issues in each pull request and monitors the health of all your open source dependencies. Discover the contents of your packages and block harmful activity before you install or update your dependencies.

Research
Security News
Socket’s threat research team has detected six malicious npm packages typosquatting popular libraries to insert SSH backdoors.

Security News
MITRE's 2024 CWE Top 25 highlights critical software vulnerabilities like XSS, SQL Injection, and CSRF, reflecting shifts due to a refined ranking methodology.

Security News
In this segment of the Risky Business podcast, Feross Aboukhadijeh and Patrick Gray discuss the challenges of tracking malware discovered in open source softare.