Research
Security News
Malicious npm Packages Inject SSH Backdoors via Typosquatted Libraries
Socket’s threat research team has detected six malicious npm packages typosquatting popular libraries to insert SSH backdoors.
darktable-lut-generator
Advanced tools
Estimate a .cube 3D lookup table from camera images for the Darktable lut 3D module.
This package estimates a .cube 3D lookup table (LUT) for use with the Darktable lut 3D module. It was designed to obtain 3D LUTs replicating in-camera jpeg styles. This is especially useful if one shoots large sets of RAW photos (e.g. for commission), where most shall simply resemble the standard out-of-camera (OOC) style when exported by darktable, while still being able to do some quick corrections on selected images while maintaining the OOC style. The resulting LUTs are, if using the default processing style, intended for usage without Filmic/Basecurve etc. (Set auto-apply pixel workflow defaults to none)
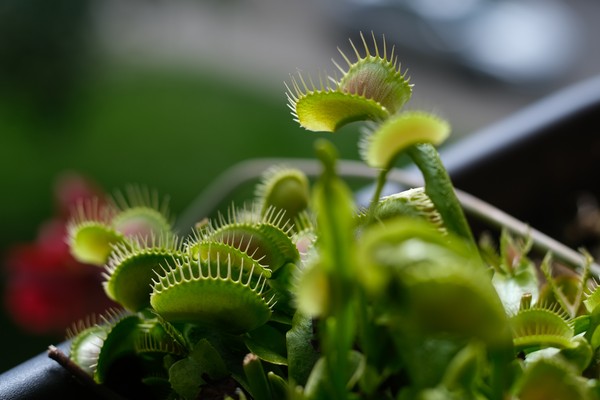
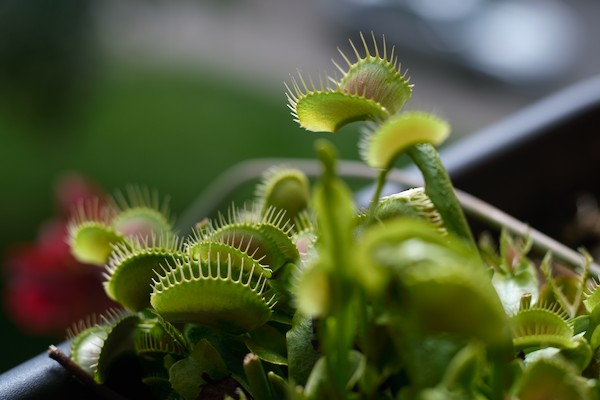
Below is an example using an LUT estimated to match the Provia film simulation on a Fujifilm X-T3. First is the OOC Jpeg, second is the RAW processed in Darktable with the LUT and third is the RAW processed in Darktable without any corrections:


Python 3 must be installed.
Installation of Darktable LUT Generator via pip:
pip install darktable_lut_generator
Run:
darktable_lut_generator [path to directory with images] [output .cube file]
For help and further arguments, run
darktable_lut_generator --help
A directory with image pairs of one RAW image and the corresponding OOC image (e.g. jpeg) is used as input.
The images should represent a wide variety of colors; ideally, the whole Adobe RGB color space is covered.
The resulting LUT is intended for application in Adobe RGB color space.
Hence, it is advisable to also shoot the in-camera jpegs in Adobe RGB in order to cover the whole available gamut.
In default configuration, Darktable may apply an exposure module with camera exposure bias correction automatically
to raw files. The LUTs produced by this module are constructed to resemble the OOC jpeg when used on a raw
image without the exposure bias correction. Also, the filmic rgb module should be turned off.
Another issue is in-camera lens correction. By default, this script does not use darktable's lens-correction module.
If possible, the images should be taken without any in-camera lens correction.
If this is not possible (e.g. because in-camera lens correction cannot be disabled on the used camera), see darktable_lut_generator --help for the appropriate option to enable darktable's lens correction.
The command
darktable_lut_generate_pattern [path to output image]
may be used to generate a simple test pattern. If the pattern is displayed on a wide-gamut screen
(an OLED smartphone with vidid color settings is fine), approx. 5 RAW+JPEG pairs can be photographed at different
exposures. That may provide a good starting sample set and is often sufficient for good results, but additional real-world images are always
helpful.
When applying the resulting LUT to the RAWs with those test images, there will still be some artifacts near the gamut
limits.
I don't know (yet) whether this results from the estimation procedure or some issues / limited understanding
regarding the exact color space transformations used by Darktable when processing / saving the sample images
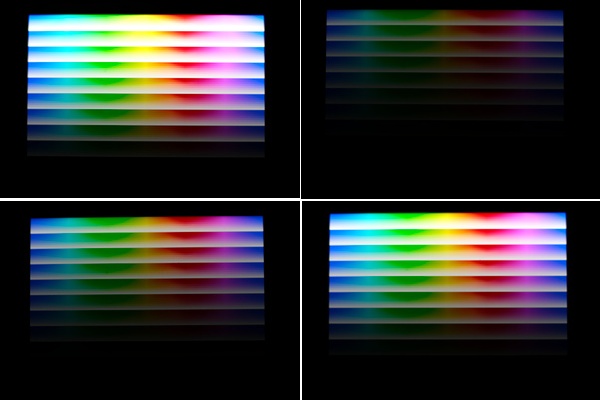
or when applying the LUT. An example of the test-set JPEGs generated by shooting a smartphone with the test pattern is
given below:

There are also some options helping the user to understand with the result interpretation for tweaking the settings
and check the sample images.
In particular, --path_dir_out_info defines a custom directory path to output some charts and images, like alignment
results
and visualizations of the generated LUT. TODO: documentation of outputs
Estimation is performed by estimating the differences to an identity LUT using linear regression with an appropriately constrained parameter space, assuming trilinear interpolation when applying the LUT.
Very sparsely or non-sampled colors will be interpolated with neighboring colors. However, no sophisticated hyperparameter tuning has been conducted in order to identify sparsely sampled patches, especially regarding different cube size.
n_samples pixels are sampled from the image, as using all pixels is computationally expensive.
Sampling is performed weighted by the inverse estimated sample density conditioned on the raw pixel colors in order to
obtain a sample with approximately uniform distribution over the represented colors.
This reduces the needed sample count for good results by approx. an order of magnitude compared to drawing pixels
uniformly.
https://docs.darktable.org/usermanual/3.8/en/module-reference/processing-modules/lut-3d/ https://eng.aurelienpierre.com/ https://library.imageworks.com/pdfs/imageworks-library-cinematic_color.pdf
https://discuss.pixls.us/t/how-to-create-haldcluts-from-in-camera-processing-styles/12690 https://discuss.pixls.us/t/help-me-build-a-lua-script-for-automatically-applying-fujifilm-film-simulations-and-more/30287 https://discuss.pixls.us/t/creating-3d-cube-luts-for-camera-ooc-styles/30968
https://github.com/bastibe/LUT-Maker https://github.com/savuori/haldclut_dt
FAQs
Estimate a .cube 3D lookup table from camera images for the Darktable lut 3D module.
We found that darktable-lut-generator demonstrated a healthy version release cadence and project activity because the last version was released less than a year ago. It has 1 open source maintainer collaborating on the project.
Did you know?

Socket for GitHub automatically highlights issues in each pull request and monitors the health of all your open source dependencies. Discover the contents of your packages and block harmful activity before you install or update your dependencies.

Research
Security News
Socket’s threat research team has detected six malicious npm packages typosquatting popular libraries to insert SSH backdoors.

Security News
MITRE's 2024 CWE Top 25 highlights critical software vulnerabilities like XSS, SQL Injection, and CSRF, reflecting shifts due to a refined ranking methodology.

Security News
In this segment of the Risky Business podcast, Feross Aboukhadijeh and Patrick Gray discuss the challenges of tracking malware discovered in open source softare.