Product
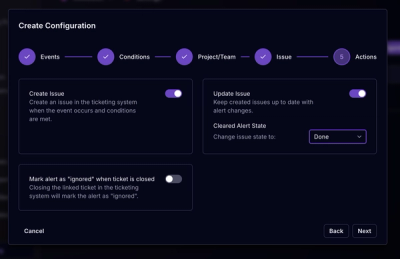
Socket for Jira Is Now Available
Socket for Jira lets teams turn alerts into Jira tickets with manual creation, automated ticketing rules, and two-way sync.
By Jeppe Hasseriis - Apr 20, 2026
@adobe/aio-cli-plugin-aep
Advanced tools
A plugin for CRUD operations on aep resources
Install brew: $ /bin/bash -c "$(curl -fsSL https://raw.githubusercontent.com/Homebrew/install/master/install.sh)"
Install npm: $ brew install npm
Install yarn: $ npm install --global yarn
Upgrade yarn: $ npm upgrade --global yarn
Install aio-cli core libraries$ npm install -g @adobe/aio-cli
Install aep aio plugin$ npm install -g @adobe/aio-cli-plugin-aep
Link aep with aio $ aio plugins:install @adobe/aio-cli-plugin-aep
When you run $ aio aep -h now you should be able to see aep as an available plugin with its available sub-commands.

Go to https://console.adobe.io/integrations and create a production integration for test
Follow the instructions on https://www.adobe.io/apis/experienceplatform/home/tutorials/alltutorials.html#!api-specification/markdown/narrative/tutorials/authenticate_to_acp_tutorial/authenticate_to_acp_tutorial.md
to get the necessary I/O config credentials
Create a config.json file with the following content and replacing the placeholders with actual values. The jwt_payload element in the following json, you can directly copy from your Adobe I/O integrations page mentioned in step 1.
{
  "client_id": "${your_client_id}",
  "client_secret": "${your_client_secret}",
  "jwt_payload": {
    "exp": ${your_expiration_time},
    "iss": "${your_org@AdobeOrg}",
    "sub": "${your_tech_id@techacct.adobe.com}",
    "https://ims-na1.adobelogin.com/s/ent_dataservices_sdk": true,
    "aud": "https://ims-na1.adobelogin.com/c/${your_client_id}"
  },
  "token_exchange_url": "https://ims-na1.adobelogin.com/ims/exchange/jwt/",
  "jwt_private_key": "${path to your private.key file used in Adobe I/O integration}",
  "x-sandbox-id": "${your_sandbox_id}",
  "x-sandbox-name": "${your_sandbox_name}",
  "env": "prod"
}
Run the following commands now (in the particular order)
$ aio config:set jwt-auth ${path_to_the_above_config.json} --file --json
$ aio jwt-auth:access-token
Go to https://console-stage.adobe.io/integrations and create a production integration for test
Follow the instructions on https://www.adobe.io/apis/experienceplatform/home/tutorials/alltutorials.html#!api-specification/markdown/narrative/tutorials/authenticate_to_acp_tutorial/authenticate_to_acp_tutorial.md
to get the necessary I/O config credentials
Create a config.json file with the following content and replacing the placeholders with actual values. The jwt_payload element in the following json, you can directly copy from your Adobe I/O integrations page mentioned in step 1.
{
  "client_id": "${your_client_id}",
  "client_secret": "${your_client_secret}",
  "jwt_payload": {
    "exp": ${your_expiration_time},
    "iss": "${your_org@AdobeOrg}",
    "sub": "${your_tech_id@techacct.adobe.com}",
    "https://ims-na1-stg1.adobelogin.com/s/ent_dataservices_sdk": true,
    "aud": "https://ims-na1-stg1.adobelogin.com/c/${your_client_id}"
  },
  "token_exchange_url": "https://ims-na1-stg1.adobelogin.com/ims/exchange/jwt/",
  "jwt_private_key": "${path to your private.key file used in Adobe I/O integration}",
  "x-sandbox-id": "${your_sandbox_id}",
  "x-sandbox-name": "${your_sandbox_name}",
  "env": "int"
}
Run the following commands now (in the particular order)
$ aio config:set jwt-auth ${path_to_the_above_config.json} --file --json
$ aio jwt-auth:access-token
$ aio aep:datasets:list
Output would look something like...
{
 'abc': {
 	tags: {
 		targetDataSetId: ['abc'],
 		'aep/siphon/partitions': [],
 		'adobe/pqs/table': ['abc'],
 		sandboxId: ['abc'],
 		mappingId: ['abc'],
 		acp_validationContext: ['enabled']
 	},
 	imsOrg: 'abc@AdobeOrg',
 	name: 'Mapping DataSet_abc',
 	namespace: 'ACP',
 	state: 'DRAFT',
 	lastBatchId: 'abc',
 	lastBatchStatus: 'success',
 	version: '1.0.3',
 	created: 1573866068596,
 	updated: 1573866132606,
 	createdClient: 'acp_foundation_connectors',
 	createdUser: 'abc@AdobeID',
 	updatedUser: 'acp_foundation_dataTracker@AdobeID',
 	lastSuccessfulBatch: 'abc',
 	viewId: 'abc',
 	aspect: 'production',
 	status: 'enabled',
 	fileDescription: {
 		persisted: false
 	},
 	files: '@/dataSets/abc/views/abc/files',
 	schemaMetadata: {
 		primaryKey: [],
 		delta: [],
 		dule: [],
 		gdpr: []
 	},
 	schemaRef: {
 		id: 'https://ns.adobe.com/acponboarding/schemas/abc',
 		contentType: 'application/vnd.adobe.xed-full+json;version=1'
 	},
 	streamingIngestionEnabled: 'false'
 },

...
You can choose not to read the following additional information.
The last command would generate a new access_token value and place it in appropriate folder for every command to read.
Think of it as the same parameter we pass in the Authorization header on postman/Curl.
You can also get the access_token manually and use the following command to set it. No need to do this if you have done step 2.
Please follow the instructions as suggested in this article, to get the access_token https://www.adobe.io/apis/experienceplatform/home/tutorials/alltutorials.html#!api-specification/markdown/narrative/tutorials/authenticate_to_acp_tutorial/authenticate_to_acp_tutorial.md#generate-access-token
$ aio config:set jwt-auth.access_token ${your_access_token_generated_through_adobeI/O_integration}
Additionally if you want to have multiple integrations and want the ability to quickly switch between them, create multiple config.json files and place each one of them in a corresponding folder
in your root directory with aprropriate name.
For example, if you want to create an integration with name 'abc'. Please place the corresponding config.json file in /Users/${your_user_name}/abc. And then run the command
$ aio aep:switch-config:set -n=abc
DockerFile location: https://github.com/adobe/aio-cli-plugin-aep/blob/master/Dockerfile
Build image: From the folder where dockerFile is located$ docker build -t aio-cli-plugin-aep .
Create a config.json file (based on whether you want STG/INT or PROD) integration with the following content and replacing the placeholders with actual values.
{
  "client_id": "${your_client_id}",
  "client_secret": "${your_client_secret}",
  "jwt_payload": {
    "exp": ${your_expiration_time},
    "iss": "${your_org@AdobeOrg}",
    "sub": "${your_tech_id@techacct.adobe.com}",
    "https://ims-na1.adobelogin.com/s/ent_dataservices_sdk": true,
    "aud": "https://ims-na1.adobelogin.com/c/${your_client_id}"
  },
  "token_exchange_url": "https://ims-na1.adobelogin.com/ims/exchange/jwt/",
  "jwt_private_key": "${path to your private.key file used in Adobe I/O integration}",
  "x-sandbox-id": "${your_sandbox_id}",
  "x-sandbox-name": "${your_sandbox_name}",
  "env": "prod"
}
$ aio config:set jwt-auth ${path_to_the_above_config.json} --file --json
$ aio jwt-auth:access-token
$ docker run -it --rm -v ~/.config:/root/.config --entrypoint /bin/bash aio-cli-plugin-aep -s
Note: In order to regenerate the access_token (in case of 403 status code), stop the container and rerun step# 4, 5 and 6.
$ npm install
$ jest
$ jest --coverage (to see coverage report)
FAQs
A plugin for CRUD operations on aep resources
The npm package @adobe/aio-cli-plugin-aep receives a total of 9 weekly downloads. As such, @adobe/aio-cli-plugin-aep popularity was classified as not popular.
We found that @adobe/aio-cli-plugin-aep demonstrated a not healthy version release cadence and project activity because the last version was released a year ago. It has 53 open source maintainers collaborating on the project.
Did you know?

Socket for GitHub automatically highlights issues in each pull request and monitors the health of all your open source dependencies. Discover the contents of your packages and block harmful activity before you install or update your dependencies.
Product
Socket for Jira lets teams turn alerts into Jira tickets with manual creation, automated ticketing rules, and two-way sync.

Company News
Socket won two 2026 Reppy Awards from RepVue, ranking in the top 5% of all sales orgs. AE Alexandra Lister shares what it's like to grow a sales career here.

Security News
NIST will stop enriching most CVEs under a new risk-based model, narrowing the NVD's scope as vulnerability submissions continue to surge.