Security News
Crates.io Users Targeted by Phishing Emails
The Rust Security Response WG is warning of phishing emails from rustfoundation.dev targeting crates.io users.
@adv-ui/vendor-by-consents-loader
Advanced tools
Set of utilities to load vendors scripts according to user consents.
You only need to define purposes and specialFeatureOptins as they're the only configurable consents on the tfc.
🔴 IMPORTANT: Before following the README, be sure you're loading the Stub from Boros TCF as it's required.
import {
  initVendorConsentsLoader,
  addVendorLoadedEventListener
} from '@adv-ui/vendor-by-consents-loader'

const OPTIMIZELY_KEY = 'optimizely'

initVendorConsentsLoader({
  vendors: {
    tealium: {
      script: 'https://frtassets.fotocasa.es/external-scripts/utag-pro.js',
      consents: {
        purposes: [1, 2, 3, 4, 5, 6, 7, 8, 9, 10],
        specialFeatureOptins: [1]
      }
    },
    [OPTIMIZELY_KEY]: {
      script: 'https://frtassets.fotocasa.es/external-scripts/optimizely.js',
      consents: {
        purposes: [1, 2]
      }
    }
  }
})

addVendorLoadedEventListener(({vendor}) => {
  vendor === OPTIMIZELY_KEY && console.log('Optimizely has been loaded')
})
In some cases you might want to load a single vendor later in your code:
import {
  loadSingleVendorByConsent,
  addVendorLoadedEventListener
} from '@adv-ui/vendor-by-consents-loader'

const GOOGLE_ADSENSE_KEY = 'google_adsense'

loadSingleVendorByConsent({
  name: GOOGLE_ADSENSE_KEY,
  script: 'https://google.com/ads.js',
  consents: {
    purposes: [5, 6]
  }
})

addVendorLoadedEventListener(({vendor}) => {
  vendor === GOOGLE_ADSENSE_KEY && console.log('Google has been loaded')
})
You can also set a vendor configuration without an specific script in case the vendor doesn't require it to work:
import {
  loadSingleVendorByConsent,
  addVendorLoadedEventListener
} from '@adv-ui/vendor-by-consents-loader'

const RTB_HOUSE_KEY = 'rtb_house'

loadSingleVendorByConsent({
  name: RTB_HOUSE_KEY,
  consents: {
    purposes: [2, 6]
  }
})

addVendorLoadedEventListener(({vendor}) => {
  vendor === RTB_HOUSE_KEY && console.log('RTB House is ready')
})
Some vendors are used across all Adevinta Spain products and, for sake of convenience, they've their own script to load them.
import {
  addVendorLoadedEventListener,
  loadComscore
} from '@adv-ui/vendor-by-consents-loader'

loadComscore({comscoreClientId: '7109919'})

addVendorLoadedEventListener(({vendor}) => {
  vendor === 'comscore' && console.log('Comscore has been loaded')
})
// First load the UMD module.
<script src="https://unpkg.com/@adv-ui/vendor-by-consents-loader/umd/index.js"></script>
<script>
  // load comscore
  window.sui.vendors.loadComscore({comscoreClientId: '7109919'})
  // init vendors loader by consents
  window.sui.vendors.initVendorConsentsLoader({
    vendors: {
      tealium: {
        script: 'https://frtassets.fotocasa.es/external-scripts/utag-pro.js',
        consents: {
          purposes: [1, 2, 3, 4, 5, 6, 7, 8, 9, 10],
          specialFeatureOptins: [1]
        }
      }
    }
  })
  // load a single vendor by consents
  window.sui.vendors.loadSingleVendorByConsent({
    name: 'google_adsense',
    script: 'https://google.com/ads.js',
    consents: {
      purposes: [5, 6]
    }
  })
  // add evento for listening comscore load
  window.sui.vendors.addVendorLoadedEventListener(({vendor}) => {
    vendor === 'comscore' && console.log('Comscore has been loaded')
    vendor === 'tealium' && window._utag.init()
    vendor === 'google_adsense' && window.gads.startAds()
  })
  //
</script>
Purposes:
Special Purposes
Features
Special Features
FAQs
Load vendors according to the allowed user's consents
We found that @adv-ui/vendor-by-consents-loader demonstrated a not healthy version release cadence and project activity because the last version was released a year ago. It has 1 open source maintainer collaborating on the project.
Did you know?

Socket for GitHub automatically highlights issues in each pull request and monitors the health of all your open source dependencies. Discover the contents of your packages and block harmful activity before you install or update your dependencies.

Security News
The Rust Security Response WG is warning of phishing emails from rustfoundation.dev targeting crates.io users.

Product
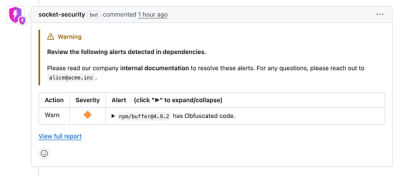
Socket now lets you customize pull request alert headers, helping security teams share clear guidance right in PRs to speed reviews and reduce back-and-forth.

Product
Socket's Rust support is moving to Beta: all users can scan Cargo projects and generate SBOMs, including Cargo.toml-only crates, with Rust-aware supply chain checks.