Product
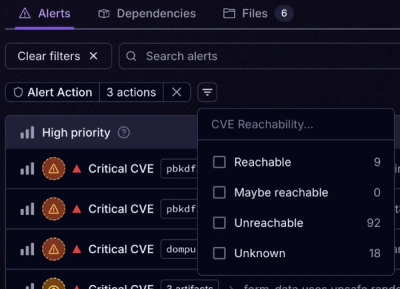
Introducing Tier 1 Reachability: Precision CVE Triage for Enterprise Teams
Socket’s new Tier 1 Reachability filters out up to 80% of irrelevant CVEs, so security teams can focus on the vulnerabilities that matter.
@autoflowlabs/playwright
Advanced tools
Add superpowers to your end-to-end tests with AutoFlow's open-source library. Learn more at https://autoflow.tools
You can add the @autoflowlabs/playwright package to your project by executing the following command in your terminal:
Install Autoflow using yarn:
yarn add --dev @autoflowlabs/playwright @playwright/test
Or npm:
npm install -D @autoflowlabs/playwright @playwright/test
This library requires access to a specific environment variable that contains your AutoFlow token, which is essential for the playwright process. This token can be found in your account on https://autoflow.tools. You can expose this variable in various ways. One option is to set it as an environment variable, as demonstrated below:
$ export AUTOFLOW_TOKEN="<your token here>"
Alternatively, you can store this token in a configuration file named autoflow.config.json located in your project's root directory, structured like this:
{
  "TOKEN": "<your token here>"
}
Utilize and incorporate the autoflow() function into your codebase by importing it as shown:
import { test } from "@playwright/test";
import { autoflow } from "@autoflowlabs/playwright";

test("autoflow example", async ({ page }) => {
  await page.goto("https://google.com/");

  // An object with page and test must be passed into every call
  const testArgs = { page, test };
  const searchButtonText = await autoflow("Get the search button text", testArgs);
  await page.goto("https://google.com/");
  await autoflow(`Type "${searchButtonText}" in the search box`, testArgs, {flowType: "action"});
  await autoflow("Press enter", testArgs, {flowType: "action"});
});
To employ the autoflow() function, you require a basic text prompt and an argument that includes yourpageand test objects.
Moreover, you can also specify a flowType, which presently includes support for action, query and assert.
autoflow("<your prompt>", { page, test }, {flowType: "action"});
The test invocations are cached for convenience to the users. If you're getting undesired results and want to invalidate the cache, use the cacheBypass option.
autoflow("<your prompt>", { page, test }, {cacheBypass: true});
The functionality provided by this package is limited to performing autoflow() actions exclusively within Chromium browsers.
There are 3 types of flowType supported. If a flowType is not provided, it is inferred from the statement.
Example
flowTypeawait autoflow("Click the link", { page, test }, {flowType: "action"});
flowTypeawait autoflow("Click the link", { page, test });
Return Type: undefined
An action, such as a "click," represents a simulated user interaction with the webpage, like clicking a link. If necessary, it will scroll to accomplish the designated task but prioritizes elements visible in the current viewport. Successful actions will return undefined, while failures will trigger an error, as shown below:
try {
  await autoflow("Click the link", { page, test }, {flowType: "action"});
} catch (e) {
  console.error("Failed to click the link");
}
Action prompts will result in one or multiple browser actions, including:
Return Type: string
A query will provide requested data from the visible section of the page as a string, for instance:
const linkText = await autoflow(
  "Get the text of the first link", { page, test }, {flowType: "query"});
console.log("The link text is", linkText);
Return Type: bool
Assert will evaluate whether something exists on the page and return a true or false
const linkText = await autoflow(
  "Is there a dog on this page?", { page, test }, {flowType: "assert"});
console.log("The link text is", linkText);
It must be noted that the assert is more inclined towards how something looks or whether something is present on the page or not VS query is about how something reads.
Within this repository, there exists a demo allowing quick experimentation with the autoflow() function. To begin using it, follow these steps:
cd packages/playwright
npm install
npm run build
cd ../../examples/playwright
npm install
Make the AUTOFLOW_TOKEN environment variable or configuration value accessible (refer to the "Setup" section above).
Run the tests, with or without UI mode
$ npm run test
$ npm run test-ui
This is an alias for npx playwright test --ui
$ npx playwright install
To ensure your prompts function correctly, here are recommended best practices for Autoflow AI prompts
Click on the "Login" buttonFind and click the "Learn More" button remains effective even if there are multiple buttons with that label or if the page has undergone a complete redesign.In our commitment to offer a generous free tier to maximum users possible, we support sequential test runs only. For optimal performance, kindly run tests using the following commands:
Headless tests: npx playwright test --workers=1
Tests with a graphical user interface: npx playwright test --ui --workers=1
At AutoFlow, we're committed to delivering a top-tier experience to the community by leveraging cutting-edge technology. With this vision in mind, we've fine-tuned our systems and services to accommodate a high volume of parallel connections and testing, ensuring that everyone enjoys a seamless and efficient experience.
FAQs
Give superpowers to your playwright tests with AI
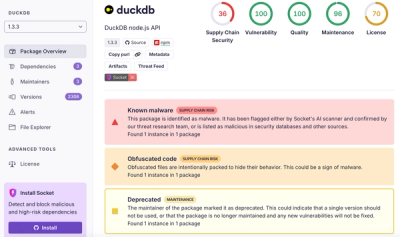
We found that @autoflowlabs/playwright demonstrated a not healthy version release cadence and project activity because the last version was released a year ago. It has 1 open source maintainer collaborating on the project.
Did you know?

Socket for GitHub automatically highlights issues in each pull request and monitors the health of all your open source dependencies. Discover the contents of your packages and block harmful activity before you install or update your dependencies.

Product
Socket’s new Tier 1 Reachability filters out up to 80% of irrelevant CVEs, so security teams can focus on the vulnerabilities that matter.

Research
/Security News
Ongoing npm supply chain attack spreads to DuckDB: multiple packages compromised with the same wallet-drainer malware.

Security News
The MCP Steering Committee has launched the official MCP Registry in preview, a central hub for discovering and publishing MCP servers.