
Research
2025 Report: Destructive Malware in Open Source Packages
Destructive malware is rising across open source registries, using delays and kill switches to wipe code, break builds, and disrupt CI/CD.
By Kush Pandya - Dec 24, 2025
@descope/react-sdk
Advanced tools
The Descope SDK for React provides convenient access to the Descope for an application written on top of React. You can read more on the Descope Website.
Project ID is required for using the SDK. Find it on the project page in the Descope Console.Install the package with:
npm i --save @descope/react-sdk
import { AuthProvider } from '@descope/react-sdk';

const AppRoot = () => {
  return (
    <AuthProvider
      projectId="my-project-id"
      // If the Descope project manages the token response in cookies, a custom domain
      // must be configured (e.g., https://auth.app.example.com)
      // and should be set as the baseUrl property.
      // baseUrl = "https://auth.app.example.com"

      // Optional: Hooks object for SDK lifecycle events
      // hooks={{
      //   beforeRequest: (req) => {
      //     console.log('Before request', {
      //       method: req.method,
      //       path: req.path,
      //       queryParams: req.queryParams,
      //     });
      //     // Modify the request as needed
      //     return req;
      //   },
      //   afterRequest: async (req, res) => {
      //     console.log('After request', {
      //       reqMethod: req.method,
      //       reqPath: req.path,
      //       resStatus: res.status,
      //     });
      //   },
      // }}
    >
      <App />
    </AuthProvider>
  );
};
You can use default flows or provide flow id directly to the Descope component
import { SignInFlow } from '@descope/react-sdk'
// you can choose flow to run from the following
// import { SignUpFlow } from '@descope/react-sdk'
// import { SignUpOrInFlow } from '@descope/react-sdk'

const App = () => {
    return (
        {...}
        <SignInFlow
            onSuccess={(e) => console.log('Logged in!')}
            onError={(e) => console.log('Could not logged in!')}
        />
    )
}
import { Descope } from '@descope/react-sdk'

const App = () => {
    return (
        {...}
        <Descope
            flowId="my-flow-id"
            onSuccess={(e) => console.log('Logged in!')}
            onError={(e) => console.log('Could not logged in')}
            // onReady={() => {
            //   This event is triggered when the flow is ready to be displayed
            //   Its useful for showing a loading indication before the page ready
            //   console.log('Flow is ready');
            // }}

            // theme can be "light", "dark" or "os", which auto select a theme based on the OS theme. Default is "light"
            // theme="dark"

            // locale can be any supported locale which the flow's screen translated to, if not provided, the locale is taken from the browser's locale.
            // locale="en"

            // debug can be set to true to enable debug mode
            // debug={true}

            // tenant ID for SSO (SAML) login. If not provided, Descope will use the domain of available email to choose the tenant
            // tenant=<tenantId>

            // Redirect URL for OAuth and SSO (will be used when redirecting back from the OAuth provider / IdP), or for "Magic Link" and "Enchanted Link" (will be used as a link in the message sent to the the user)
            // redirectUrl=<redirectUrl>

            // autoFocus can be true, false or "skipFirstScreen". Default is true.
            // - true: automatically focus on the first input of each screen
            // - false: do not automatically focus on screen's inputs
            // - "skipFirstScreen": automatically focus on the first input of each screen, except first screen
            // autoFocus="skipFirstScreen"

            // validateOnBlur: set it to true will show input validation errors on blur, in addition to on submit

            // restartOnError: if set to true, in case of flow version mismatch, will restart the flow if the components version was not changed. Default is false

            // errorTransformer is a function that receives an error object and returns a string. The returned string will be displayed to the user.
            // NOTE: errorTransformer is not required. If not provided, the error object will be displayed as is.
            // Example:
            // const errorTransformer = useCallback(
            // 	(error: { text: string; type: string }) => {
            // 		const translationMap = {
            // 			SAMLStartFailed: 'Failed to start SAML flow'
            // 		};
            // 		return translationMap[error.type] || error.text;
            // 	},
            // 	[]
            // );
            // ...
            // errorTransformer={errorTransformer}
            // ...


            // form is an object the initial form context that is used in screens inputs in the flow execution.
            // Used to inject predefined input values on flow start such as custom inputs, custom attributes and other inputs.
            // Keys passed can be accessed in flows actions, conditions and screens prefixed with "form.".
            // NOTE: form is not required. If not provided, 'form' context key will be empty before user input.
            // Example:
            // ...
            // form={{ email: "predefinedname@domain.com",  firstName: "test", "customAttribute.test": "aaaa", "myCustomInput": 12 }}
            // ...


            // client is an object the initial client context in the flow execution.
            // Keys passed can be accessed in flows actions and conditions prefixed with "client.".
            // NOTE: client is not required. If not provided, context key will be empty.
            // Example:
            // ...
            // client={{ version: "1.2.0" }}
            // ...


            // logger is an object describing how to log info, warn and errors.
            // NOTE: logger is not required. If not provided, the logs will be printed to the console.
            // Example:
            // const logger = {
            // 	info: (title: string, description: string, state: any) => {
            //      console.log(title, description, JSON.stringify(state));
            //  },
            // 	warn: (title: string, description: string) => {
            //      console.warn(title);
            //  },
            // 	error: (title: string, description: string) => {
            //      console.error('OH NOO');
            //  },
            // }
            // ...
            // logger={logger}
            // ...


            // Use a custom style name or keep empty to use the default style.
            // styleId="my-awesome-style"
            // Set a CSP nonce that will be used for style and script tags
            //nonce="rAnd0m"

            // popupOrigin: sets the expected origin for OAuth popup communication when redirect URL is on different origin than the main application. Required for cross-origin OAuth popup flows
            //popupOrigin="https://auth.example.com"

            // Clear screen error message on user input
            //dismissScreenErrorOnInput={true}
        />
    )
}
onScreenUpdateA function that is called whenever there is a new screen state and after every next call. It receives the following parameters:
screenName: The name of the screen that is about to be renderedcontext: An object containing the upcoming screen statenext: A function that, when called, continues the flow executionref: A reference to the descope-wc nodeThe function can be sync or async, and should return a boolean indicating whether a custom screen should be rendered:
true: Render a custom screenfalse: Render the default flow screenThis function allows rendering custom screens instead of the default flow screens. It can be useful for highly customized UIs or specific logic not covered by the default screens
To render a custom screen, its elements should be appended as children of the Descope component
Usage example:
const CustomScreen = ({onClick, setForm}) => {
  const onChange = (e) => setForm({ email: e.target.value })

  return (
    <>
      <input
        type="email"
        placeholder="Email"
        onChange={onChange}
      />
      <button
        type="button"
        onClick={onClick}
      >
        Submit
      </button>
    </>
)}

const Login = () => {
  const [state, setState] = useState();
  const [form, setForm] = useState();

  const onScreenUpdate = (screenName, context, next) => {
    setState({screenName, context, next})

    if (screenName === 'My Custom Screen') {
      return true;
    }

    return false;
  };

  return <Descope
  ...
  onScreenUpdate={onScreenUpdate}
  >{state.screenName === 'My Custom Screen' && <CustomScreen
    onClick={() => {
      // replace with the button interaction id
      state.next('interactionId', form)
    }}
    setForm={setForm}/>}
  </Descope>
}
useDescope, useSession and useUser hooks in your components in order to get authentication state, user details and utilitiesThis can be helpful to implement application-specific logic. Examples:
import { useDescope, useSession, useUser } from '@descope/react-sdk';
import { useCallback } from 'react';

const App = () => {
  // NOTE - `useDescope`, `useSession`, `useUser` should be used inside `AuthProvider` context,
  // and will throw an exception if this requirement is not met
  // useSession retrieves authentication state, session loading status, useful claims, and the session token
  // If the session token is managed in cookies in project settings, sessionToken will be empty.
  const { isAuthenticated, isSessionLoading, sessionToken, claims } = useSession();
  // useUser retrieves the logged in user information
  const { user, isUserLoading } = useUser();
  // useDescope retrieves Descope SDK for further operations related to authentication
  // such as logout
  const sdk = useDescope();

  if (isSessionLoading || isUserLoading) {
    return <p>Loading...</p>;
  }

  const handleLogout = useCallback(() => {
    sdk.logout();
  }, [sdk]);

  if (isAuthenticated) {
    return (
      <>
        <p>Hello {user.name}</p>
        <button onClick={handleLogout}>Logout</button>
      </>
    );
  }

  return <p>You are not logged in</p>;
};
Note: useSession triggers a single request to the Descope backend to attempt to refresh the session. If you don't useSession on your app, the session will not be refreshed automatically. If your app does not require useSession, you can trigger the refresh manually by calling refresh from useDescope hook. Example:
const { refresh } = useDescope();
useEffect(() => {
  refresh();
}, [refresh]);
Descope SDK automatically refreshes the session token when it is about to expire. This is done in the background using the refresh token, without any additional configuration.
If you want to disable this behavior, you can pass autoRefresh={false} to the AuthProvider component. This will prevent the SDK from automatically refreshing the session token.
For more SDK usage examples refer to docs
When developing a full-stack application, it is common to have private server API which requires a valid session token:
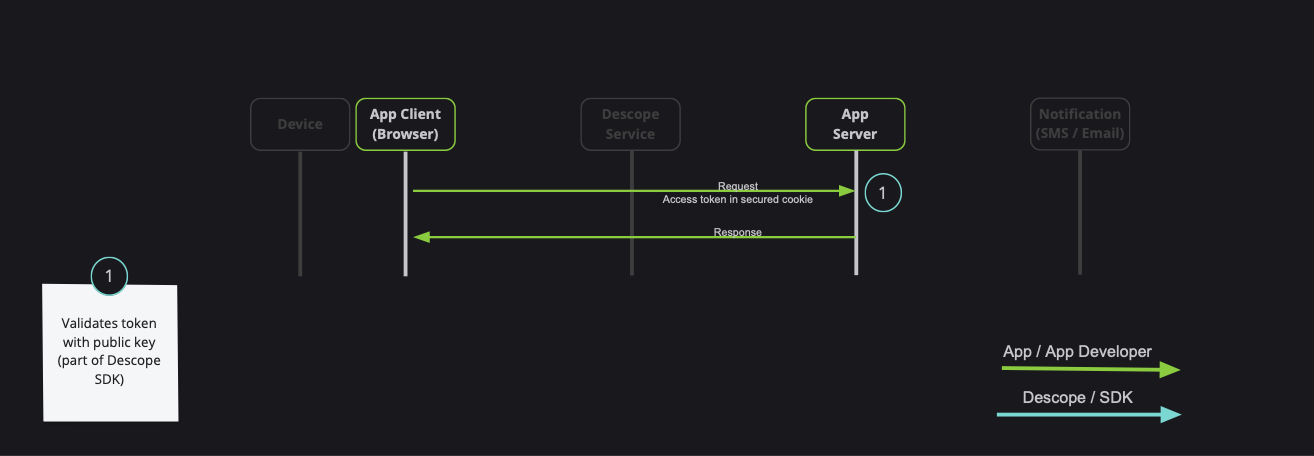
Note: Descope also provides server-side SDKs in various languages (NodeJS, Go, Python, etc). Descope's server SDKs have out-of-the-box session validation API that supports the options described bellow. To read more about session validation, Read this section in Descope documentation.
There are 2 ways to achieve that:
getSessionToken to get the token, and pass it on the Authorization Header (Recommended)sessionTokenViaCookie boolean prop to the AuthProvider component (Use cautiously, session token may grow, especially in cases of using authorization, or adding custom claim)getSessionToken to get the tokenAn example for api function, and passing the token on the Authorization header:
import { getSessionToken } from '@descope/react-sdk';

// fetch data using back
// Note: Descope backend SDKs support extracting session token from the Authorization header
export const fetchData = async () => {
  const sessionToken = getSessionToken();
  const res = await fetch('/path/to/server/api', {
    headers: {
      Authorization: `Bearer ${sessionToken}`,
    },
  });
  // ... use res
};
An example for component that uses fetchData function from above
// Component code
import { fetchData } from 'path/to/api/file'
import { useCallback } from 'react'

const Component = () => {
    const onClick = useCallback(() => {
        fetchData()
    },[])
    return (
        {...}
        {
            // button that triggers an API that may use session token
            <button onClick={onClick}>Click Me</button>
        }
    )
}
Note that ff Descope project settings are configured to manage session token in cookies, the getSessionToken function will return an empty string.
sessionTokenViaCookie boolean prop to the AuthProviderPassing sessionTokenViaCookie prop to AuthProvider component. Descope SDK will automatically store session token on the DS cookie.
Note: Use this option if session token will stay small (less than 1k). Session token can grow, especially in cases of using authorization, or adding custom claims
Example:
import { AuthProvider } from '@descope/react-sdk';

const AppRoot = () => {
  return (
    <AuthProvider projectId="my-project-id" sessionTokenViaCookie>
      <App />
    </AuthProvider>
  );
};
Now, whenever you call fetch, the cookie will automatically be sent with the request. Descope backend SDKs also support extracting the token from the DS cookie.
Note:
The session token cookie is set as a Secure cookie. It will be sent only over HTTPS connections.
In addition, some browsers (e.g. Safari) may not store Secure cookie if the hosted page is running on an HTTP protocol.
The session token cookie is set to SameSite=Strict; Secure; by default.
If you need to customize this, you can set sessionTokenViaCookie={{sameSite: 'Lax', secure: false, cookieName: 'MY_COOKIE'}}.
sameSite (default: Strict) – Controls the SameSite attribute of the session cookie.secure (default: true) – If true, sets the cookie as Secure (sent only over HTTPS).cookieName (default: DS) – The name of the session token cookie. Useful for avoiding conflicts when running multiple Descope projects on the same domain.domain (default: auto-detected) – The domain for the session token cookie. If not specified, uses the domain from Descope project settings or current domain.If project settings are configured to manage session token in cookies, Descope services will automatically set the session token in the DS cookie as a Secure and HttpOnly cookie. In this case, the session token will not be stored in the browser's and will not be accessible to the client-side code using useSession or getSessionToken.
However, useSession's returned claims field will always be available to retrieve custom claims & common Descope claims
from the token.
### Helper Functions

You can also use the following functions to assist with various actions managing your JWT.

`getSessionToken()` - Get current session token.
`getRefreshToken()` - Get current refresh token. Note: Relevant only if the refresh token is stored in local storage. If the refresh token is stored in an `httpOnly` cookie, it will return an empty string.
`refresh(token = getRefreshToken())` - Force a refresh on current session token using an existing valid refresh token.
`isSessionTokenExpired(token = getSessionToken())` - Check whether the current session token is expired. Provide a session token if is not persisted (see [token persistence](#token-persistence)).
`isRefreshTokenExpired(token = getRefreshToken())` - Check whether the current refresh token is expired. Provide a refresh token if is not persisted (see [token persistence](#token-persistence)).
`getJwtRoles(token = getSessionToken(), tenant = '')` - Get current roles from an existing session token. Provide tenant id for specific tenant roles.
`getJwtPermissions(token = getSessionToken(), tenant = '')` - Fet current permissions from an existing session token. Provide tenant id for specific tenant permissions.
`getCurrentTenant(token = getSessionToken())` - Get current tenant id from an existing session token (from the `dct` claim).

### Refresh token lifecycle

Descope SDK is automatically refreshes the session token when it is about to expire. This is done in the background using the refresh token, without any additional configuration.

If the Descope project settings are configured to manage tokens in cookies.
you must also configure a custom domain, and set it as the `baseUrl` prop in the `AuthProvider` component. See the above [`AuthProvider` usage](#wrap-your-app-with-auth-provider) for usage example.

### Token Persistence

Descope stores two tokens: the session token and the refresh token.

- The refresh token is either stored in local storage or an `httpOnly` cookie. This is configurable in the Descope console.
- The session token is stored in either local storage or a JS cookie. This behavior is configurable via the `sessionTokenViaCookie` prop in the `AuthProvider` component.

However, for security reasons, you may choose not to store tokens in the browser. In this case, you can pass `persistTokens={false}` to the `AuthProvider` component. This prevents the SDK from storing the tokens in the browser.

Notes:

- You must configure the refresh token to be stored in an `httpOnly` cookie in the Descope console. Otherwise, the refresh token will not be stored, and when the page is refreshed, the user will be logged out.
- You can still retrieve the session token using the `useSession` hook.

### Custom Refresh Cookie Name

When managing multiple Descope projects on the same domain, you can avoid refresh cookie conflicts by assigning a custom cookie name to your refresh token during the login process (for example, using Descope Flows). However, you must also configure the SDK to recognize this unique name by passing the `refreshCookieName` prop to the `AuthProvider` component.

This will signal Descope API to use the custom cookie name as the refresh token.

Note that this option is only available when the refresh token managed on cookies.

```js
import { AuthProvider } from '@descope/react-sdk';

const AppRoot = () => {
  // pass the custom cookie name to the AuthProvider
  return (
    <AuthProvider projectId="my-project-id" refreshCookieName="MY_DSR">
      <App />
    </AuthProvider>
  );
};
Descope stores the last user information in local storage. If you wish to disable this feature, you can pass storeLastAuthenticatedUser={false} to the AuthProvider component. Please note that some features related to the last authenticated user may not function as expected if this behavior is disabled. Local storage is being cleared when the user logs out, if you want the avoid clearing the local storage, you can pass keepLastAuthenticatedUserAfterLogout={true} to the AuthProvider component.
If you are migrating from an external authentication provider to Descope, you can use the getExternalToken prop in the AuthProvider component. This function should return a valid token from the external provider. The SDK will then use this token to authenticate the user with Descope.
import { AuthProvider } from '@descope/react-sdk';

const AppRoot = () => {
  const externalToken = useCallback(async () => {
    // Bring token from external provider (e.g. get access token from another auth provider)
    return 'my-external-token';
  }, []);

  return (
    <AuthProvider projectId="my-project-id" getExternalToken={externalToken}>
      <App />
    </AuthProvider>
  );
};
Widgets are components that allow you to expose management features for tenant-based implementation. In certain scenarios, your customers may require the capability to perform managerial actions independently, alleviating the necessity to contact you. Widgets serve as a feature enabling you to delegate these capabilities to your customers in a modular manner.
Important Note:
Tenant Admin Role.The UserManagement widget lets you embed a user table in your site to view and take action.
The widget lets you:
Note:
import { UserManagement } from '@descope/react-sdk';
...
  <UserManagement
    widgetId="user-management-widget"
    tenant="tenant-id"
  />
Example: Manage Users
The RoleManagement widget lets you embed a role table in your site to view and take action.
The widget lets you:
Note:
Editable field is determined by the user's access to the role - meaning that project-level roles are not editable by tenant level users.import { RoleManagement } from '@descope/react-sdk';
...
<RoleManagement
widgetId="role-management-widget"
tenant="tenant-id"
/>
Example: Manage Roles
The AccessKeyManagement widget lets you embed an access key table in your site to view and take action.
The widget lets you:
import { AccessKeyManagement } from '@descope/react-sdk';
...
  {
	  /* admin view: manage all tenant users' access keys */
  }
  <AccessKeyManagement
    widgetId="access-key-management-widget"
    tenant="tenant-id"
  />

  {
    /* user view: mange access key for the logged-in tenant's user */
  }
  <AccessKeyManagement
    widgetId="user-access-key-management-widget"
    tenant="tenant-id"
  />
Example: Manage Access Keys
The AuditManagement widget lets you embed an audit table in your site.
import { AuditManagement } from '@descope/react-sdk';
...
  <AuditManagement
    widgetId="audit-management-widget"
    tenant="tenant-id"
  />
Example: Manage Audit
The UserProfile widget lets you embed a user profile component in your app and let the logged in user update his profile.
The widget lets you:
import { UserProfile } from '@descope/react-sdk';
...
  <UserProfile
    widgetId="user-profile-widget"
    onLogout={() => {
      // add here you own logout callback
      window.location.href = '/login';
    }}
  />
Example: User Profile
The ApplicationsPortal lets you embed an applications portal component in your app and allows the logged-in user to open applications they are assigned to.
import { ApplicationsPortal } from '@descope/react-sdk';
...
  <ApplicationsPortal
    widgetId="applications-portal-widget"
  />
Example: Applications Portal
You can find an example react app in the examples folder.
To run the examples, set your Project ID by setting the DESCOPE_PROJECT_ID env var or directly
in the sample code.
Find your Project ID in the Descope console.
export DESCOPE_PROJECT_ID=<Project-ID>
Alternatively, put the environment variable in .env file in the project root directory.
See the .env.example file for a reference.
Note: Due to an issue with react-sdk tsconfig, you need to remove "examples" from the exclude field in the tsconfig.json file in the root of the project before running the example.
Run the following command in the root of the project to build and run the example:
npm i && npm start
See the following table for customization environment variables for the example app:
| Env Variable | Description | Default value |
|---|---|---|
| DESCOPE_FLOW_ID | Which flow ID to use in the login page | sign-up-or-in |
| DESCOPE_BASE_URL | Custom Descope base URL | None |
| DESCOPE_BASE_STATIC_URL | Allows to override the base URL that is used to fetch static files | https://static.descope.com/pages |
| DESCOPE_THEME | Flow theme | None |
| DESCOPE_LOCALE | Flow locale | Browser's locale |
| DESCOPE_REDIRECT_URL | Flow redirect URL for OAuth/SSO/Magic Link/Enchanted Link | None |
| DESCOPE_TENANT_ID | Flow tenant ID for SSO/SAML | None |
| DESCOPE_DEBUG_MODE | "true" - Enable debugger "false" - Disable flow debugger | None |
| DESCOPE_STEP_UP_FLOW_ID | Step up flow ID to show to logged in user (via button). e.g. "step-up". Button will be hidden if not provided | None |
| DESCOPE_TELEMETRY_KEY | String - Telemetry public key provided by Descope Inc | None |
| DESCOPE_OIDC_ENABLED | "true" - Use OIDC login | None |
| DESCOPE_OIDC_APPLICATION_ID | Descope OIDC Application ID, In case OIDC login is used | None |
To improve modularity and reduce bundle size, all flow-related utilities are available also under @descope/react-sdk/flows subpath. Example:
import { Descope, useSession, ... } from '@descope/react-sdk/flows';
The Descope SDK caches the user and session token in the frontend. If you update the user in your backend (using Descope Management SDK/API for example), you can call me / refresh from useDescope hook to refresh the user and session token. Example:
const sdk = useDescope();

const handleUpdateUser = useCallback(() => {
  myBackendUpdateUser().then(() => {
    sdk.me();
    // or
    sdk.refresh();
  });
}, [sdk]);
To learn more please see the Descope Documentation and API reference page.
Descope also supports OIDC login. To enable OIDC login, pass oidcConfig prop to the AuthProvider component. Example:
import { AuthProvider } from '@descope/react-sdk';

const AppRoot = () => {
  return (
    <AuthProvider
      projectId="my-project-id" // also serves as the client ID
      oidcConfig={true}

      /* alternatively, you can pass the oidcConfig object
      oidcConfig={{
        applicationId: 'my-application-id', // optional, if not provided, the default OIDC application will be used

        redirectUri: 'https://my-app.com/redirect', // optional, if not provided, the default redirect URI will be used


        scope: 'openid profile email', // optional, if not provided, default is openid email offline_access roles descope.custom_claims
      }}
      */
    >
      <App />
    </AuthProvider>
  );
};
To use an inbound app as an OIDC provider, you must provide both the issuer and clientId configuration options. The issuer is the OIDC authority URL, and the clientId is the client ID for your inbound app.
Note: When configuring an inbound app as an OIDC provider, you must obtain the issuer URL directly from the inbound app settings page in the Descope console. The issuer URL is specific to your inbound app configuration and cannot be constructed manually. In addition, you'll need to provide the client ID from the same inbound app settings.
<AuthProvider
  projectId="my-project-id"
  oidcConfig={{
    // Required: Get this from your inbound app settings page
    issuer: 'https://api.descope.com/v1/apps/<Project ID>',
    // Required: Client ID from your inbound app settings
    clientId: 'your-inbound-app-client-id',
    // Optional: Custom redirect URI (defaults to current URL)
    redirectUri: 'https://my-app.com/redirect',
    // Optional: Custom scope (defaults to 'openid' when issuer is provided)
    scope: 'openid profile email',
  }}
>
  <App />
</AuthProvider>
When using a custom issuer (including inbound apps), the default scope is 'openid' instead of the full Descope scope. You can override this by providing a custom scope value.
Use the oidc.loginWithRedirect method from the useDescope hook to trigger the OIDC login. Example:
const MyComponent = () => {
  const sdk = useDescope();

  return (
    // ...
    <button
      onClick={() => {
        sdk.oidc.loginWithRedirect({
          // By default, the login will redirect the user to the current URL
          // If you want to redirect the user to a different URL, you can specify it here
          redirect_uri: window.location.origin,
        });
      }}
    >
      Login with OIDC
    </button>
  );
};
The AuthProvider will automatically handle the redirect back from the OIDC provider. The user will be redirected to the redirect_uri specified in the oidc.login method.
You can call sdk.logout to logout the user. Example:
const MyComponent = () => {
  const sdk = useDescope();

  return (
    // ...
    <button
      onClick={() => {
        sdk.logout();
      }}
    >
      Logout
    </button>
  );
};
If you want to redirect the user to a different URL after logout, you can use oidc.logout method. Example:
const MyComponent = () => {
  const sdk = useDescope();

  return (
    // ...
    <button
      onClick={() => {
        sdk.oidc.logout({
          // by default, the logout will redirect the user to the current URL
          // if you want to redirect the user to a different URL, you can specify it here
          post_logout_redirect_uri: window.location.origin + '/after-logout',
        });
      }}
    >
      Logout
    </button>
  );
};
If you need help you can email Descope Support
The Descope SDK for React is licensed for use under the terms and conditions of the MIT license Agreement.
FAQs
Descope React SDK
The npm package @descope/react-sdk receives a total of 25,064 weekly downloads. As such, @descope/react-sdk popularity was classified as popular.
We found that @descope/react-sdk demonstrated a healthy version release cadence and project activity because the last version was released less than a year ago. It has 0 open source maintainers collaborating on the project.
Did you know?

Socket for GitHub automatically highlights issues in each pull request and monitors the health of all your open source dependencies. Discover the contents of your packages and block harmful activity before you install or update your dependencies.
Research
Destructive malware is rising across open source registries, using delays and kill switches to wipe code, break builds, and disrupt CI/CD.

Security News
Socket CTO Ahmad Nassri shares practical AI coding techniques, tools, and team workflows, plus what still feels noisy and why shipping remains human-led.

Research
/Security News
A five-month operation turned 27 npm packages into durable hosting for browser-run lures that mimic document-sharing portals and Microsoft sign-in, targeting 25 organizations across manufacturing, industrial automation, plastics, and healthcare for credential theft.