Product
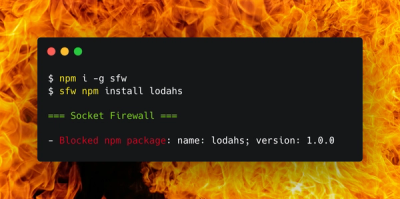
Introducing Socket Firewall: Free, Proactive Protection for Your Software Supply Chain
Socket Firewall is a free tool that blocks malicious packages at install time, giving developers proactive protection against rising supply chain attacks.
@onirix/annotations
Advanced tools
Onirix Annotations allows you to display information associated with the elements of an Onirix Studio experience in a convenient and simple way. Simply add dasheets to Studio elements and Onirix Annotations will take care of displaying them when the user clicks on them.
If you want to know more about datasheets and templates in Onirix Studio, take a look at our documentation about the Datastore module.
npm install @onirix/annotations
Include the dependency within the HTML head tag:
<head>
    <script src="https://unpkg.com/@onirix/annotations@1.0.0/dist/ox-annotations.umd.js"/>
</head>
As ESM modules:
import OnirixAnnotations from "https://unpkg.com/@onirix/annotations@1.0.0/dist/ox-annotations.esm.js";
To use this library, first, the embedsdk must be initialize and pass it to the constructor.
import OnirixEmbedSDK from "https://unpkg.com/@onirix/embed-sdk@1.8.0/dist/ox-embed-sdk.esm.js";
import OnirixAnnotations from "https://unpkg.com/@onirix/annotations@1.0.0/dist/ox-annotations.esm.js";

const embedSDK = new OnirixEmbedSDK();
embedSDK.connect();

const oxAnnotations = new OnirixAnnotations(embedSDK);
Onirix Annotations can be configured by adding a second parameter to the constructor:
const params = {
    persist: false,
    template: "custom-template-name",
    noDatasheets: "There isn't datasheet in this scene."
};

const oxAnnotations = new OnirixAnnotationsLib(embedSDK, params);
If persist is true browser will remember visit elements next time that scene be loaded. If false (default value) all elements be inactive every time the experience loads.
Onirix Annotations will render only datasheets from template "ox-annotation" (default value). If you want user other datasheet's template you have to set template's name here.
If no element with datasheets is found, an error message will be displayed. This message can be customized by indicating the text in the noDatasheets parameter. If no text is indicated, this will be There isn't datasheet in this scene. (default value).
If you need more info about datasheets and templates in Onirix Studio, take a look at our documentation about the Datastore module.
You can use any asset in the Onirix Studio experience elements, but if you want the state of the element to change when the datasheet is displayed you must choose an asset that implements the following variants:
If you need help with the variants take a look at our documentation.
If your assets do not have variants do not worry. Onirix Annotions provides you with three functions that you can override to make modifications to the experience by showing/hiding the datasheet.
oxAnnotations.onActive = (element) => {
    /**
     * Your code here
     */
}
oxAnnotations.onInactive = (element) => {
    /**
     * Your code here
     */
}

oxAnnotations.onVisited = (element) => {
    /**
     * Your code here
     */
}
The three functions receive as parameter the datasheet element that has been shown/hidden. Use our EmbedSDK to make changes to the 3D element.
The body has a css class called ox-annotations and the datasheet element has it's own class called ox-datasheet. On the other hand, the dialog that indicates that there are no datasheets uses the class ox-no-datasheet By employing these selectors, you will be able to customize the style of individual elements under them in the DOM.
To modify the look and feel of the Annotations you can add all the CSS you need to your experience through Onirix Studio's online code editor.
Let's add some code to change the white background of the datasheet and the font.
.ox-annotations .ox-datasheet {
    filter: contrast(150%) brightness(105%);
    background-color: #FABADA;
    color: #6228a7;
}
You can make infinite changes to the interface by adding the appropriate CSS selectors. Through your browser's development tools you can explore the names of the css classes used by the library and add your own custom selectors and rules.
This class includes three listener triggering client actions. When a element is clicked and it has a correct datasheet an event will be launched and you can hear it in your code in this way:
oxAnnotations.onActive = (element) => {
    /**
     * Your code here
     */
}
On the other hand, when the datasheet is closed two events can be launched:
You can hear both of them in your code:
oxAnnotations.onInactive = (element) => {
    /**
     * Your code here
     */
}

oxAnnotations.onVisited = (element) => {
    /**
     * Your code here
     */
}
The constructor accepts essential data for subscribe to embedsdk events:
constructor(embedSdk, params = { persist: false, template: TemplateNames.ANNOTATION, noDatasheets: "There isn't datasheet in this scene." });
If you want to make deeper changes you can clone the Onirix Annotations code from our GitHub repository and create your own Annotations control.
👤 Onirix
FAQs
Onirix helper for annotation experiences.
We found that @onirix/annotations demonstrated a not healthy version release cadence and project activity because the last version was released a year ago. It has 3 open source maintainers collaborating on the project.
Did you know?

Socket for GitHub automatically highlights issues in each pull request and monitors the health of all your open source dependencies. Discover the contents of your packages and block harmful activity before you install or update your dependencies.

Product
Socket Firewall is a free tool that blocks malicious packages at install time, giving developers proactive protection against rising supply chain attacks.

Research
Socket uncovers malicious Rust crates impersonating fast_log to steal Solana and Ethereum wallet keys from source code.

Research
A malicious package uses a QR code as steganography in an innovative technique.