
Security News
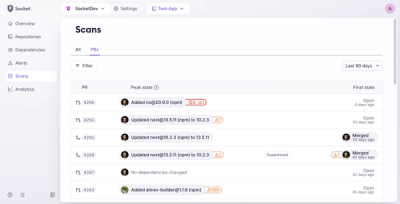
MCP Steering Committee Launches Official MCP Registry in Preview
The MCP Steering Committee has launched the official MCP Registry in preview, a central hub for discovering and publishing MCP servers.
By Sarah Gooding - Sep 09, 2025
@papercups-io/chat-widget
Advanced tools
Papercups chat widget


![]()
Available at https://app.papercups.io/demo
npm install --save @papercups-io/chat-widget
First, sign up at https://app.papercups.io/register to get your account token. Your account token is what you will use to pass in as the accountId prop below.
Paste the code below between your <head> and </head> tags:
<script>
  window.Papercups = {
    config: {
      // Pass in your Papercups account token here after signing up
      token: 'xxxxxxxx-xxxx-xxxx-xxxx-xxxxxxxxxxx',
      // Specify a Papercups inbox
      inbox: 'xxxxxxxx-xxxx-xxxx-xxxx-xxxxxxxxxxx',
      title: 'Welcome to Papercups!',
      subtitle: 'Ask us anything in the chat window below 😊',
      newMessagePlaceholder: 'Start typing...',
      primaryColor: '#13c2c2',
      // Optionally pass in a default greeting
      greeting: 'Hi there! How can I help you?',
      // Optionally pass in metadata to identify the customer
      customer: {
        name: 'Test User',
        email: 'test@test.com',
        external_id: '123',
        metadata: {version: 1, plan: 'premium'}, // Custom fields go here
      },
      // Optionally specify the base URL
      baseUrl: 'https://app.papercups.io',
      // Add this if you want to require the customer to enter
      // their email before being able to send you a message
      requireEmailUpfront: true,
      // Add this if you want to indicate when you/your agents
      // are online or offline to your customers
      showAgentAvailability: true,
    },
  };
</script>
<script
  type="text/javascript"
  async
  defer
  src="https://app.papercups.io/widget.js"
></script>
Place the code below in any pages on which you would like to render the widget. If you'd like to render it in all pages by default, place it in the root component of your app.
import React from 'react';

import {ChatWidget} from '@papercups-io/chat-widget';

// You can also import the following in v1.1.0 and above:
// import {ChatWidget, ChatWindow, Papercups} from '@papercups-io/chat-widget';
//
// The `ChatWindow` component allows you to embed the chat however you want,
// and the `Papercups` object provides access to functions that can programmatically
// open/close the chat widget, e.g.:
//
// `Papercups.open()` // => opens the chat widget
// `Papercups.close()` // => closes the chat widget
// `Papercups.toggle()` // => toggles (opens or closes) the chat widget

const ExamplePage = () => {
  return (
    <>
      {/*
        Put <ChatWidget /> at the bottom of whatever pages you would
        like to render the widget on, or in your root/router component
        if you would like it to render on every page
      */}
      <ChatWidget
        // Pass in your Papercups account token here after signing up
        token='xxxxxxxx-xxxx-xxxx-xxxx-xxxxxxxxxxx'
        // Specify a Papercups inbox
        inbox='xxxxxxxx-xxxx-xxxx-xxxx-xxxxxxxxxxx'
        title='Welcome to Papercups!'
        subtitle='Ask us anything in the chat window below 😊'
        newMessagePlaceholder='Start typing...'
        primaryColor='#13c2c2'
        // Optionally pass in a default greeting
        greeting='Hi there! How can I help you?'
        // Optionally pass in metadata to identify the customer
        customer={{
          name: 'Test User',
          email: 'test@test.com',
          external_id: '123',
          metadata: {version: 1, plan: 'premium'}, // Custom fields go here
        }}
        // Optionally specify the base URL
        baseUrl='https://app.papercups.io'
        // Add this if you want to require the customer to enter
        // their email before being able to send you a message
        requireEmailUpfront
        // Add this if you want to indicate when you/your agents
        // are online or offline to your customers
        showAgentAvailability
      />
    </>
  );
};
These are the props you can pass into your <ChatWidget /> React component, or the fields you can specify in your Papercups.config:
| Prop | Type | Value | Default |
|---|---|---|---|
token | string | Your Papercups account token | N/A |
inbox | string | The Papercups inbox you would like messages to flow into (defaults to your primary inbox) | N/A |
accountId (deprecated) | string | Your Papercups account token (deprecated: use token field instead) | N/A |
title | string | The title in the header of your chat widget | Welcome! |
subtitle | string | The subtitle in the header of your chat widget | How can we help you? |
newMessagePlaceholder | string | The placeholder text in the new message input | Start typing... |
emailInputPlaceholder | string | The placeholder text in the optional email input | Enter your email |
newMessagesNotificationText | string | The notification text when new messages arrive and the chat window is closed | View new messages |
primaryColor | string | The theme color of your chat widget | 1890ff |
greeting | string | An optional initial message to greet your customers with | N/A |
awayMessage | string | Replaces the greeting message if outside working hours | N/A |
showAgentAvailability | boolean | If you want to show whether you (or your agents) are online or not | false |
agentAvailableText | string | The text shown when you (or your agents) are online | We're online right now! |
agentUnavailableText | string | The text shown when you (and your agents) are offline | We're away at the moment. |
customer | object | Identifying information for the customer, including name, email, external_id, and metadata (for any custom fields) | N/A |
baseUrl | string | The base URL of your API if you're self-hosting Papercups | https://app.papercups.io |
iframeUrlOverride | string | An override of the iframe URL we use to render the chat, if you chose to self-host that as well | https://chat-widget.papercups.io |
requireEmailUpfront | boolean | If you want to require unidentified customers to provide their email before they can message you | false |
isOpenByDefault | boolean | If you want the chat widget to open as soon as it loads | false |
persistOpenState | boolean | Persists the open state of the chat across pages | false |
hideToggleButton | boolean | Hides the toggle button in case you want to open/close programmatically | false |
hideOutsideWorkingHours | boolean | Hides the chat widget outside of working hours set in Papercups | false |
popUpInitialMessage | boolean | number | Pops up the initial greeting after number milliseconds (or immediately if true) | false |
customIconUrl | string | A link to a custom icon image URL | N/A |
iconVariant | 'outlined' | 'filled' | The style of the default icon | outlined |
position | 'right' | 'left' | The position of the chat on the page | right |
styles | object | Inline style overrides for chatContainer, toggleContainer, and toggleButton | {} |
onChatLoaded | ({open, close, identify}) => void | Callback fired when chat is loaded, returning some utility functions | N/A |
onChatOpened | () => void | Callback fired when chat is opened | N/A |
onChatClosed | () => void | Callback fired when chat is closed | N/A |
onMessageSent | (message: Message) => void | Callback fired when message is sent | N/A |
onMessageReceived | (message: Message) => void | Callback fired when message is received | N/A |
To build the project, run npm start in the root directory. (If you're running it for the first time, you'll have to run npm install first.)
npm install
npm start
To test it out, use the /example directory:
cd example
npm install
npm start
This will start a development server on http://localhost:3000 by default, and open up the example app in your browser.
By default, the example widget points at development servers for the Papercups API (which runs at http://localhost:4000) and the Papercups chat window (which runs at http://localhost:8080). These values are set with the baseUrl and iframeUrlOverride props respectively.
If you want to develop against your account in production, you can update these values to the following:
baseUrl: http://app.papercups.ioiframeUrlOverride: https://chat-widget.papercups.io(Note that you can also simply remove these props, since the values above are the defaults.)
You'll also want to update your account token to point to your own account. If you haven't already, create a free account at https://app.papercups.io/register to get started.
Once you have your account token, update the accountId prop to point at yours.
If you're having any trouble getting started or just want to say hi, join us on Slack! :wave:
We welcome any contributions! Please create an issue before submitting a pull request.
When creating a pull request, be sure to include a screenshot! 🎨
MIT © Papercups
FAQs
Papercups chat widget
The npm package @papercups-io/chat-widget receives a total of 410 weekly downloads. As such, @papercups-io/chat-widget popularity was classified as not popular.
We found that @papercups-io/chat-widget demonstrated a not healthy version release cadence and project activity because the last version was released a year ago. It has 2 open source maintainers collaborating on the project.
Did you know?

Socket for GitHub automatically highlights issues in each pull request and monitors the health of all your open source dependencies. Discover the contents of your packages and block harmful activity before you install or update your dependencies.
Security News
The MCP Steering Committee has launched the official MCP Registry in preview, a central hub for discovering and publishing MCP servers.
Product
Socket’s new Pull Request Stories give security teams clear visibility into dependency risks and outcomes across scanned pull requests.
Research
/Security News
npm author Qix’s account was compromised, with malicious versions of popular packages like chalk-template, color-convert, and strip-ansi published.