
Security News
CVE Volume Surges Past 48,000 in 2025 as WordPress Plugin Ecosystem Drives Growth
CVE disclosures hit a record 48,185 in 2025, driven largely by vulnerabilities in third-party WordPress plugins.
By Sarah Gooding - Jan 09, 2026
@sendbird/chat-ai-widget
Advanced tools
Sendbird Chat AI Widget, Detailed documentation can be found at https://github.com/sendbird/chat-ai-widget#readme
![]()


Developed with the software and tools below.
![]()
![]()
![]()
![]()
![]()
![]()
![]()
![]()
![]()
This is a Sendbird Chat AI Widget implemented on top of React UiKit.
NOTE: Proper utilization through code build is available starting from the "AI Chatbot Pro" plan or higher of the Sendbird AI Chatbot pricing plan.
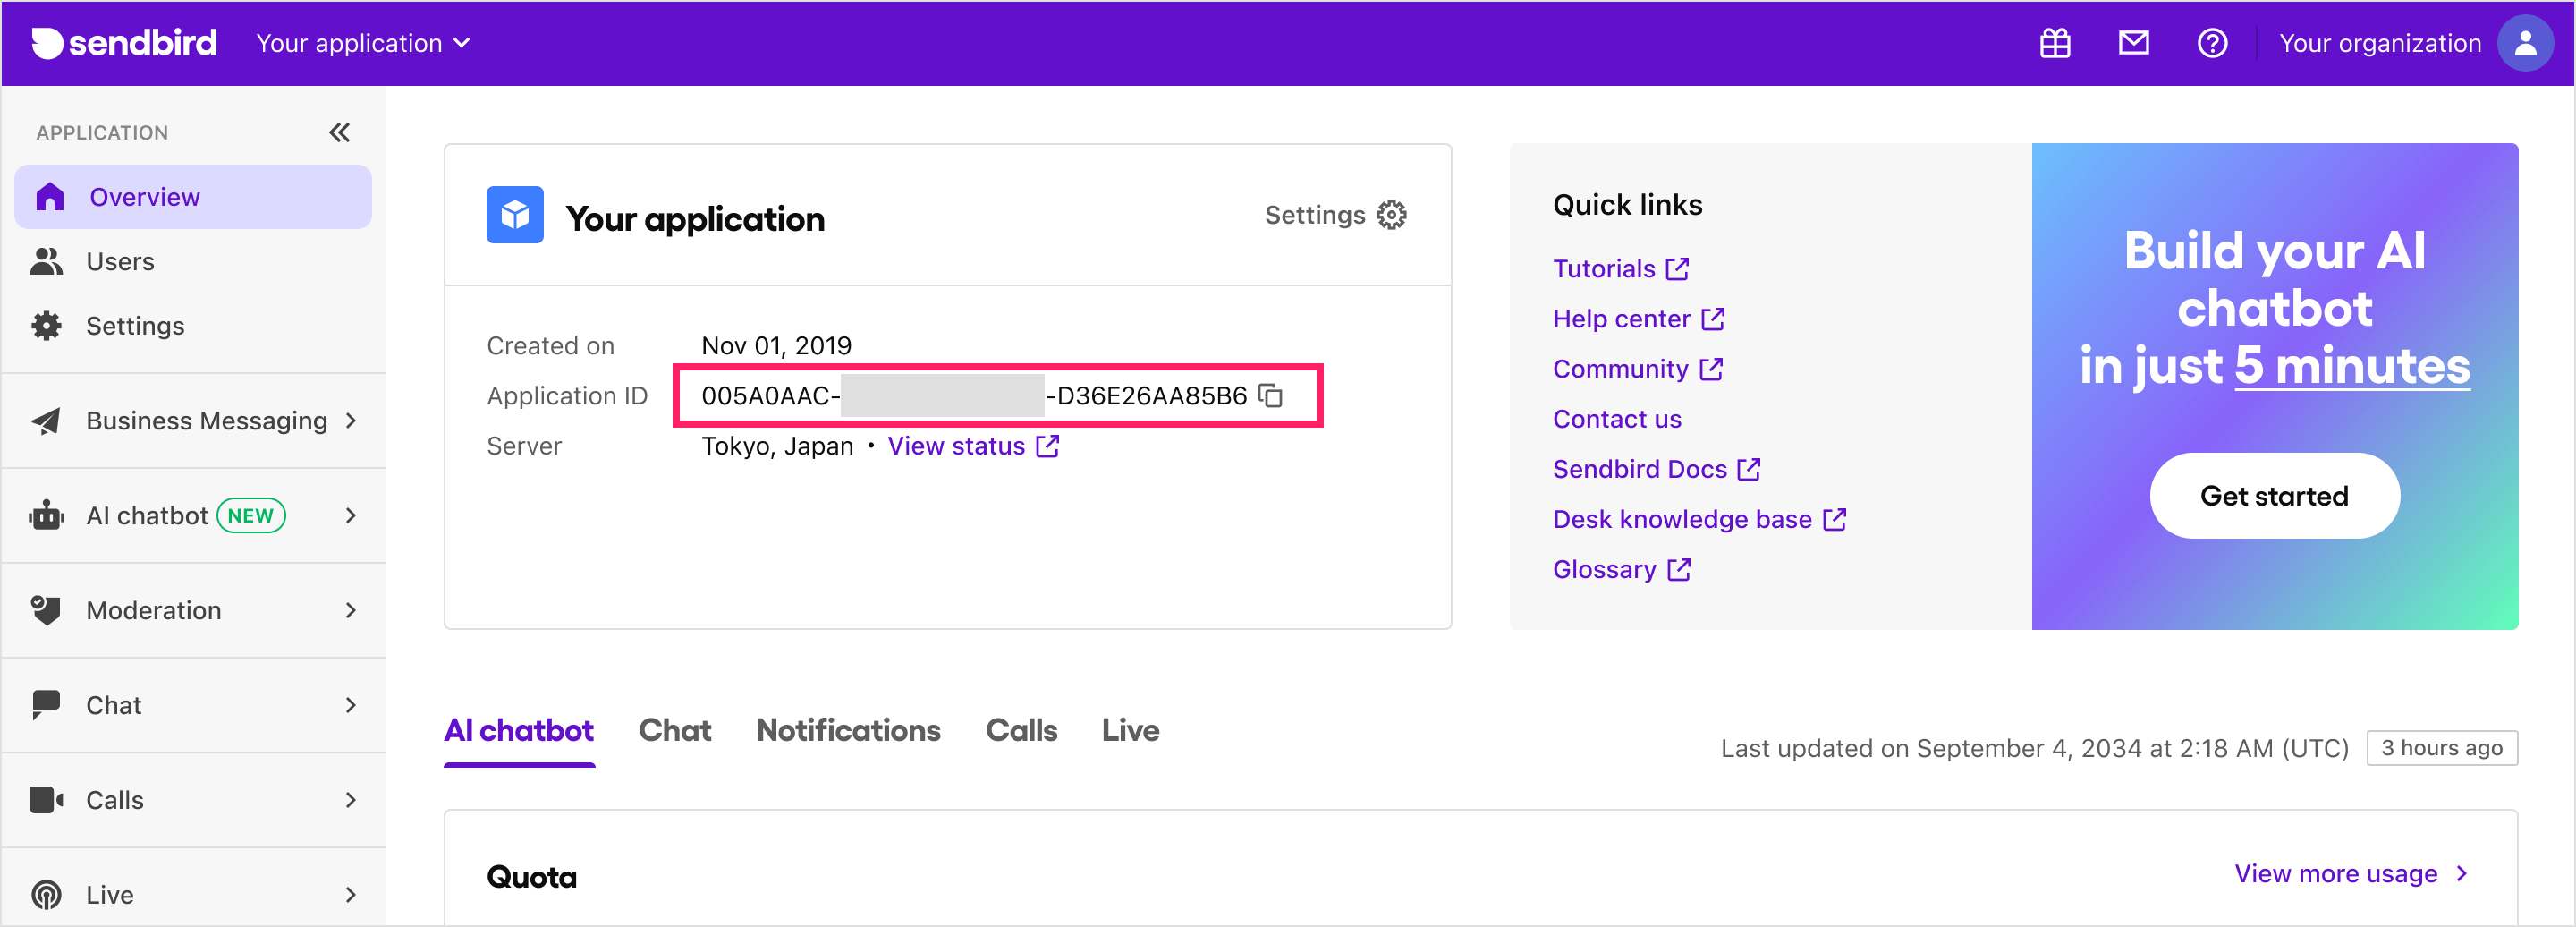
Prepare Sendbird Application ID and Bot ID. Here's how you can get them:
Application ID: If you don't have an account, sign up on the Sendbird Dashboard and create a new application.
Bot ID: If you don't have a bot, create one on the Sendbird Dashboard under AI Chatbot > Manage Bots > Create Bot.
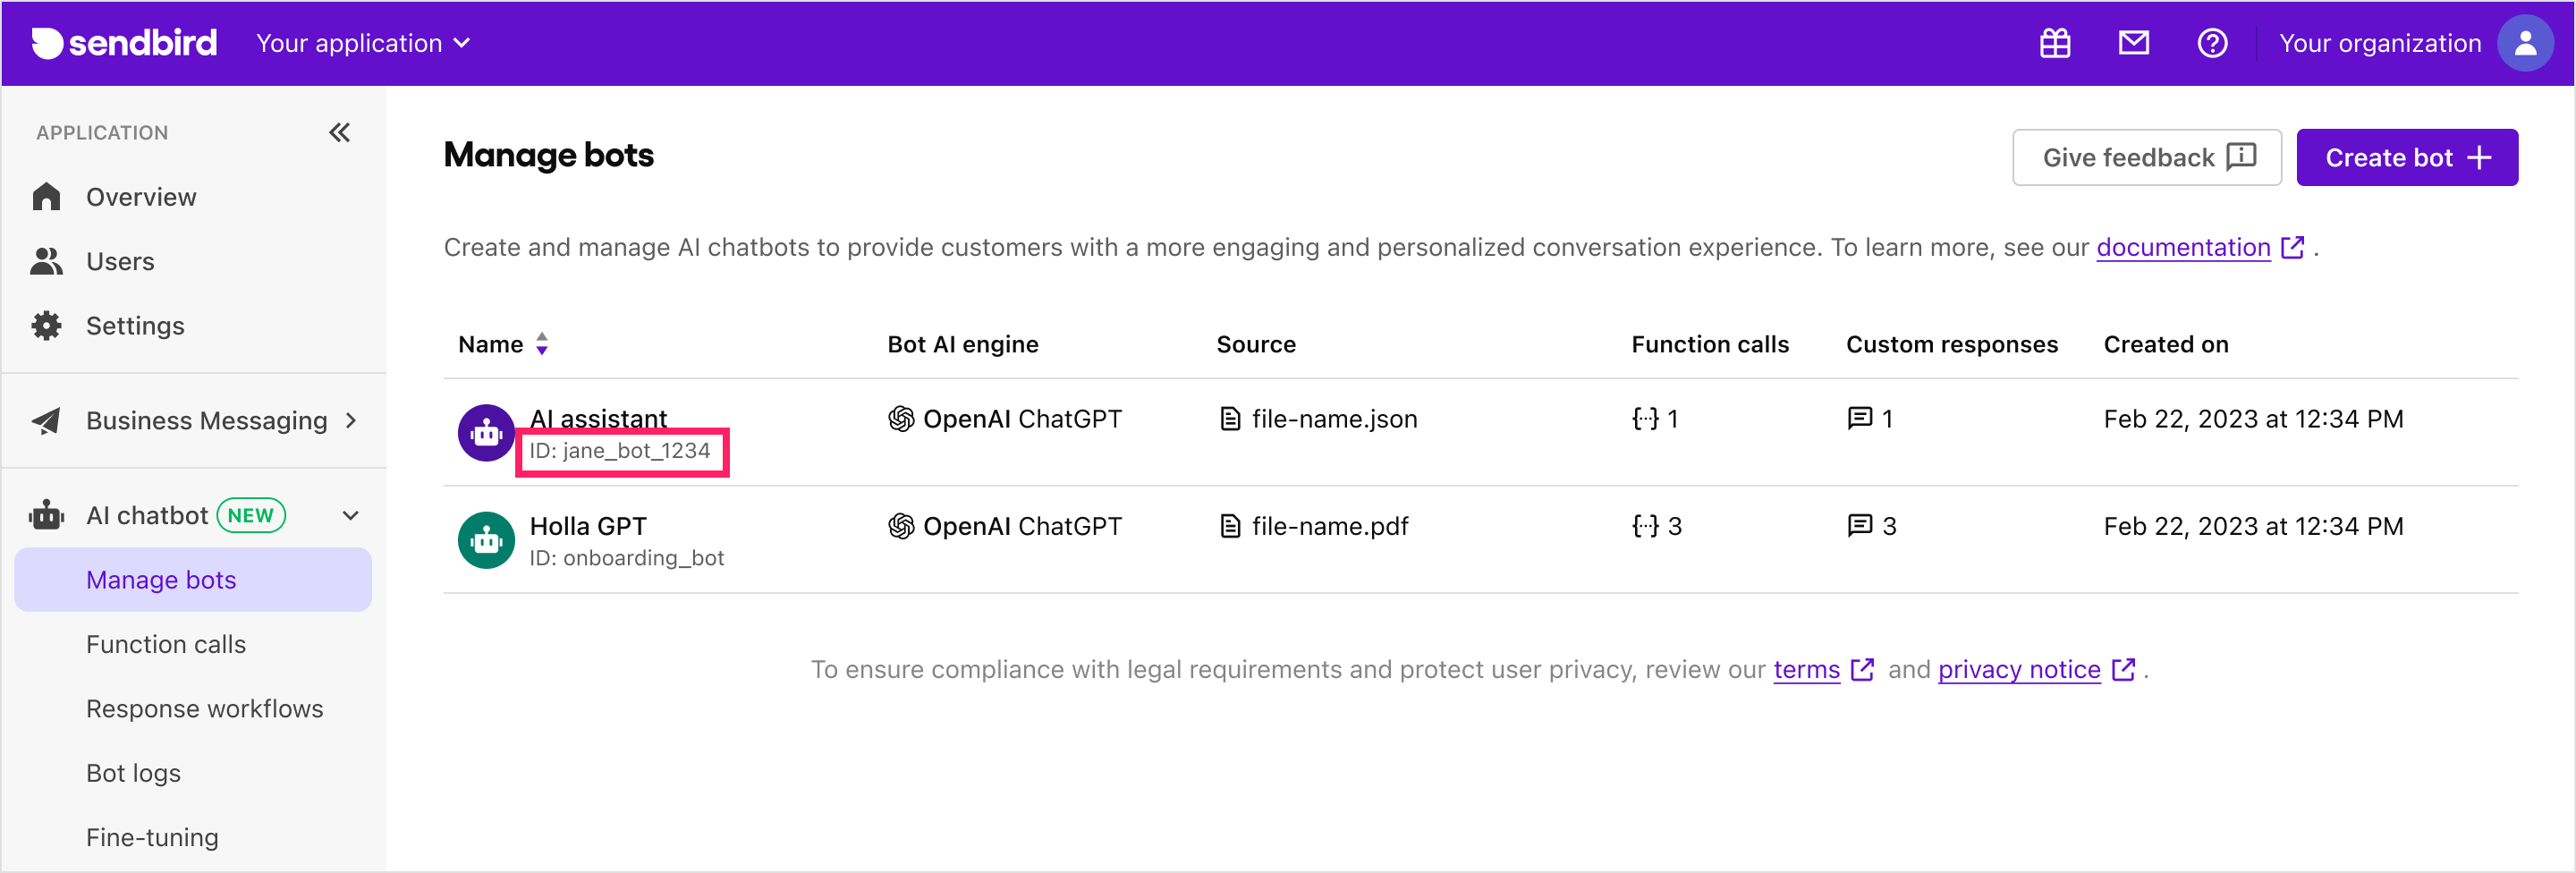
You can also find your application ID and bot ID in the Sendbird Dashboard under AI Chatbot > Manage Bots > Bot Settings > Add to My Website.
Install the library:
# With npm
npm install @sendbird/chat-ai-widget
# Or if you're using yarn
yarn add @sendbird/chat-ai-widget
Add the import statement and component to your code:
 import { ChatAiWidget } from "@sendbird/chat-ai-widget";
 import "@sendbird/chat-ai-widget/dist/style.css";

 const App = () => {
   return (
     <ChatAiWidget
       applicationId="AE8F7EEA-4555-4F86-AD8B-5E0BD86BFE67" // Your Sendbird Application ID
       botId="khan-academy-bot" // Your Bot ID
     />
   );
 };

 export default App;
Not using React in your environment? You can also load this Chat AI Widget component from an HTML file on your website. Please refer to js-example.html for an example.
yarn install:deps
yarn dev
.env:
# Vite prefix is required for Vite to load the env variables
# Plz modify below two env variables on your needs
VITE_CHAT_WIDGET_APP_ID=AE8F7EEA-4555-4F86-AD8B-5E0BD86BFE67
VITE_CHAT_WIDGET_BOT_ID=khan-academy-bot
You can customize the UI of the ChatBot by using the ChatAiWidget component. The following are the props that can be used to customize the UI.
import { ChatAiWidget } from "@sendbird/chat-ai-widget";
import '@sendbird/chat-ai-widget/dist/style.css';

const App = () => {
  return (
    <ChatAiWidget
      applicationId="Your Sendbird application ID"
      botId="Your Sendbird bot ID"
      // more available props can be found in the next section
    />
  );
};

export default App;
| Prop Name | Type | Required | Default Value | Description |
|---|---|---|---|---|
applicationId | string | Yes | N/A | Your Sendbird application ID |
botId | string | Yes | N/A | Your Sendbird bot ID |
userNickName | string | No | N/A | The nickname of the user |
enableEmojiFeedback | boolean | No | true | Enables emoji feedback functionality. |
enableMention | boolean | No | true | Enables mention functionality. |
deviceType | 'desktop' | 'mobile' | No | N/A | Device type to be used in the widget |
stringSet | { [key: string]: string } | No | N/A | Customizable string set. Available string sets can be found here. |
customRefreshComponent | { icon: string, style: React.CSSProperties, width: string, height: string, onClick: () => void } | No | N/A | Customizable refresh component. You can set properties such as icon, style, width, height, and onClick. |
userId | string | No | N/A | User ID to be used in the widget connect. Must be used with sessionToken and configureSession. The example usage can be found here. |
sessionToken | string | No | N/A | Session token to be used in the widget connect. Must be used with userId and configureSession. The example usage can be found here. |
configureSession | () => SessionHandler | No | N/A | Session configuration function. Must be used with userId and sessionToken. The example usage can be found here. |
autoOpen | boolean | No | N/A | Determines whether the chatbot widget automatically opens when the browser window is opened. This property is being ignored in mobile view. |
enableResetHistoryOnConnect | boolean | No | false | Determines whether the chatbot widget history is reset when the user connects. |
messageInputControls.blockWhileBotResponding | boolean | number | No | N/A | Allows to control enabled/disabled state of the message input for waiting for the bot's reply mesage. If number value is given, a timer will be set to force unblock the message input. |
dateLocale | Locale | No | enUS | Locale value to be applied to string values of message timestamp and date separator. Locale values must be imported from date-fns. |
enableHideWidgetForDeactivatedUser | boolean | No | false | Determines whether the chatbot widget is hidden when the user is deactivated. |
enableWidgetExpandButton | boolean | No | false | Determines whether the expand button is displayed in the chatbot widget. |
messageStackDirection | 'top' | 'bottom' | No | 'bottom' | Determines direction at which message stack starts in the message list. |
FAQs
Sendbird Chat AI Widget, Detailed documentation can be found at https://github.com/sendbird/chat-ai-widget#readme
We found that @sendbird/chat-ai-widget demonstrated a healthy version release cadence and project activity because the last version was released less than a year ago. It has 1 open source maintainer collaborating on the project.
Did you know?

Socket for GitHub automatically highlights issues in each pull request and monitors the health of all your open source dependencies. Discover the contents of your packages and block harmful activity before you install or update your dependencies.
Security News
CVE disclosures hit a record 48,185 in 2025, driven largely by vulnerabilities in third-party WordPress plugins.

Security News
Socket CEO Feross Aboukhadijeh joins Insecure Agents to discuss CVE remediation and why supply chain attacks require a different security approach.

Security News
Tailwind Labs laid off 75% of its engineering team after revenue dropped 80%, as LLMs redirect traffic away from documentation where developers discover paid products.