
Security News
Another Round of TEA Protocol Spam Floods npm, But It’s Not a Worm
Recent coverage mislabels the latest TEA protocol spam as a worm. Here’s what’s actually happening.
By Philipp Burckhardt - Nov 14, 2025
@tencentcloud/ai-desk-customer-uniapp
Advanced tools
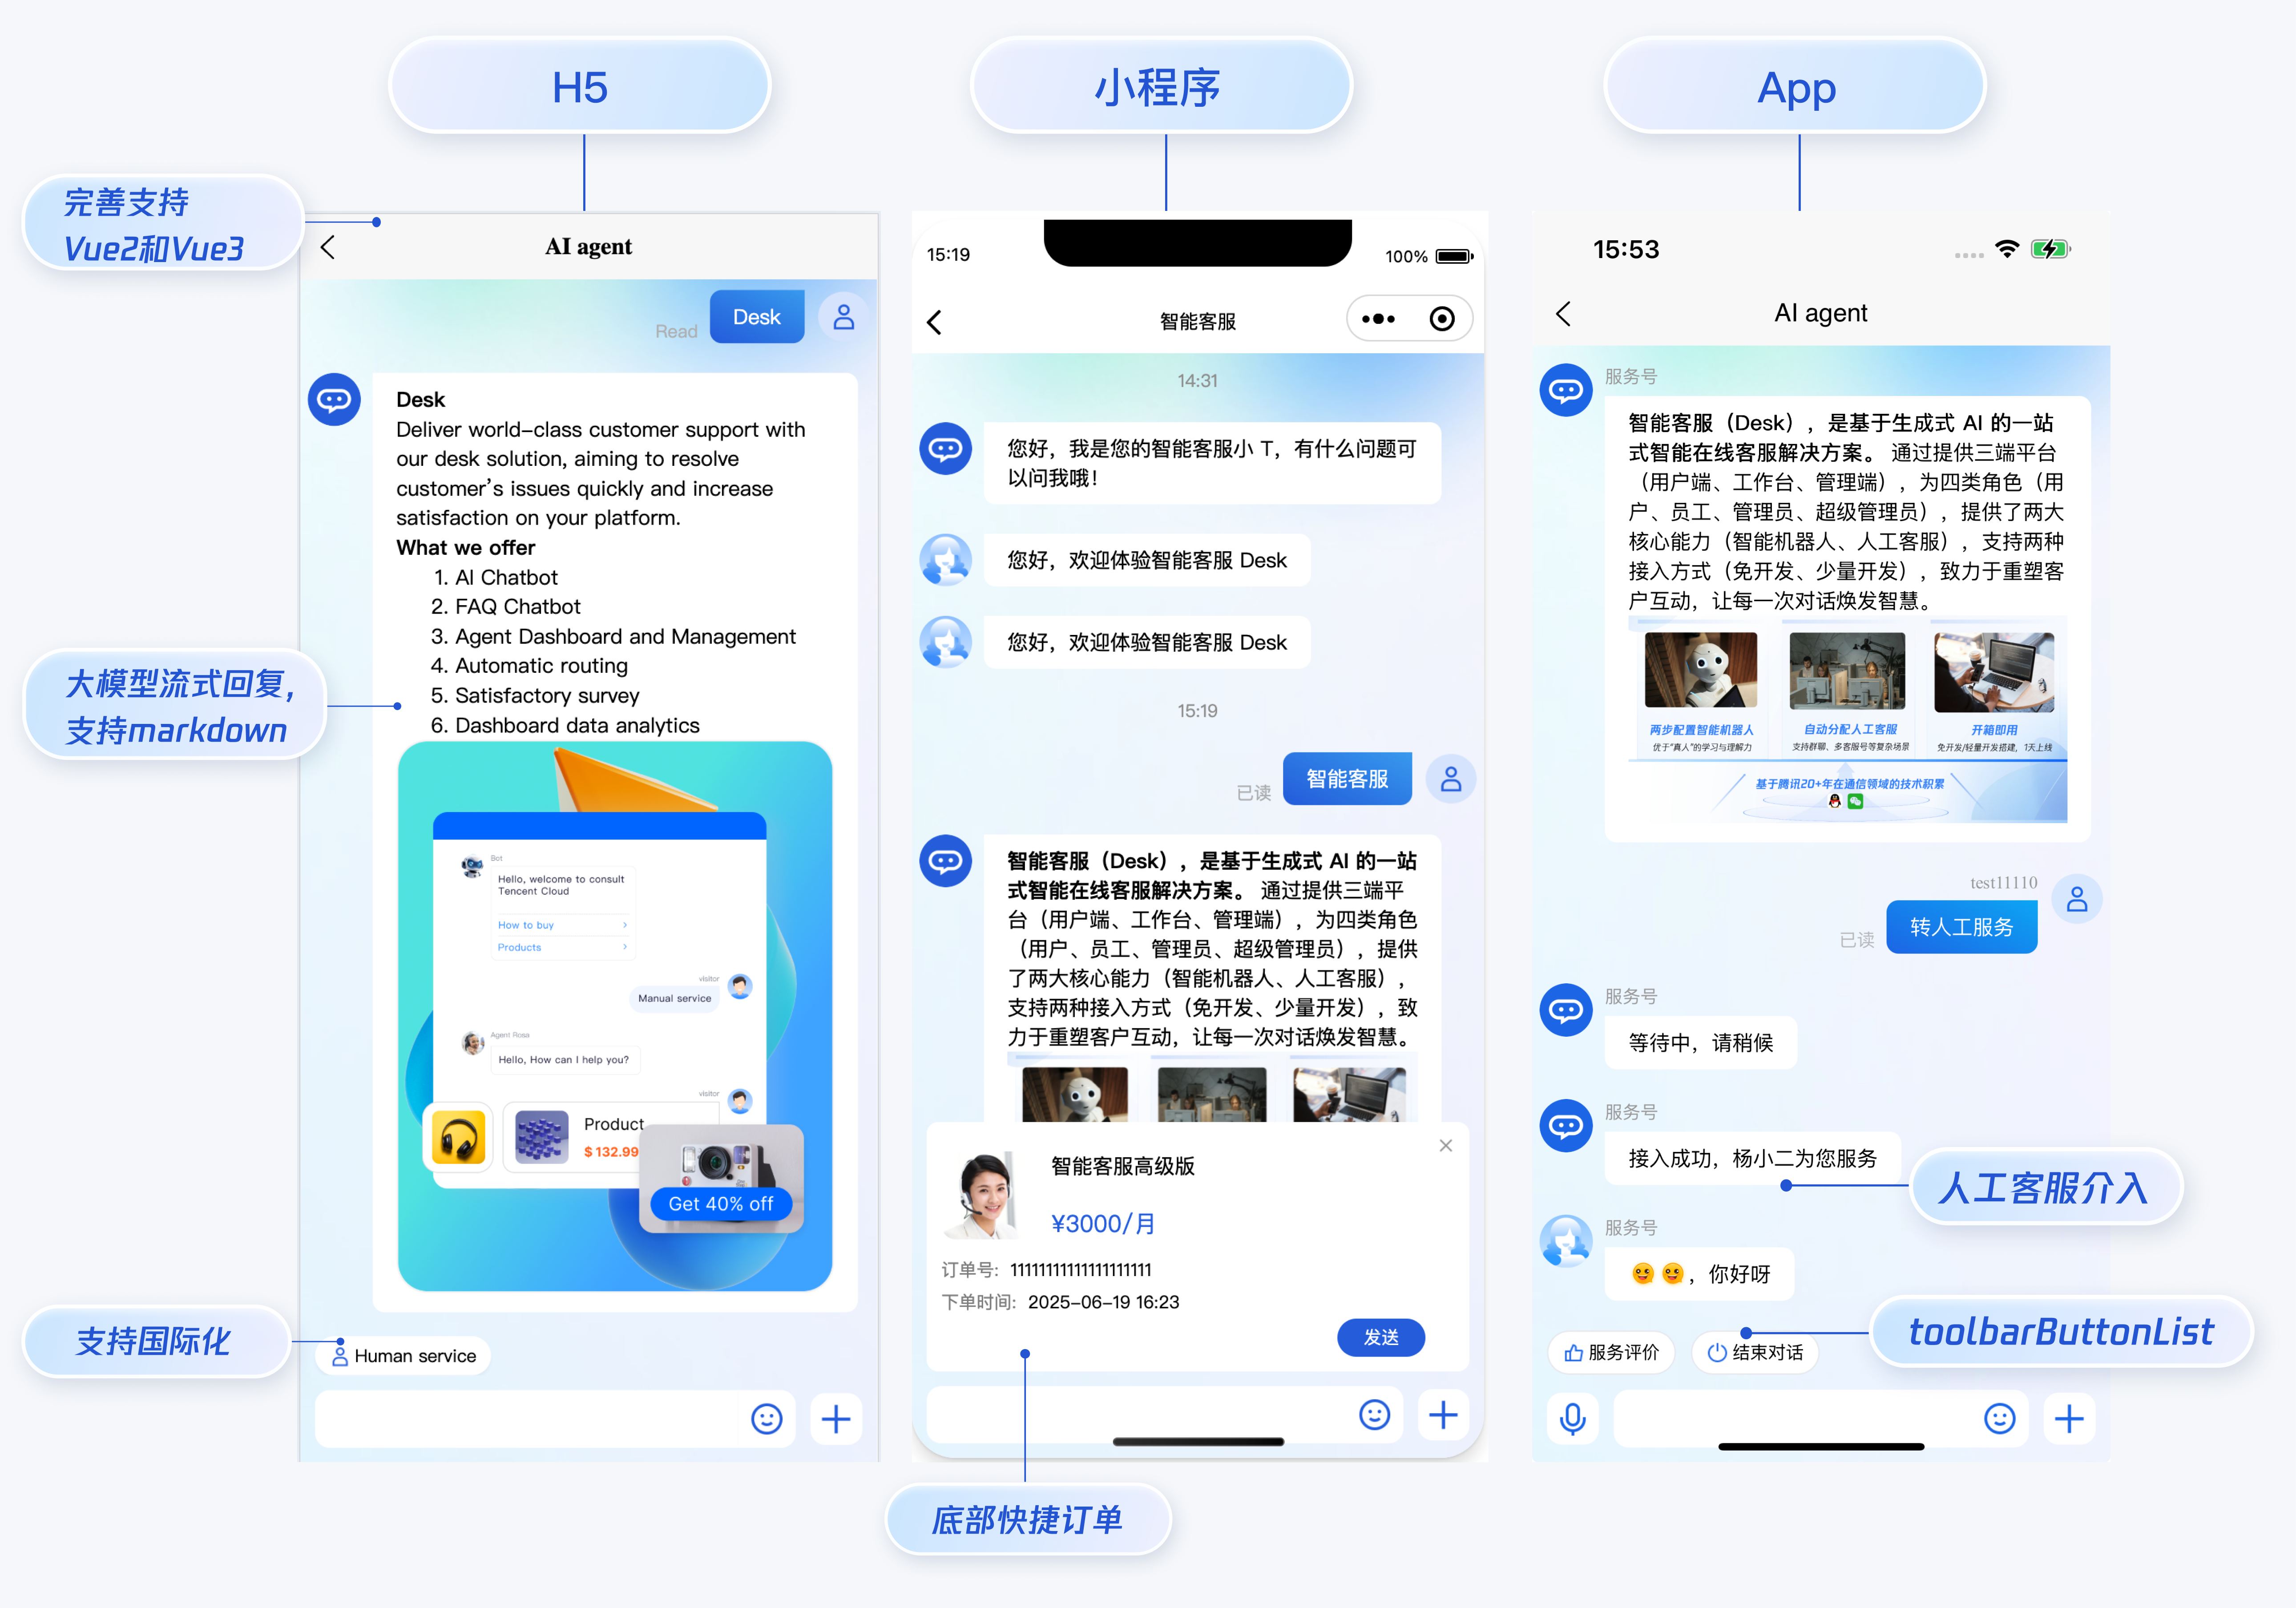
智能客服用户端 uni-app UIKit。使用此 UIKit,您可以在一天内将智能客服的能力集成到您的 H5、小程序、App 项目。极简接入,一套代码多端运行且体验一致,用智能客服为您的产品增收提效,提升用户满意度和付费转化。
HBuilderX 升级到最新版本
TypeScript / JavaScript (UIKit 使用 ts 语言开发,支持在 js 或者 ts 项目中集成)
Vue2 / Vue3
sass(sass-loader 版本 ≤ 10.1.1)
node(12.13.0 ≤ node 版本 ≤ 17.0.0, 推荐使用 Node.js 官方 LTS 版本 16.17.0)
npm(版本请与 node 版本匹配)
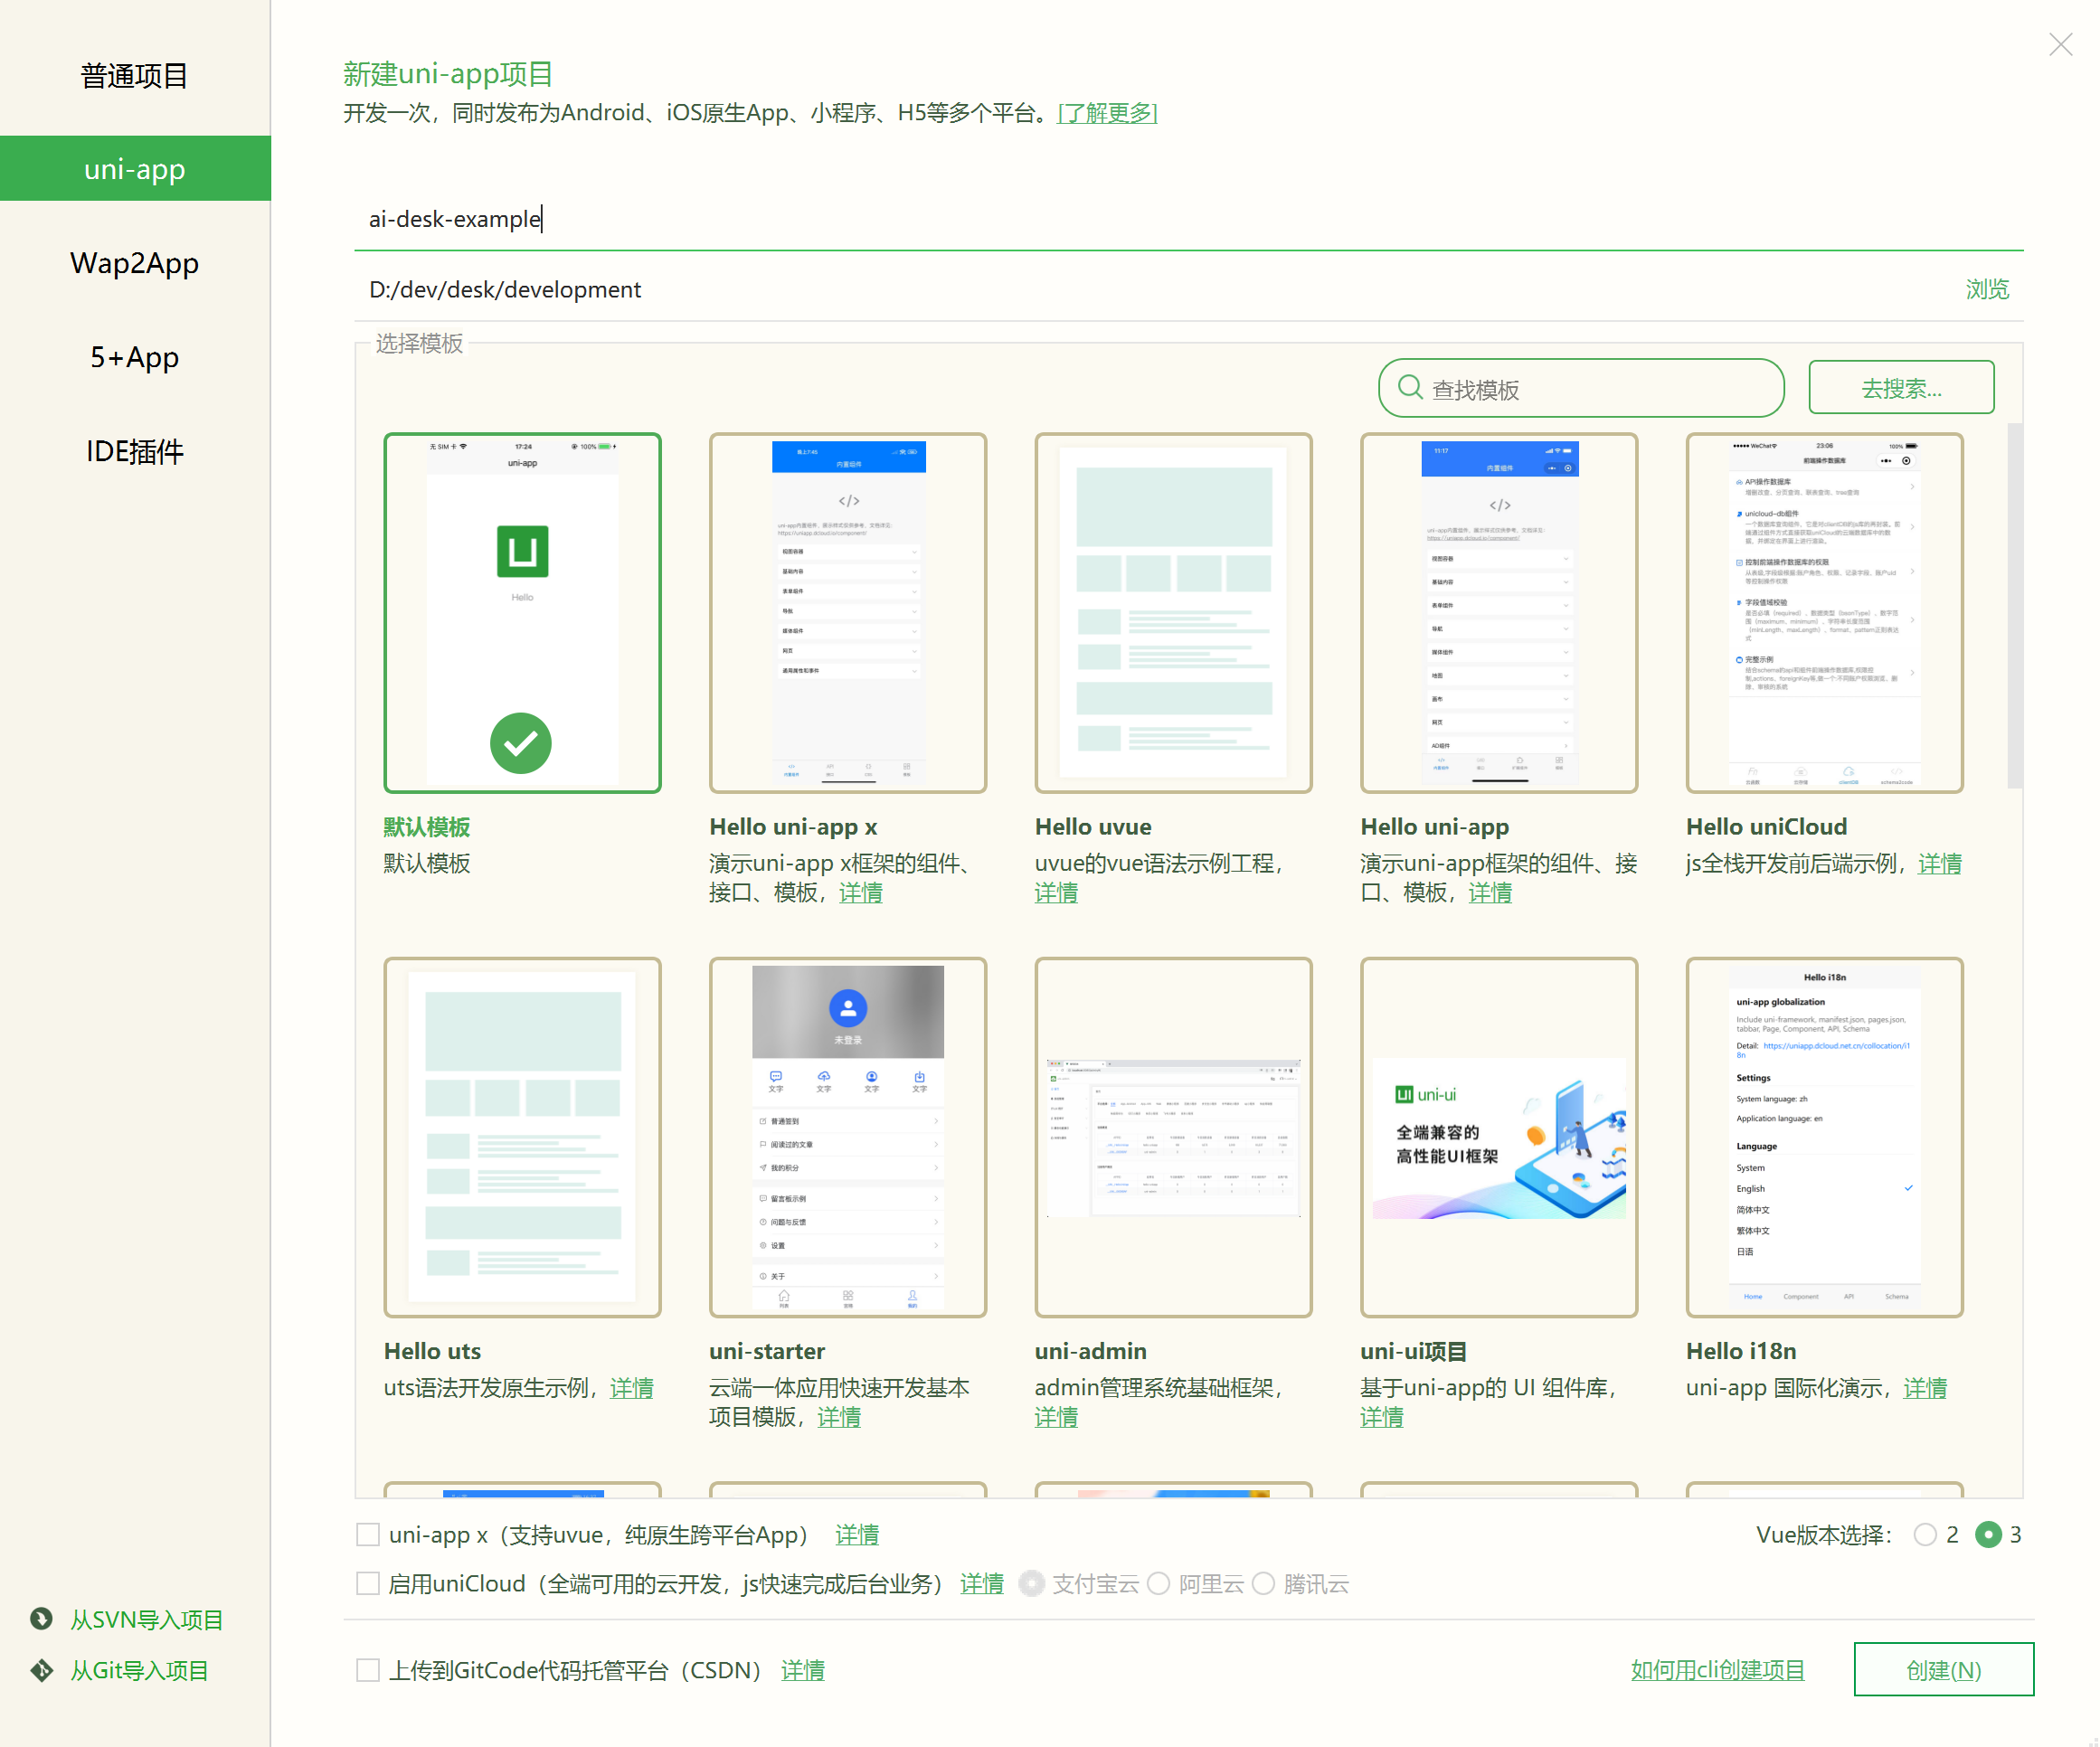
打开 HbuilderX,在菜单栏中选择 “文件-新建-项目”,创建一个名为 ai-desk-example 的 uni-app 项目。Vue 版本选择推荐 3。
HBuilderX 创建项目时默认不会创建 package.json 文件,请在项目根目录下执行以下命令创建 package.json 文件:
npm init -y
通过 NPM 方式下载 UIKit。
npm i @tencentcloud/ai-desk-customer-uniapp@latest unplugin-vue2-script-setup
为了方便您对 UI 进行扩展,请在项目的根目录下执行以下命令,将 UIKit 源码复制到项目中。
【macOS 端】
mkdir -p ./pages-ai-desk/ai-desk-customer-uniapp &&
rsync -av --exclude={'node_modules','excluded-list.txt'} ./node_modules/@tencentcloud/ai-desk-customer-uniapp/ ./pages-ai-desk/ai-desk-customer-uniapp/
【Windows 端】
xcopy .\node_modules\@tencentcloud\ai-desk-customer-uniapp .\pages-ai-desk\ai-desk-customer-uniapp /i /e /exclude:.\node_modules\@tencentcloud\ai-desk-customer-uniapp\excluded-list.txt
【manifest.json 文件】
在 manifest.json文件的源码视图中开启小程序分包 subPackages 和关闭 H5 treeShaking 选项。
// weixin miniProgram
"mp-weixin" : {
    "appid" : "",
    "optimization" : {
        "subPackages" : true
    }
},
// H5: close treeshaking to solve the problem of uni[methond]() is not a function
"h5" : {
    "optimization" : {
        "treeShaking" : {
            "enable" : false
        }
    }
},
注意:
小程序默认使用分包集成,打包小程序时
manifest.json不要配置 lazyCodeLoading 选项。
【vue.config.js(Vue2 项目请修改;Vue3 项目无需修改)】
Vue2 项目必须在根目录下创建或修改 vue.config.js 。
const ScriptSetup = require('unplugin-vue2-script-setup/webpack').default;

module.exports = {
  parallel: false,
  configureWebpack: {
    plugins: [
      ScriptSetup({
        /* options */
      }),
    ],
  },
  chainWebpack(config) {
    // disable type check and let `vue-tsc` handles it
    config.plugins.delete('fork-ts-checker');
  },
};
为了规避小程序主包体积超限问题,我们建议您将客服 UIKit 放入分包。假设您的主包页面是 pages/index/index.vue,分包页面是 pages-ai-desk/index/index.vue,主包页面有一个咨询客服的入口,用户点击后跳转至分包的智能客服页面。项目的目录结构如下所示:
----YOUR-UNI-APP-PROJECT
----pages
--------index
------------index.vue
----pages-ai-desk
--------ai-desk-customer-uniapp
--------index
------------index.vue
----App.vue
----manifest.json
----pages.json
请将以下内容复制到项目对应的文件中。
【App.vue 文件】
<script>
export default {
	onLaunch: function() {
		console.log('App Launch')
	},
	onShow: function() {
		console.log('App Show')
	},
	onHide: function() {
		console.log('App Hide')
	}
}
</script>
<style>
uni-page-body,
html,
body,
page {
  width: 100% !important;
  height: 100% !important;
  overflow: hidden;
}
#app {
  height: 100% !important;
}
</style>
【pages.json 文件】
{
	"pages": [
		{
			"path": "pages/index/index",
			"style": {
				"navigationBarTitleText": "uni-app"
			}
		}
	],
	"subPackages": [{
		"root": "pages-ai-desk",
		"pages": [{
			"path": "index/index",
			"style": {
				"navigationBarTitleText": "智能客服",
				"navigationStyle": "default"
			}
		}]
	}],
	"globalStyle": {
		"navigationBarTextStyle": "black",
		"navigationBarTitleText": "uni-app",
		"navigationBarBackgroundColor": "#F8F8F8",
		"backgroundColor": "#F8F8F8"
	},
	"uniIdRouter": {},
	"condition": { //模式配置,仅开发期间生效
		"current": 0, //当前激活的模式(list 的索引项)
		"list": [{
			"name": "", //模式名称
			"path": "", //启动页面,必选
			"query": "" //启动参数,在页面的onLoad函数里面得到
		}]
	}
}
【main.js(Vue2 项目请修改;Vue3 项目无需修改)】
如果您是 Vue2 项目,请在 main.js 中引入组合式API,防止环境变量 isPC 等无法使用。
// #ifndef VUE3
import VueCompositionAPI from '@vue/composition-api';
Vue.use(VueCompositionAPI);
// #endif
【主包 pages/index/index.vue】
<template>
  <div class="chat">
    <button @click="getSupport">咨询客服</button>
  </div>
</template>
<script>
export default {
  methods: {
    getSupport() {
      uni.navigateTo({
        url: "/pages-ai-desk/index/index"
      })
    }
  }
}
</script>
<style lang="scss" scoped>
.chat {
  height: 100%;
  overflow: hidden;
  display: flex;
  align-items: center;
  justify-content: center;
}
</style>
【分包 pages-ai-desk/index/index.vue】
<template>
  <CustomerServiceChat style="height: 100%;"
  />
</template>
<script>
import TUICustomerServer from '../ai-desk-customer-uniapp';
import CustomerServiceChat from '../ai-desk-customer-uniapp/components/CustomerServiceChat/index-uniapp.vue';

export default {
  components: {
    CustomerServiceChat
  },
  data() {
  },
  onLoad() {
    this.$nextTick(() => {
      // SDKAppID/userID/userSig 的获取请参考步骤4
      const SDKAppID = 0; // Your SDKAppID,即开通了智能客服 Desk 的应用 ID
      const userID = ''; // Your userID,可复用您 app 的账号体系,或随机生成
      const userSig = ''; // Your userSig,接入阶段可控制台生成,生产阶段请务必由服务端生成
      // 带昵称和头像登录
      TUICustomerServer.initWithProfile({
        SDKAppID,
        userID,
        userSig,
        nickName: '张三 1852010****',
        avatar: 'https://im.sdk.qcloud.com/download/tuikit-resource/avatar/avatar_3.png'
      });
    });
  }
}
</script>
<style scoped lang="scss">
</style>
设置pages-ai-desk/index/index.vue中的 SDKAppID、userID、userSig 。
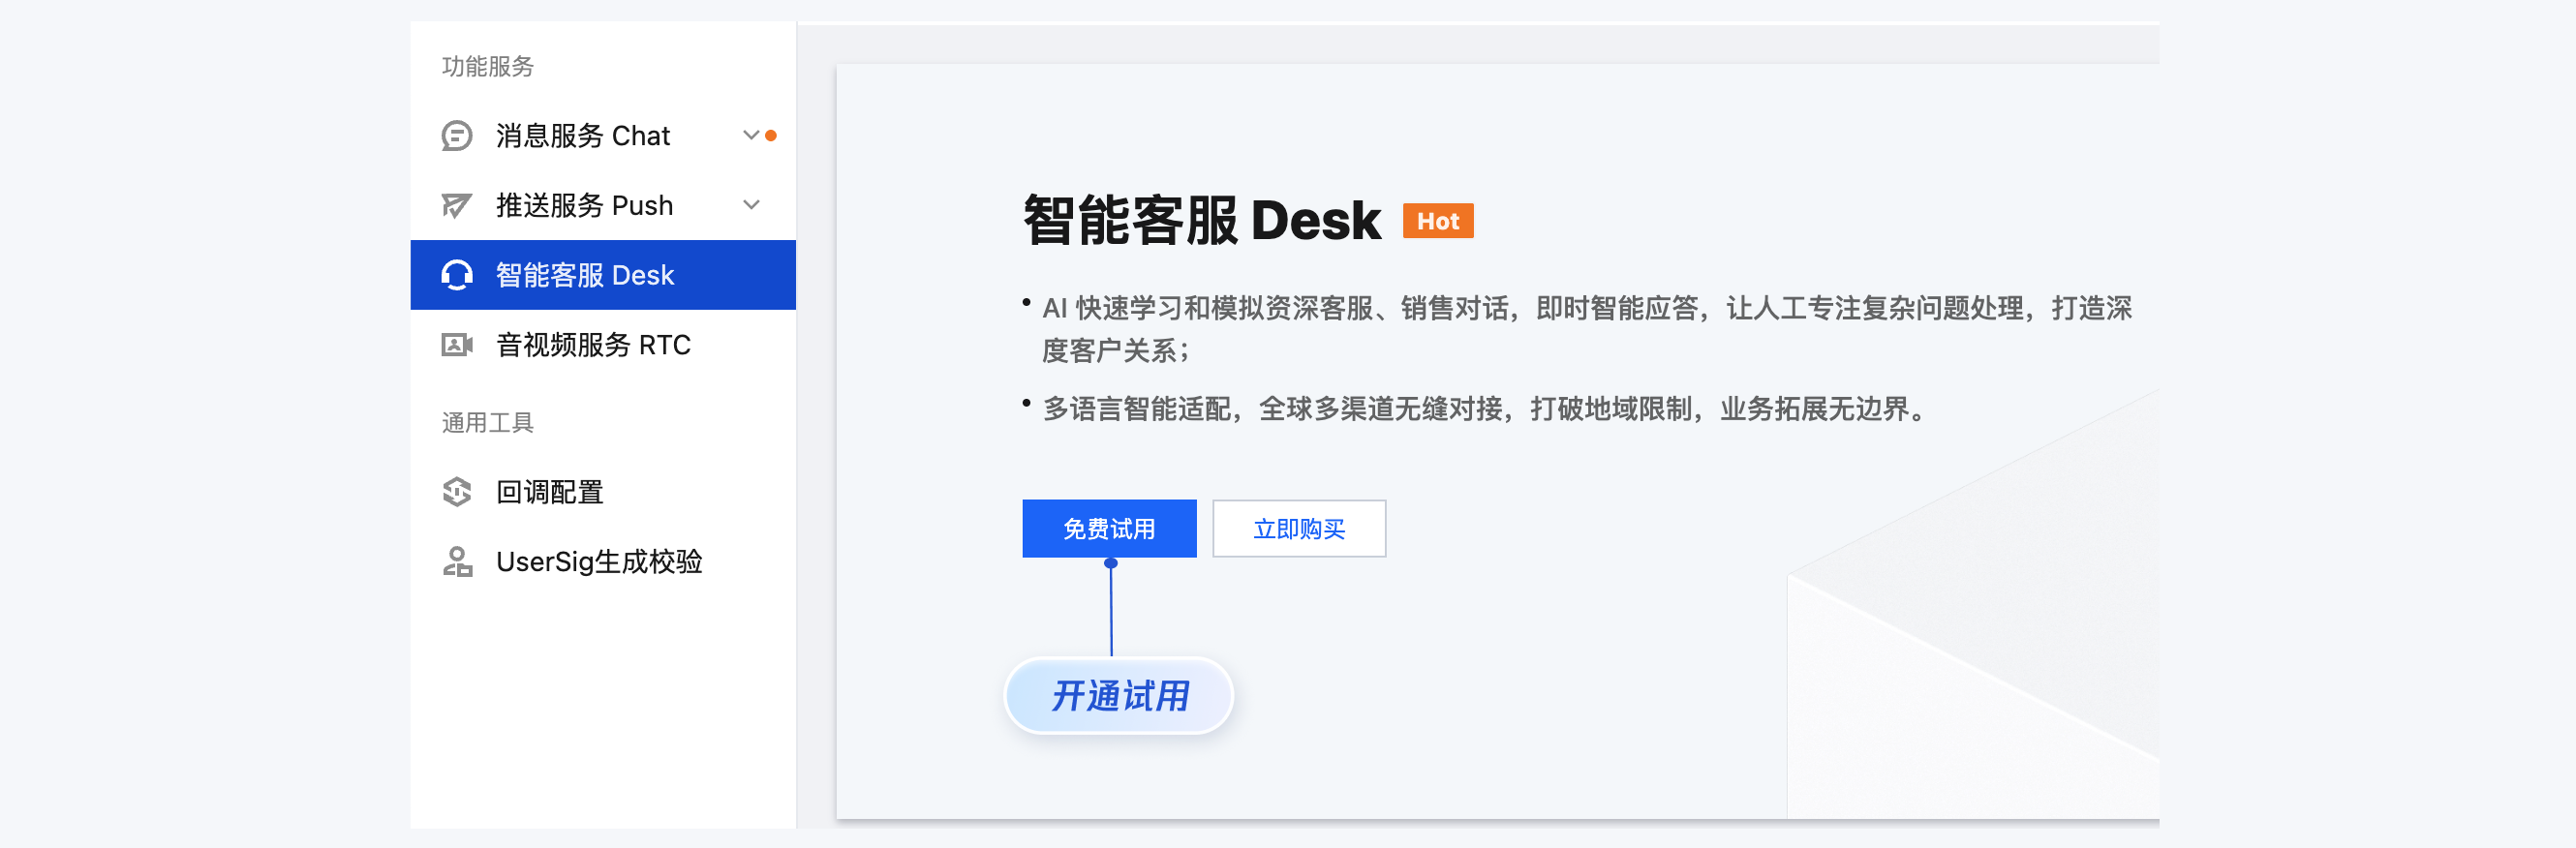
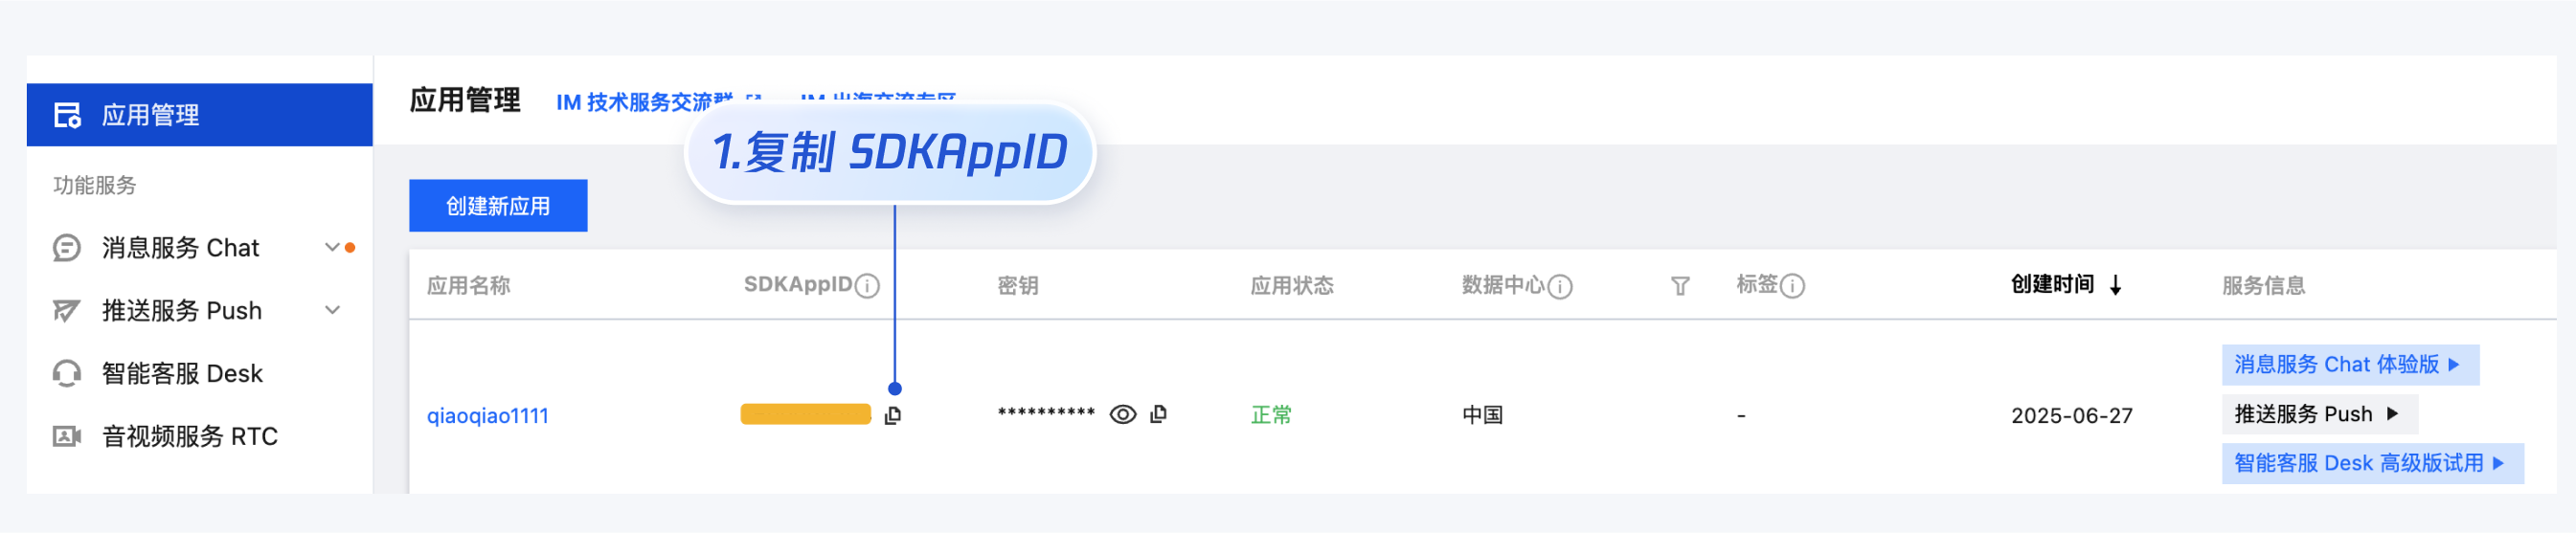
SDKAppID 信息:在 即时通信 IM 控制台 单击应用管理 > 创建新应用,并选择智能客服 Desk, 开通智能客服 后获取。
userID 信息,可本地生成一个随机的字符串,例如 test-1234。
userSig 信息,可单击 即时通信 IM 控制台 > UserSig生成校验,填写创建的 userID,即可生成 userSig。

使用 HBuilderX 启动该项目,单击运行,可选择运行到浏览器,或者手机,或者小程序模拟器。
如果您选择了运行到微信开发者工具,但 HBuilderX 没有自动拉起微信开发者工具,请使用微信开发者工具手动打开编译后的项目,目录地址:unpackage/dist/dev/mp-weixin。
小程序开发环境,请选择 详情 > **本地设置 **中勾选 不校验合法域名、web-view(业务域名)、TLS版本以及 HTTPS 证书。上线前请在微信公众平台 > 开发 > 开发管理 > 开发设置 > 服务器域名中进行域名配置,域名配置详见:小程序合法域名。
UIKit 支持以下界面语言:
| 语言代码(userLang) | 语言 |
| zh_cn | 简体中文 |
| en | 英文 |
| zh_tw | 繁体中文 |
| ja | 日语 |
| id | 印尼语 |
| ms | 马来语 |
| vi | 越南语 |
| th | 泰语 |
| fil | 菲律宾语 |
| ru | 俄语 |
如果您的业务需要出海,且用户语言以英语为主,可在引入智能客服时设置userLang="en"。如果您不指定userLang, UIKit 会使用浏览器或 App 设置的语言。
<template>
  <CustomerServiceChat style="height: 100%;"
    userLang="en"
  />
</template>
如果您需要支持动态切换用户语言,可使用TUICustomerServer.changeLanguage接口,并通过切换 页面/组件 key 的方式,实现语言动态修改与展示。
<template>
  <CustomerServiceChat style="height: 100%;"
    :key="locale"
    :userLang="locale"
  />
</template>
<script>
import TUICustomerServer  from '../ai-desk-customer-uniapp';
import CustomerServiceChat from '../ai-desk-customer-uniapp/components/CustomerServiceChat/index-uniapp.vue';

export default {
  components: {
    CustomerServiceChat,
  },
  data() {
    let locale = 'en';
    return {
      locale
    }
  },
  methods: {
    changeLanguage(language) {
       TUICustomerServer.changeLanguage(language).then(() => {
         this.locale = language;
       });
    }
  }
}
</script>
<style scoped lang="scss">
</style>
如果您希望人工客服在工作台接待用户咨询时,能看到用户的昵称、头像等信息以提升沟通效率,效果如下所示:

请使用initWithProfile接口初始化,传入昵称和头像即可。
TUICustomerServer.initWithProfile({
  SDKAppID,
  userID,
  userSig,
  nickName: '张三 1852010****',
  avatar: 'https://im.sdk.qcloud.com/download/tuikit-resource/avatar/avatar_3.png'
})
如果您想实现输入框上方增加快捷按钮,方便用户使用,例如增加“人工客服”,“发送订单消息”等,可在引入智能客服时设置 toolbarButtonList。效果如下所示:
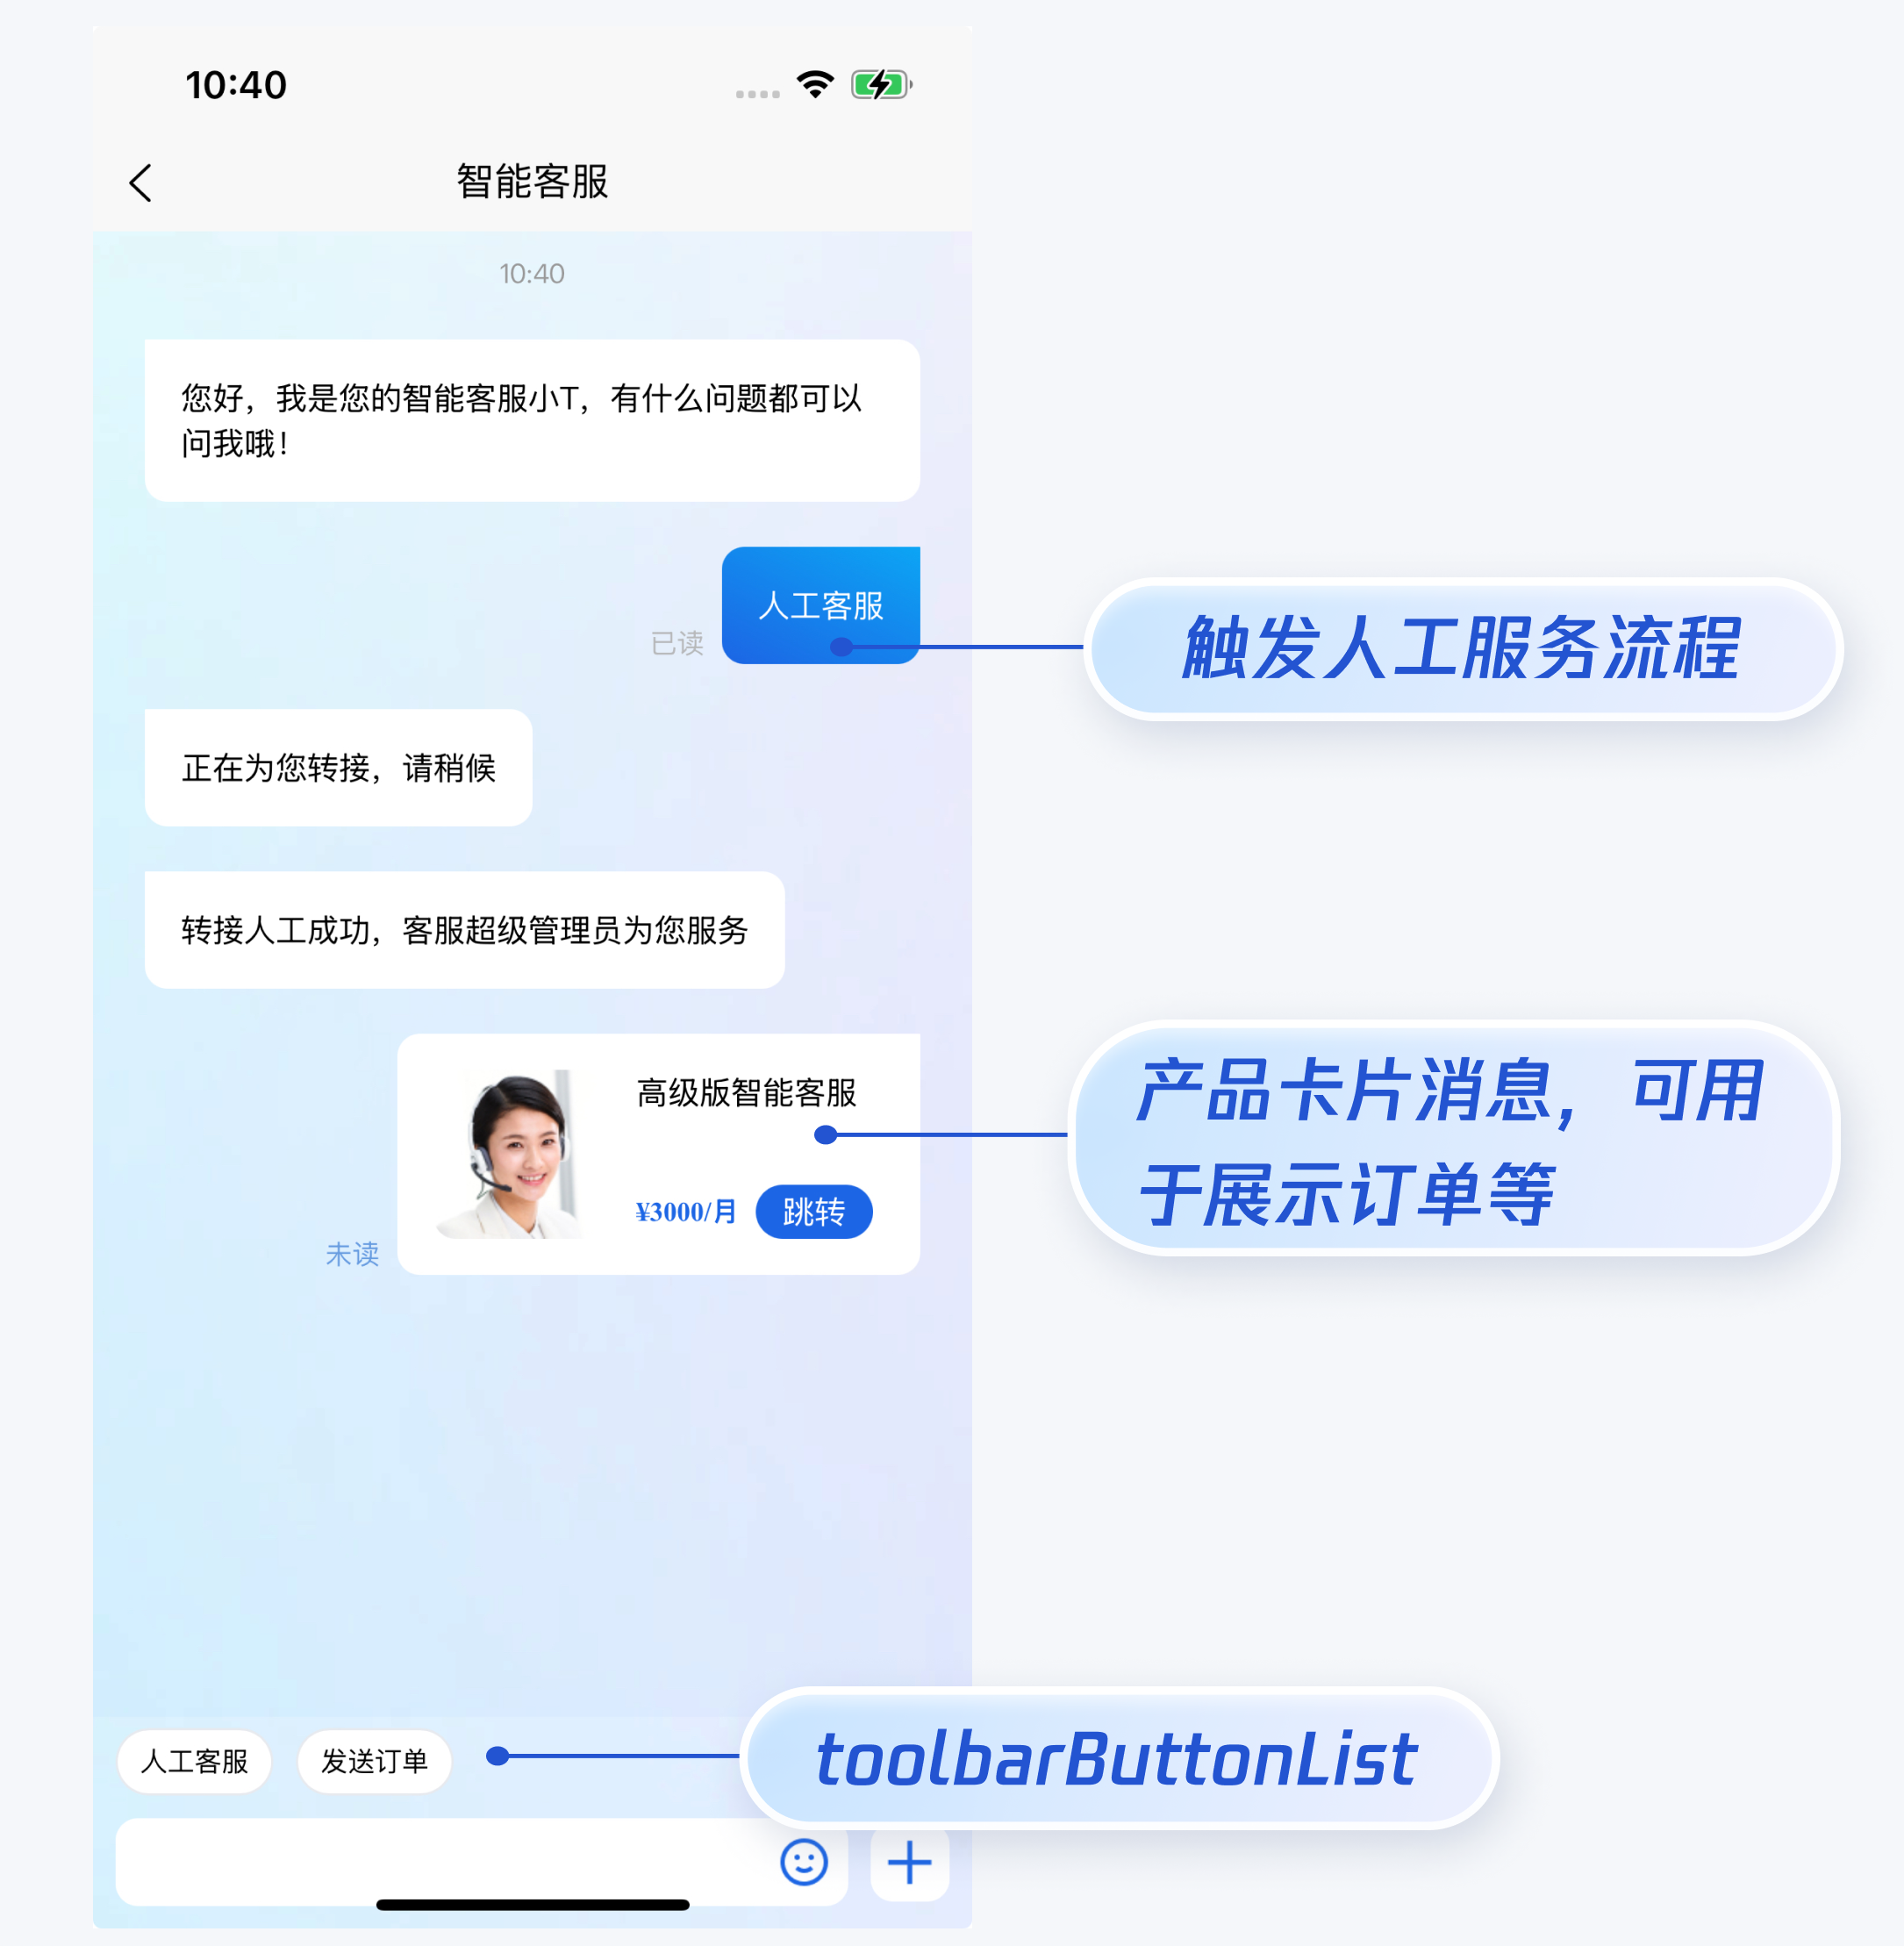
toolbarButtonList 是一个包含了一个或多个配置的数组,配置的描述如下:
| 参数 | 类型 | 是否必填 | 说明 |
| title | String | Yes | button 标题。 |
| icon | String | No | button 图标 url。 |
| isPreset | Number | Yes | - 1:客服组件内置功能。 - 0:非内置功能。 |
| presetId | String | No | 当 isPreset 为 1 时,可选值如下: - humanService:人工服务。 - serviceRating:服务评价。 - endHumanService:结束对话。 |
| isEnabled | Number | Yes | - 1:渲染。 - 0:不渲染。 |
| content | String | No | 当 isPreset 为 0 时,填入文本内容或者 url。 |
| type | Number | Yes | - 1:点击 button 后客服组件发送 content 对应的文本。 - 2:点击 button 后客服组件打开 content 对应的 url(小程序打开 url 可能会受限,请提前参考相关文档解决)。 |
<template>
  <CustomerServiceChat style="height: 100%;"
    :toolbarButtonList="toolbarButtonList"
  />
</template>
<script>
import TUICustomerServer  from '../ai-desk-customer-uniapp';
import CustomerServiceChat from '../ai-desk-customer-uniapp/components/CustomerServiceChat/index-uniapp.vue';

export default {
  components: {
    CustomerServiceChat,
  },
  data() {
    const toolbarButtonList = [
      {"title":"人工服务","icon":"https://tccc-im-agent-avatar-1258344699.cos.ap-nanjing.myqcloud.com/toolbar_button_1.png","type":1,"content":"","isPreset":1,"presetId":"humanService","isEnabled":1},
      {"title":"服务评价","icon":"https://tccc-im-agent-avatar-sg-1258344699.cos.ap-singapore.myqcloud.com/toolbar_button_2.png","type":1,"content":"","isPreset":1,"presetId":"serviceRating","isEnabled":1},
      {"title":"结束对话","icon":"https://tccc-im-agent-avatar-sg-1258344699.cos.ap-singapore.myqcloud.com/toolbar_button_3.png","type":1,"content":"","isPreset":1,"presetId":"endHumanService","isEnabled":1},
      {"type":1,"title":"智能客服","content":"智能客服","isPreset":0,"isEnabled":1}
    ];
    return {
      toolbarButtonList,
    }
  }
}
</script>
<style scoped lang="scss">
</style>
说明:
请升级 ai-desk-customer-uniapp 到 v1.5.2 或更高版本。
如果您想实现打开客服会话时在聊天区域底部展示快捷订单,可以配置 bottomQuickOrder,效果如下所示:
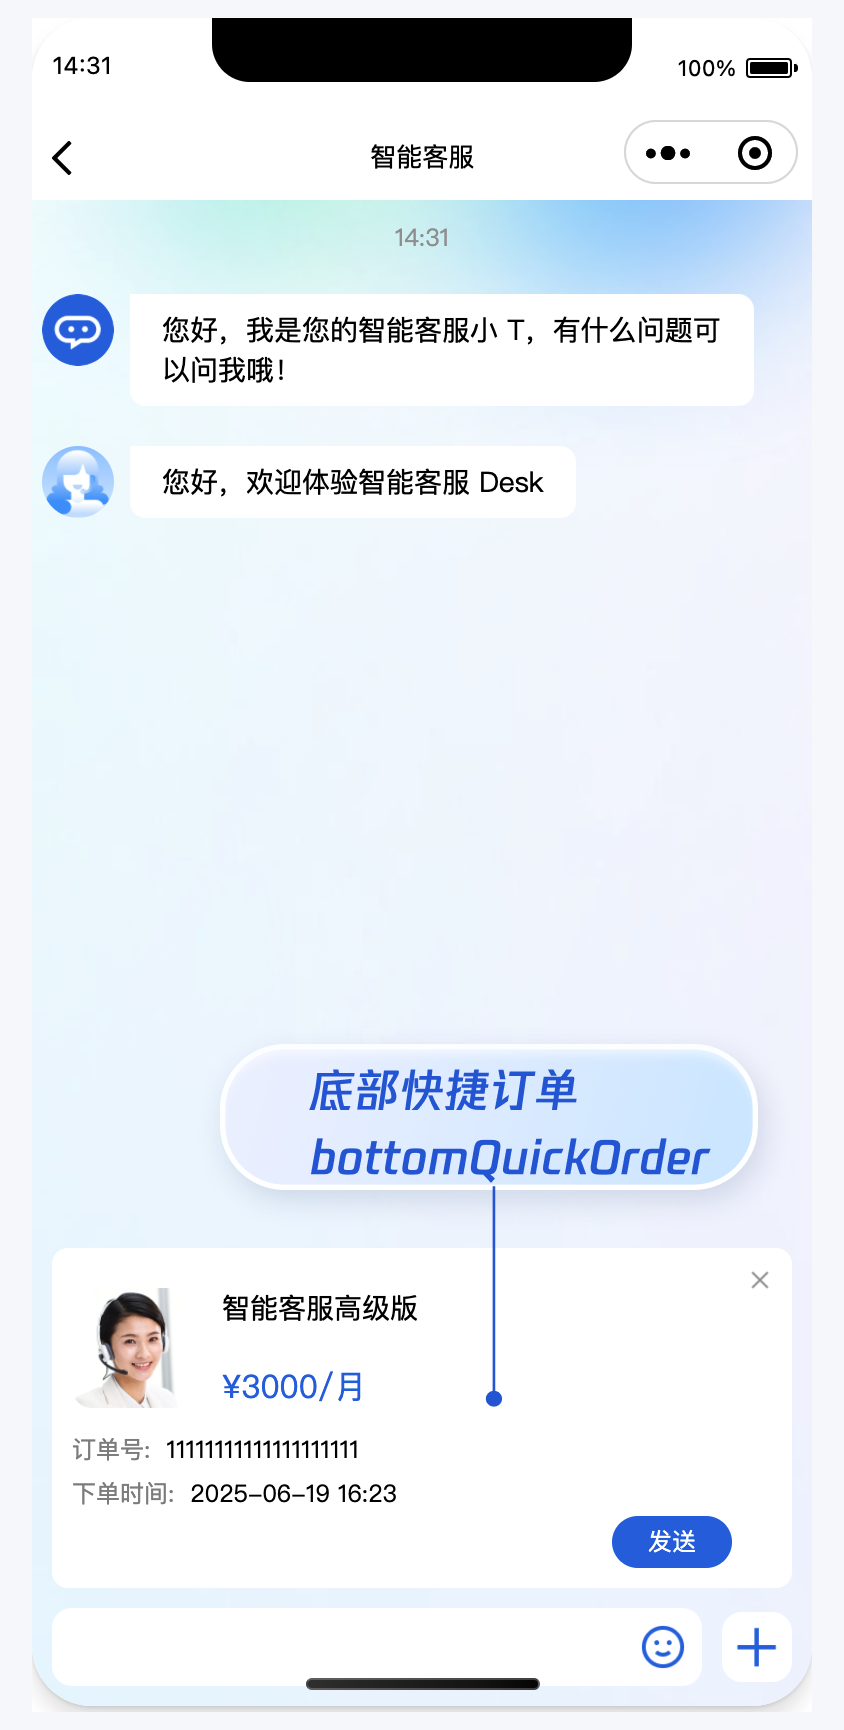
bottomQuickOrder 的参数描述如下:
| 参数 | 类型 | 是否必填 | 说明 |
| header | String | Yes | 订单标题,对应上图的“智能客服高级版”。 |
| desc | String | Yes | 订单描述,对应上图的“3000/月”。 |
| pic | String | No | 订单图片 url。 |
| url | String | Yes | 当客服坐席收到订单消息时,点击可打开此 url 对应的页面。 |
| customField | Array | No | 自定义配置,例如“订单号”,“订单时间”等信息。。 |
<template>
  <CustomerServiceChat style="height: 100%;"
    :bottomQuickOrder="bottomQuickOrder"
  />
</template>
<script>
import TUICustomerServer  from '../ai-desk-customer-uniapp';
import CustomerServiceChat from '../ai-desk-customer-uniapp/components/CustomerServiceChat/index-uniapp.vue';

export default {
  components: {
    CustomerServiceChat,
  },
  data() {
    const bottomQuickOrder = {
      header: "高级版智能客服(包含3个客服许可)",
      desc: "¥3000/月",
      pic: "https://cloudcache.tencent-cloud.com/qcloud/portal/kit/images/presale.a4955999.jpeg",
      url: 'https://cloud.tencent.com/document/product/269/97537',
      customField: [
        {
          name: '订单号',
          value: '11111111111111111111'
        },
        {
          name: '下单时间',
          value: '2025-07-02 16:23'
        }
      ]
    };

    return {
      bottomQuickOrder,
    }
  }
}
</script>
<style scoped lang="scss">
</style>
说明:
请升级 ai-desk-customer-uniapp 到 v1.5.3 或更高版本。
如果您的应用内需要多个客服号,为用户提供专属客服功能,以提高服务质量和响应速度,可用 UIKit 提供的多客服号功能实现。效果如下所示:
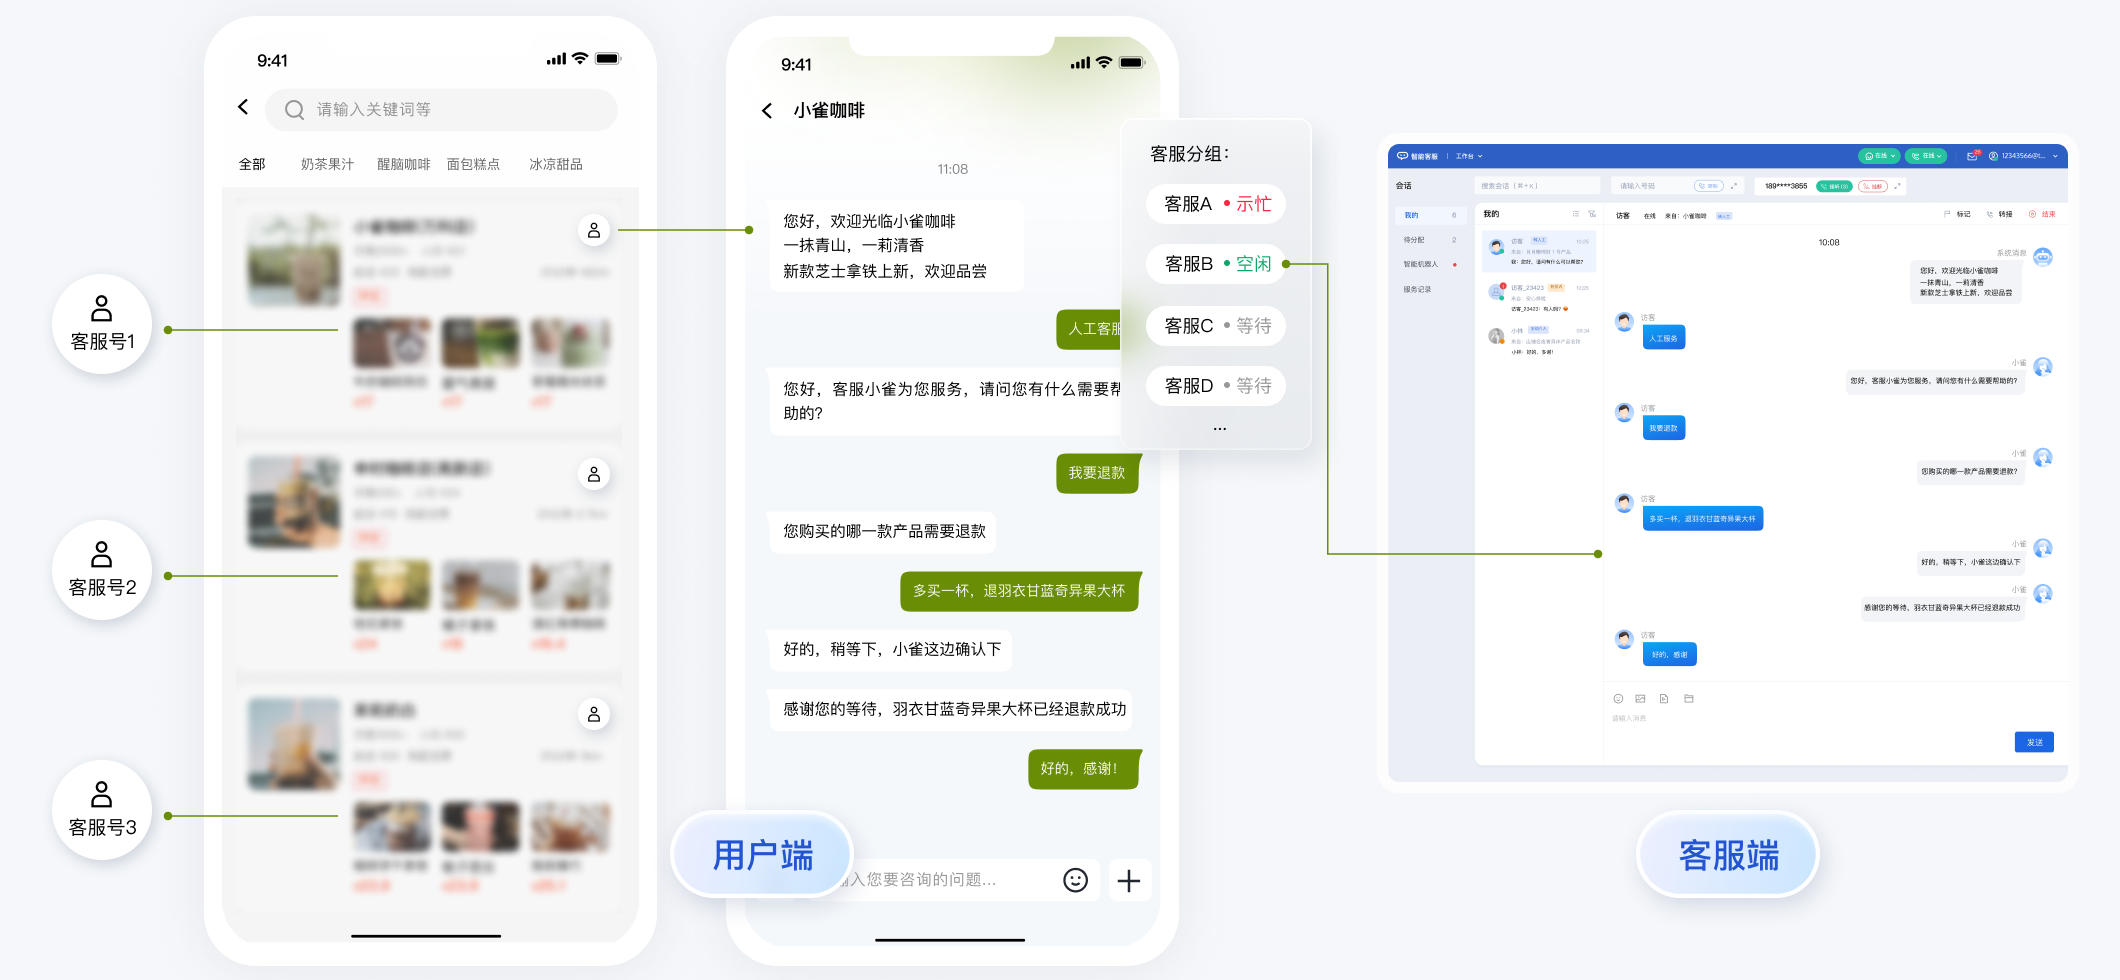
// 1. 初始化前将业务侧自定义的客服号 ID 传递给 UIKit
// 自定义客服号请使用 restapi - https://cloud.tencent.com/document/product/269/111798
TUICustomerServer.setCustomerServiceIDList(['customerServiceID_001', 'customerServiceID_002', 'customerServiceID_003']);
// 2. 初始化时,带上要发起会话的客服号 ID,比如 'customerServiceID_002'
// 如果不带上要发起会话的客服号 ID,则 UIKit 默认使用多客服号列表的第 1 个元素
TUICustomerServer.initWithProfile({
  SDKAppID,
  userID,
  userSig,
  nickName: '张三 1562010****',
  avatar: 'your avatar url',
  customerServiceID: 'customerServiceID_002',
});
说明:
用户端可以通过发送自定义消息的方式实现主动结束会话,适用于以下 3 种情况:
- 用户转人工触发排队,发送此消息可以结束排队。
- 客服接待方式为手动接待,用户转人工分配客服成功后等待客服确认接待,发送此消息可以结束等待。
- 用户转人工且成功接入人工客服,发送此消息可以结束本次会话。
TUICustomerServer.sendCustomMessage({
  to: '@customer_service_account',
  conversationType: 'C2C',
  payload: {
    data: JSON.stringify({
      src: '27',
      customerServicePlugin: 0,
    }),
  },
}, { onlineUserOnly: true });
除了HBuilderX可视化界面,您也可以使用 cli 脚手架,通过 vue-cli 创建 uni-app 项目。这两种方式在集成过程上有所区别,请您参考下面的步骤进行。
【uni-app vue2 默认模板】
vue create -p dcloudio/uni-preset-vue my-project
npm i @tencentcloud/ai-desk-customer-uniapp@latest unplugin-vue2-script-setup
npm i sass sass-loader@10.1.1 ts-loader typescript @vue/cli-plugin-typescript --legacy-peer-deps
【macOS 端】
mkdir -p ./src/pages-ai-desk/ai-desk-customer-uniapp &&
rsync -av --exclude={'node_modules','excluded-list.txt'} ./node_modules/@tencentcloud/ai-desk-customer-uniapp/ ./src/pages-ai-desk/ai-desk-customer-uniapp/
【Windows 端】
xcopy .\node_modules\@tencentcloud\ai-desk-customer-uniapp .\src\pages-ai-desk\ai-desk-customer-uniapp /i /e /exclude:.\node_modules\@tencentcloud\ai-desk-customer-uniapp\excluded-list.txt
const ScriptSetup = require('unplugin-vue2-script-setup/webpack').default;

module.exports = {
  parallel: false,
  configureWebpack: {
    plugins: [
      ScriptSetup({
        /* options */
      }),
    ],
  },
  chainWebpack(config) {
    // disable type check and let `vue-tsc` handles it
    config.plugins.delete('fork-ts-checker');
    config.module.rule('ts').test(/\.ts$/).use('ts-loader').loader('ts-loader').end();
  },
};
{
  "compilerOptions": {
    "target": "esnext",
    "module": "esnext",
    "strict": true,
    "jsx": "preserve",
    "importHelpers": true,
    "moduleResolution": "node",
    "esModuleInterop": true,
    "allowSyntheticDefaultImports": true,
    "experimentalDecorators":true,
    "sourceMap": true,
    "skipLibCheck": true,
    "baseUrl": ".",
    "types": [
      "webpack-env",
      "@dcloudio/types"
    ],
    "paths": {
      "@/*": [
        "./src/*"
      ]
    },
    "lib": [
      "esnext",
      "dom",
      "dom.iterable",
      "scripthost"
    ]
  },
  "exclude": [
    "node_modules",
    "unpackage",
    "dist",
    "src/**/*.nvue",
    "src/pages-ai-desk/ai-desk-customer-uniapp"
  ]
}
【uni-app vue2 TypeScript 模板】 8. 创建 vue2 项目,使用默认模板(TypeScript)。
vue create -p dcloudio/uni-preset-vue my-project
npm i @tencentcloud/ai-desk-customer-uniapp@latest unplugin-vue2-script-setup
npm i sass sass-loader@10.1.1 --legacy-peer-deps
【macOS 端】
mkdir -p ./src/pages-ai-desk/ai-desk-customer-uniapp &&
rsync -av --exclude={'node_modules','excluded-list.txt'} ./node_modules/@tencentcloud/ai-desk-customer-uniapp/ ./src/pages-ai-desk/ai-desk-customer-uniapp/
【Windows 端】
xcopy .\node_modules\@tencentcloud\ai-desk-customer-uniapp .\src\pages-ai-desk\ai-desk-customer-uniapp /i /e /exclude:.\node_modules\@tencentcloud\ai-desk-customer-uniapp\excluded-list.txt
const ScriptSetup = require('unplugin-vue2-script-setup/webpack').default;

module.exports = {
  parallel: false,
  configureWebpack: {
    plugins: [
      ScriptSetup({
        /* options */
      }),
    ],
  },
  chainWebpack(config) {
    // disable type check and let `vue-tsc` handles it
    config.plugins.delete('fork-ts-checker');
  },
};
"exclude": [
    ...
    "src/pages-ai-desk/ai-desk-customer-uniapp"
]
【uni-app vue3】 15. 创建 vue3 项目,用 javascript 开发。
npx degit dcloudio/uni-preset-vue#vite my-project
或创建 vue3 项目,用 typescript 开发。
npx degit dcloudio/uni-preset-vue#vite-ts my-project
npm i @tencentcloud/ai-desk-customer-uniapp@latest
npm i sass sass-loader@10.1.1 --legacy-peer-deps
【macOS 端】
mkdir -p ./src/pages-ai-desk/ai-desk-customer-uniapp &&
rsync -av --exclude={'node_modules','excluded-list.txt'} ./node_modules/@tencentcloud/ai-desk-customer-uniapp/ ./src/pages-ai-desk/ai-desk-customer-uniapp/
【Windows 端】
xcopy .\node_modules\@tencentcloud\ai-desk-customer-uniapp .\src\pages-ai-desk\ai-desk-customer-uniapp /i /e /exclude:.\node_modules\@tencentcloud\ai-desk-customer-uniapp\excluded-list.txt
说明:
UIKit 中默认没有集成 TencentCloud-TIMPush 推送插件。TencentCloud-TIMPush 是腾讯云即时通信 IM Push 插件。目前推送支持小米、华为、荣耀、OPPO、vivo、魅族、APNs、一加、realme、iQOO 和 苹果等厂商通道。
如果您需要在 App 中集成离线推送能力,请参见 uni-app 推送 实现。

UserSig 是用户登录即时通信 IM 的密码,其本质是对 UserID 等信息加密后得到的密文。
UserSig 签发方式是将 UserSig 的计算代码集成到您的服务端,并提供面向项目的接口,在需要 UserSig 时由您的项目向业务服务器发起请求获取动态 UserSig。更多详情请参见 服务端生成 UserSig。
如果您打包 App / H5,需要在 pages.json 中配置 tabBar。请参考 uni-app 官网 tabBar 配置 自实现。
如果您打包小程序,因为主包体积限制,小程序默认是分包集成,如果您的 tabBar 需要自定义实现。请参考 uni-app 官网 自定义 tabBar。
请在 微信公众平台 > 开发 > 开发管理 > 开发设置 > 服务器域名 中进行域名配置。域名配置详见:小程序合法域名。
点此进入 IM 社群,享有专业工程师的支持,解决您的难题。
FAQs
uni-app Vue2/Vue3 UIKit for AI Desk
We found that @tencentcloud/ai-desk-customer-uniapp demonstrated a healthy version release cadence and project activity because the last version was released less than a year ago. It has 17 open source maintainers collaborating on the project.
Did you know?

Socket for GitHub automatically highlights issues in each pull request and monitors the health of all your open source dependencies. Discover the contents of your packages and block harmful activity before you install or update your dependencies.
Security News
Recent coverage mislabels the latest TEA protocol spam as a worm. Here’s what’s actually happening.
Security News
PyPI adds Trusted Publishing support for GitLab Self-Managed as adoption reaches 25% of uploads

Research
/Security News
A malicious Chrome extension posing as an Ethereum wallet steals seed phrases by encoding them into Sui transactions, enabling full wallet takeover.