Security News
Crates.io Users Targeted by Phishing Emails
The Rust Security Response WG is warning of phishing emails from rustfoundation.dev targeting crates.io users.
aesirx-consent
Advanced tools
Follow the instructions in: https://github.com/aesirxio/analytics-1stparty
consent.js to your project<head>:<script>
window.aesirx1stparty = "https://example.com"
window.aesirxClientID="[REPLACE THIS WITH THE PROVIDED CLIENT_ID]"
window.aesirxClientSecret="[REPLACE THIS WITH THE PROVIDED CLIENT_SECRET]"
</script>
<script async defer src="YOUR_PROJECT_PATH/consent.js"></script>
https://example.com is the link to your 1st party server which must be installed)CLIENT_ID replace this with the provided CLIENT_ID from https://dapp.shield.aesirx.io/CLIENT_SECRET replace this with the provided CLIENT_SECRET fromhttps://dapp.shield.aesirx.io/<script>
window.disableAnalyticsConsent = "true"
</script>
npm i aesirx-consent
.env)REACT_APP_ENDPOINT_ANALYTICS_URL=https://example.com
REACT_APP_SSO_CLIENT_ID=[REPLACE THIS WITH THE PROVIDED CLIENT_ID]
REACT_APP_SSO_CLIENT_SECRET=[REPLACE THIS WITH THE PROVIDED CLIENT_SECRET]
(https://example.com is the link to your 1st party server)
`CLIENT_ID` replace this with the provided `CLIENT_ID` from https://dapp.shield.aesirx.io/
`CLIENT_SECRET` replace this with the provided `CLIENT_SECRET` fromhttps://dapp.shield.aesirx.io/
add this environment variable to .env
REACT_APP_DISABLE_ANALYTICS_CONSENT=true
Create ConsentContainer component:
import React from 'react';
import { ConsentReact } from 'aesirx-consent';
const ConsentContainer = ({children}) => {
  return <ConsentReact>{children}</ConsentReact>;
};

export default ConsentContainer;
<ConsentContainer><[YOUR-COMPONENT]/></ConsentContainer><ConsentContainer> need to using inside <Router> componentnpm i aesirx-consent
.env)NEXT_PUBLIC_ENDPOINT_ANALYTICS_URL=https://example.com
NEXT_PUBLIC_SSO_CLIENT_ID=[REPLACE THIS WITH THE PROVIDED CLIENT_ID]
NEXT_PUBLIC_SSO_CLIENT_SECRET=[REPLACE THIS WITH THE PROVIDED CLIENT_SECRET]
(https://example.com is the link to your 1st party server)
`CLIENT_ID` replace this with the provided `CLIENT_ID` from https://dapp.shield.aesirx.io/
`CLIENT_SECRET` replace this with the provided `CLIENT_SECRET` fromhttps://dapp.shield.aesirx.io/
add this environment variable to .env
NEXT_PUBLIC_DISABLE_ANALYTICS_CONSENT=true
Added in app.js:
import { ConsentNext } from "aesirx-consent";

<ConsentNext>
  <[YOUR-COMPONENT]/>
</ConsentNext>
Please follow below CSS example:
  // Customize toast
  .aesirxconsent .toast {
    --aesirxconsent-toast-font-size: 16px;
    --aesirxconsent-toast-padding-x: 0.75rem;
    --aesirxconsent-toast-padding-y: 0.5rem;
    --aesirxconsent-toast-spacing: 1.5rem;
    --aesirxconsent-toast-zindex: 1049;
  }
  // Customize button
  .aesirxconsent .btn {
    --aesirxconsent-btn-font-size: 16px;
    --aesirxconsent-btn-padding-x: 0.75rem;
    --aesirxconsent-btn-padding-y: 0.375rem;
    --aesirxconsent-btn-font-weight: 400;
    --aesirxconsent-btn-line-height: 1.5;
  }
  // Customize button success
  .aesirxconsent .btn-success {
    --aesirxconsent-btn-color: #000;
    --aesirxconsent-btn-bg: #1ab394;
    --aesirxconsent-btn-border-color: #1ab394;
    --aesirxconsent-btn-hover-color: #000;
    --aesirxconsent-btn-hover-bg: #3cbea4;
    --aesirxconsent-btn-hover-border-color: #31bb9f;
    --aesirxconsent-btn-focus-shadow-rgb: 22, 152, 126;
    --aesirxconsent-btn-active-color: #000;
    --aesirxconsent-btn-active-bg: #48c2a9;
    --aesirxconsent-btn-active-border-color: #31bb9f;
    --aesirxconsent-btn-active-shadow: inset 0 3px 5px rgba(0, 0, 0, 0.125);
    --aesirxconsent-btn-disabled-color: #000;
    --aesirxconsent-btn-disabled-bg: #1ab394;
    --aesirxconsent-btn-disabled-border-color: #1ab394;
  }
  // To customize CSS for dark mode (Bootstrap dark mode)
  [data-bs-theme=dark] .aesirxconsent {
    color: #fff;
  }
There is 5 template for Consent modal
<script>
  window.consentLayout = "default"
</script>
add this environment variable to .env
REACT_APP_CONSENT_LAYOUT=default
add this environment variable to .env
NEXT_PUBLIC_CONSENT_LAYOUT=default
<script>
   window.optInConsentData = `[
      {
        "title":"payment",
        "content":"<div>YOUR_CONTENT_INPUT_HERE</div>"
      }
    ]`;

    //trigger open optIn consent with Javascript
    document.querySelector('.opt-in-consent.payment').classList.add('show');
</script>
(We also provive option replaceAnalyticsConsent to replace Analytics Consent with Opt-in Consent)
<script>
   window.optInConsentData = `[
      {
        "title":"payment",
        "content":"<div>YOUR_CONTENT_INPUT_HERE</div>",
        "replaceAnalyticsConsent": "true"
      }
    ]`
</script>
const OptInConsent = React.lazy(
  () => import('./OptInConsent').then(module => ({ default: module.OptInConsent }))
);
const ConsentComponent = () => {
  const [showModal, setShowModal] = useState(false);
  const handleOpen = () => {
    setShowModal(true);
  };
   const handleConsent = () => {
    setShowModal(false);
  };
  const handleReject = () => {
    setShowModal(false);
  };
  return (
    <>
      <OptInConsent
        optInConsentData={[
          {
            title: 'payment',
            content: `<div>YOUR_CONTENT_INPUT_HERE</div>`,
            show: showModal,
            handleConsent: handleConsent,
            handleReject: handleReject
          },
        ]}
      />
    </>
  );
};
(We also provive option replaceAnalyticsConsent to replace Analytics Consent with Opt-in Consent)
To use this in ReactJS please add isOptInReplaceAnalytics to our provider first
<ConsentReact location={location} history={history} isOptInReplaceAnalytics={true}>
  {children}
</ConsentReact>
<OptInConsent
  optInConsentData={[
    {
      title: 'payment',
      content: `<div>YOUR_CONTENT_INPUT_HERE</div>`,
      show: showModal,
      handleConsent: handleConsent,
      handleReject: handleReject,
      replaceAnalyticsConsent: "true"
    },
  ]}
/>
import dynamic from "next/dynamic";
const OptInConsent = dynamic(
  () => import("aesirx-analytics").then((module) => module.OptInConsent),
  {
    loading: () => <div>Loading...</div>,
    ssr: false,
  }
);

const ConsentComponent = () => {
  const [showModal, setShowModal] = useState(false);
  const handleOpen = () => {
    setShowModal(true);
  };
  const handleConsent = () => {
    setShowModal(false);
  };
  const handleReject = () => {
    setShowModal(false);
  };
  return (
    <>
      <OptInConsent
        optInConsentData={[
          {
            title: 'payment',
            content: `<div>YOUR_CONTENT_INPUT_HERE</div>`,
            show: showModal,
            handleConsent: handleConsent,
            handleReject: handleReject
          },
        ]}
      />
    </>
  );
};
(We also provive option replaceAnalyticsConsent to replace Analytics Consent with Opt-in Consent)
To use this in NextJS please add isOptInReplaceAnalytics to our provider first
<ConsentNext router={useRouter()} isOptInReplaceAnalytics={true}>
  <[YOUR-COMPONENT]/>
</ConsentNext>
<OptInConsent
  optInConsentData={[
    {
      title: 'payment',
      content: `<div>YOUR_CONTENT_INPUT_HERE</div>`,
      show: showModal,
      handleConsent: handleConsent,
      handleReject: handleReject,
      replaceAnalyticsConsent: "true"
    },
  ]}
/>
FAQs
## Setup instructions
We found that aesirx-consent demonstrated a healthy version release cadence and project activity because the last version was released less than a year ago. It has 1 open source maintainer collaborating on the project.
Did you know?

Socket for GitHub automatically highlights issues in each pull request and monitors the health of all your open source dependencies. Discover the contents of your packages and block harmful activity before you install or update your dependencies.

Security News
The Rust Security Response WG is warning of phishing emails from rustfoundation.dev targeting crates.io users.

Product
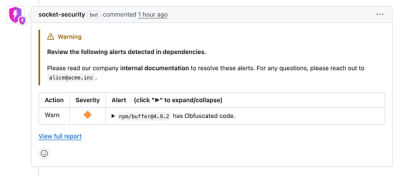
Socket now lets you customize pull request alert headers, helping security teams share clear guidance right in PRs to speed reviews and reduce back-and-forth.

Product
Socket's Rust support is moving to Beta: all users can scan Cargo projects and generate SBOMs, including Cargo.toml-only crates, with Rust-aware supply chain checks.