Product
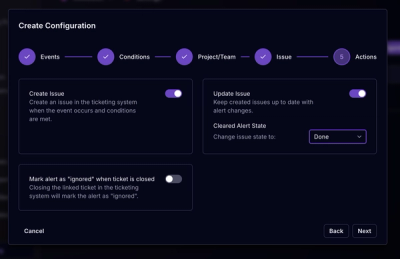
Socket for Jira Is Now Available
Socket for Jira lets teams turn alerts into Jira tickets with manual creation, automated ticketing rules, and two-way sync.
By Jeppe Hasseriis - Apr 20, 2026
apify-cli
Advanced tools
Apify command-line interface (CLI) helps you manage the Apify cloud platform and develop, build, and deploy Apify Actors.
![]()
![]()
Apify command-line interface (Apify CLI) helps you create, develop, build and run Apify Actors, and manage the Apify cloud platform from any computer.
Apify Actors are cloud programs that can perform arbitrary web scraping, automation or data processing job. They accept input, perform their job and generate output. While you can develop Actors in an online IDE directly in the Apify web application, for complex projects it is more convenient to develop Actors locally on your computer using Apify SDK and only push the Actors to the Apify cloud during deployment. This is where the Apify CLI comes in.
Note that Actors running on the Apify platform are executed in Docker containers, so with an appropriate Dockerfile
you can build your Actors in any programming language.
However, we recommend using JavaScript / Node.js, for which we provide most libraries and support.
curl -fsSL https://apify.com/install-cli.sh | bash
irm https://apify.com/install-cli.ps1 | iex
On macOS (or Linux), you can install the Apify CLI via the Homebrew package manager.
brew install apify-cli
First, make sure you have Node.js version 22 or higher with NPM installed on your computer:
node --version
npm --version
Install or upgrade Apify CLI by running:
npm install -g apify-cli
Alternatively, you can use fnm (Fast Node Manager) and install Apify CLI only into a selected user-level Node version without requiring root privileges:
fnm install 22
fnm use 22
npm install -g apify-cli
Finally, verify that Apify CLI was installed correctly by running:
apify --version
You can also skip the manual global installation altogether and use
npx apify-cliwith all the following commands instead.
The following examples demonstrate the basic usage of Apify CLI.
apify create my-hello-world
First, you will be prompted to select a template with the boilerplate for the Actor, to help you get started quickly.
The command will create a directory called my-hello-world that contains a Node.js project
for the Actor and a few configuration files.
If you decided to skip the installation and go with
npx, the command will benpx apify-cli create my-hello-world.
cd ./my/awesome/project
apify init
This command will only set up local Actor development environment in an existing directory,
i.e. it will create the .actor/actor.json file and apify_storage directory.
Before you can run your project locally using apify run, you have to set up the right start command in package.json under scripts.start. For example:
{
    ...
    "scripts": {
        "start": "node your_main_file.js",
    },
    ...
}
You can find more information about by running apify help run.
If you want to run a Scrapy project on Apify platform, follow the Scrapy integration guide.
cd my-hello-world
apify run
This command runs the Actor on your local machine. Now's your chance to develop the logic - or magic :smirk:
apify login
Before you can interact with the Apify cloud, you need to create an Apify account
and log in to it using the above command. You will be prompted for
your Apify API token.
Note that the command will store the API token and other sensitive information to ~/.apify.
apify push
This command uploads your project to the Apify cloud and builds an Actor from it. On the platform, Actor needs to be built before it can be run.
apify call
Runs the Actor corresponding to the current directory on the Apify platform.
This command can also be used to run other Actors, for example:
apify call apify/hello-world
This file associates your local development project with an Actor on the Apify platform. It contains information such as Actor name, version, build tag and environment variables. Make sure you commit this file to the Git repository.
For example, .actor/actor.json file can look as follows:
{
  "actorSpecification": 1,
  "name": "name-of-my-scraper",
  "version": "0.0",
  "buildTag": "latest",
  "environmentVariables": {
    "MYSQL_USER": "my_username",
    "MYSQL_PASSWORD": "@mySecretPassword"
  },
  "dockerfile": "./Dockerfile",
  "readme": "./ACTOR.md",
  "input": "./input_schema.json",
  "storages": {
    "dataset": "./dataset_schema.json"
  }
}
Dockerfile field
If you specify the path to your Docker file under the dockerfile field, this file will be used for Actor builds on the platform. If not specified, the system will look for Docker files at .actor/Dockerfile and Dockerfile in this order of preference.
Readme field
If you specify the path to your readme file under the readme field, the readme at this path will be used on the platform. If not specified, readme at .actor/README.md and README.md will be used in this order of preference.
Input field
You can embed your input schema object directly in actor.json under input field. Alternatively, you can provide a path to a custom input schema. If not provided, the input schema at .actor/INPUT_SCHEMA.json and INPUT_SCHEMA.json is used in this order of preference.
Storages.dataset field
You can define the schema of the items in your dataset under the storages.dataset field. This can be either an embedded object or a path to a JSON schema file. You can read more about the schema of your Actor output here.
Note on migration from deprecated config "apify.json"
Note that previously, Actor config was stored in the apify.json file that has been deprecated. You can find the (very slight) differences and migration info in migration guidelines.
There are two options how you can set up environment variables for Actors.
All keys from env will be set as environment variables into Apify platform after you push Actor to Apify. Current values on Apify will be overridden.
{
  "actorSpecification": 1,
  "name": "dataset-to-mysql",
  "version": "0.1",
  "buildTag": "latest",
  "environmentVariables": {
    "MYSQL_USER": "my_username",
    "MYSQL_PASSWORD": "@mySecretPassword"
  }
}
In Apify Console select your Actor, you can set up variables into Source tab.
After setting up variables in the app, remove the environmentVariables from .actor/actor.json. Otherwise, variables from .actor/actor.json will override variables in the app.
{
  "actorSpecification": 1,
  "name": "dataset-to-mysql",
  "version": "0.1",
  "buildTag": "latest"
}
CLI provides commands to manage secrets environment variables. Secrets are stored to the ~/.apify directory.
You can add a new secret using the command:
apify secrets:add mySecretPassword pwd1234
After adding a new secret you can use the secret in .actor/actor.json.
{
    "actorSpecification": 1,
    "name": "dataset-to-mysql",
    ...
    "environmentVariables": {
      "MYSQL_PASSWORD": "@mySecretPassword"
    },
    ...
}
To see all CLI commands simply run:
apify help
To get information about a specific command run:
apify help COMMAND
Still haven't found what you were looking for? Please go to Apify Help center or contact us.
See a list of all our commands on the reference page
FAQs
Apify command-line interface (CLI) helps you manage the Apify cloud platform and develop, build, and deploy Apify Actors.
The npm package apify-cli receives a total of 6,894 weekly downloads. As such, apify-cli popularity was classified as popular.
We found that apify-cli demonstrated a healthy version release cadence and project activity because the last version was released less than a year ago. It has 11 open source maintainers collaborating on the project.
Did you know?

Socket for GitHub automatically highlights issues in each pull request and monitors the health of all your open source dependencies. Discover the contents of your packages and block harmful activity before you install or update your dependencies.
Product
Socket for Jira lets teams turn alerts into Jira tickets with manual creation, automated ticketing rules, and two-way sync.

Company News
Socket won two 2026 Reppy Awards from RepVue, ranking in the top 5% of all sales orgs. AE Alexandra Lister shares what it's like to grow a sales career here.

Security News
NIST will stop enriching most CVEs under a new risk-based model, narrowing the NVD's scope as vulnerability submissions continue to surge.