Product
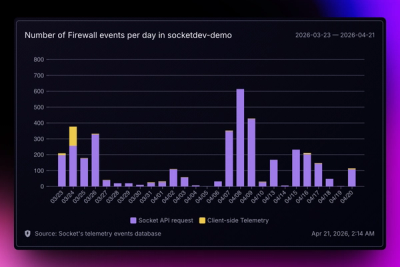
Introducing Reports: An Extensible Reporting Framework for Socket Data
Explore exportable charts for vulnerabilities, dependencies, and usage with Reports, Socket’s new extensible reporting framework.
By André Staltz - Apr 21, 2026
benchify-mcp
Advanced tools
It is generated with Stainless.
You can run the MCP Server directly via npx:
export BENCHIFY_API_KEY="My API Key"
npx -y benchify-mcp@latest
There is a partial list of existing clients at modelcontextprotocol.io. If you already have a client, consult their documentation to install the MCP server.
For clients with a configuration JSON, it might look something like this:
{
  "mcpServers": {
    "benchify_api": {
      "command": "npx",
      "args": ["-y", "benchify-mcp", "--client=claude", "--tools=all"],
      "env": {
        "BENCHIFY_API_KEY": "My API Key"
      }
    }
  }
}
If you use Cursor, you can install the MCP server by using the button below. You will need to set your environment variables
in Cursor's mcp.json, which can be found in Cursor Settings > Tools & MCP > New MCP Server.

If you use MCP, you can install the MCP server by clicking the link below. You will need to set your environment variables
in VS Code's mcp.json, which can be found via Command Palette > MCP: Open User Configuration.
If you use Claude Code, you can install the MCP server by running the command below in your terminal. You will need to set your
environment variables in Claude Code's .claude.json, which can be found in your home directory.
claude mcp add --transport stdio benchify_api --env BENCHIFY_API_KEY="Your BENCHIFY_API_KEY here." -- npx -y benchify-mcp
There are three ways to expose endpoints as tools in the MCP server:
You can run the package on the command line to discover and filter the set of tools that are exposed by the MCP Server. This can be helpful for large APIs where including all endpoints at once is too much for your AI's context window.
You can filter by multiple aspects:
--tool includes a specific tool by name--resource includes all tools under a specific resource, and can have wildcards, e.g. my.resource*--operation includes just read (get/list) or just write operationsIf you specify --tools=dynamic to the MCP server, instead of exposing one tool per endpoint in the API, it will
expose the following tools:
list_api_endpoints - Discovers available endpoints, with optional filtering by search queryget_api_endpoint_schema - Gets detailed schema information for a specific endpointinvoke_api_endpoint - Executes any endpoint with the appropriate parametersThis allows you to have the full set of API endpoints available to your MCP Client, while not requiring that all of their schemas be loaded into context at once. Instead, the LLM will automatically use these tools together to search for, look up, and invoke endpoints dynamically. However, due to the indirect nature of the schemas, it can struggle to provide the correct properties a bit more than when tools are imported explicitly. Therefore, you can opt-in to explicit tools, the dynamic tools, or both.
See more information with --help.
All of these command-line options can be repeated, combined together, and have corresponding exclusion versions (e.g. --no-tool).
Use --list to see the list of available tools, or see below.
If you specify --tools=code to the MCP server, it will expose just two tools:
search_docs - Searches the API documentation and returns a list of markdown resultsexecute - Runs code against the TypeScript clientThis allows the LLM to implement more complex logic by chaining together many API calls without loading intermediary results into its context window.
The code execution itself happens in a Deno sandbox that has network access only to the base URL for the API.
Different clients have varying abilities to handle arbitrary tools and schemas.
You can specify the client you are using with the --client argument, and the MCP server will automatically
serve tools and schemas that are more compatible with that client.
--client=<type>: Set all capabilities based on a known MCP client
openai-agents, claude, claude-code, cursor--client=cursorAdditionally, if you have a client not on the above list, or the client has gotten better over time, you can manually enable or disable certain capabilities:
--capability=<name>: Specify individual client capabilities
top-level-unions: Enable support for top-level unions in tool schemasvalid-json: Enable JSON string parsing for argumentsrefs: Enable support for $ref pointers in schemasunions: Enable support for union types (anyOf) in schemasformats: Enable support for format validations in schemas (e.g. date-time, email)tool-name-length=N: Set maximum tool name length to N characters--capability=top-level-unions --capability=tool-name-length=40--capability=top-level-unions,tool-name-length=40--resource=cards --operation=read
--resource=cards --no-tool=create_cards
--client=cursor --capability=tool-name-length=40
--resource=cards,accounts --operation=read --tag=kyc --no-tool=create_cards
Launching the client with --transport=http launches the server as a remote server using Streamable HTTP transport. The --port setting can choose the port it will run on, and the --socket setting allows it to run on a Unix socket.
Authorization can be provided via the Authorization header using the Bearer scheme.
Additionally, authorization can be provided via the following headers:
| Header | Equivalent client option | Security scheme |
|---|---|---|
x-benchify-api-key | apiKey | bearerAuth |
A configuration JSON for this server might look like this, assuming the server is hosted at http://localhost:3000:
{
  "mcpServers": {
    "benchify_api": {
      "url": "http://localhost:3000",
      "headers": {
        "Authorization": "Bearer <auth value>"
      }
    }
  }
}
The command-line arguments for filtering tools and specifying clients can also be used as query parameters in the URL. For example, to exclude specific tools while including others, use the URL:
http://localhost:3000?resource=cards&resource=accounts&no_tool=create_cards
Or, to configure for the Cursor client, with a custom max tool name length, use the URL:
http://localhost:3000?client=cursor&capability=tool-name-length%3D40
// Import the server, generated endpoints, or the init function
import { server, endpoints, init } from "benchify-mcp/server";

// import a specific tool
import runFixer from "benchify-mcp/tools/fixer/run-fixer";

// initialize the server and all endpoints
init({ server, endpoints });

// manually start server
const transport = new StdioServerTransport();
await server.connect(transport);

// or initialize your own server with specific tools
const myServer = new McpServer(...);

// define your own endpoint
const myCustomEndpoint = {
  tool: {
    name: 'my_custom_tool',
    description: 'My custom tool',
    inputSchema: zodToJsonSchema(z.object({ a_property: z.string() })),
  },
  handler: async (client: client, args: any) => {
    return { myResponse: 'Hello world!' };
  })
};

// initialize the server with your custom endpoints
init({ server: myServer, endpoints: [runFixer, myCustomEndpoint] });
The following tools are available in this MCP server.
fixer:run_fixer (write): Handle fixer requests - supports two formats: 1) JSON with inline file contents in files array, 2) multipart/form-data with tar.zst bundle and manifest (same as Sandbox API). Use multipart for better performance with large projects.stacks:create_stacks (write): Create a new stack environment using manifest + bundle format. Upload a JSON manifest with file metadata and a tar.zst bundle containing your project files. For multi-service stacks, automatically detects and orchestrates multiple services.retrieve_stacks (read): Retrieve current status and information about a stack and its servicesupdate_stacks (write): Update stack files using manifest + bundle format and/or individual operations. For multi-service stacks, changes are routed to appropriate services.bundle_multipart_stacks (write): Accepts multipart/form-data containing a JSON string manifest (must include entrypoint) and a tarball file, forwards to /sandbox/bundle-multipart, and returns base64 bundle (path + content).create_and_run_stacks (write): Create a simple container sandbox with a custom image and commanddestroy_stacks (write): Permanently destroy a stack and all its services, cleaning up resourcesexecute_command_stacks (write): Run a command in the sandbox container and get the outputget_logs_stacks (read): Retrieve logs from all services in the stackget_network_info_stacks (read): Retrieve network details for a stack including URLs and connection inforead_file_stacks (read): Reads file content from inside the sandbox (using exec under the hood)reset_stacks (write): Clears /workspace and extracts a new tarball into the sandbox. Use tarball_base64 and optional tarball_filename.wait_for_dev_server_url_stacks (read): Poll stack logs until a dev server URL is detected or timeoutwrite_file_stacks (write): Writes file content to a path inside the sandbox (via mount or exec under the hood)stacks.bundle:create_files_stacks_bundle (write): Accepts a JSON array of {path, content}, packs into a tar.zst, and forwards to the Sandbox Manager /sandbox/bundle endpoint.fix_string_literals:create_fix_string_literals (write): Fix string literal issues in TypeScript files.validate_template:validate_validate_template (write): Validate a template configurationfix_parsing_and_diagnose:detect_issues_fix_parsing_and_diagnose (write): Fast detection endpoint for quick diagnostic results. Phase 1 of the 3-phase architecture. Returns issues quickly (within 1-3 seconds) and provides metadata about available fixes and time estimates. Does not apply any fixes, only analyzes code.fix:create_ai_fallback_fix (write): AI-powered fallback for complex issues. Phase 3 of the 3-phase architecture. Handles issues that standard fixers cannot resolve. Uses LLM to understand and fix complex problems. Provides confidence scores and alternative suggestions.fix.standard:create_fix_standard (write): Standard fixes endpoint - applies non-parsing fixes. Phase 2 of the 3-phase architecture. Takes the output from Phase 1 (detection) and applies CSS, UI, dependency, and type fixes. The output can be used as input to Phase 3 (AI fallback).FAQs
The official MCP Server for the Benchify API
The npm package benchify-mcp receives a total of 14 weekly downloads. As such, benchify-mcp popularity was classified as not popular.
We found that benchify-mcp demonstrated a healthy version release cadence and project activity because the last version was released less than a year ago. It has 1 open source maintainer collaborating on the project.
Did you know?

Socket for GitHub automatically highlights issues in each pull request and monitors the health of all your open source dependencies. Discover the contents of your packages and block harmful activity before you install or update your dependencies.
Product
Explore exportable charts for vulnerabilities, dependencies, and usage with Reports, Socket’s new extensible reporting framework.
Product
Socket for Jira lets teams turn alerts into Jira tickets with manual creation, automated ticketing rules, and two-way sync.

Company News
Socket won two 2026 Reppy Awards from RepVue, ranking in the top 5% of all sales orgs. AE Alexandra Lister shares what it's like to grow a sales career here.