

Product
Rust Support Now in Beta
Socket's Rust support is moving to Beta: all users can scan Cargo projects and generate SBOMs, including Cargo.toml-only crates, with Rust-aware supply chain checks.
By Mikola Lysenko, Trevor Norris - Sep 11, 2025
drag-kit - 轻量级可拖拽元素库drag-kit 是一个轻量级的 JavaScript 库,旨在实现元素的拖拽功能。drag-kit 提供了多种配置选项,包括初始位置、位置保存、拖拽区域限制、网格对齐和自动吸附等功能。该库不仅处理了内嵌 iframe 带来的拖拽问题,还兼容 Vue 2、Vue 3 和 React 等主流前端框架。
npm install drag-kit
在 Vue 中,使用 onMounted 钩子:
<template>
  <div id="draggableElement" style="display: none;">Drag me!</div>
</template>

<script lang="ts">
import { onMounted } from 'vue';
import { createDraggable } from 'drag-kit';

export default {
  setup() {
    onMounted(() => {
      createDraggable('draggableElement', {
        initialPosition: { x: '100px', y: '200px' }
      });
    });
  }
};
</script>
在 React 中,使用 useEffect 钩子:
import React, { useEffect } from 'react';
import { createDraggable } from 'drag-kit';

const DraggableComponent: React.FC = () => {
  useEffect(() => {
    createDraggable('draggableElement', {
      initialPosition: { x: '100px', y: '200px' }
    });
  }, []);

  return <div id="draggableElement" style={{ display: 'none' }}>Drag me!</div>;
};

export default DraggableComponent;
在纯 JavaScript 中使用:
<!DOCTYPE html>
<html lang="en">
<head>
  <meta charset="UTF-8">
  <meta name="viewport" content="width=device-width, initial-scale=1.0">
  <title>Drag Kit Example</title>
  <style>
    #draggableElement {
      width: 100px;
      height: 100px;
      background-color: #3498db;
      position: absolute;
      cursor: move;
    }
  </style>
</head>
<body>
  <div id="draggableElement">拖拽我!</div>

  <script src="https://unpkg.com/drag-kit/lib/drag-kit.umd.js"></script>
  <script>
    // 初始化拖拽功能
    document.addEventListener('DOMContentLoaded', () => {
      const draggable = dragKit.createDraggable('draggableElement', {
        initialPosition: { x: '50px', y: '50px' }
      });
    });
  </script>
</body>
</html>
建议:将元素在初始化前设置为 display: none,提升更好的交互效果。
createDraggable(elementId: string, options?: DraggableOptions): Draggable;
参数
mode ('screen' | 'page' | 'container'): 拖动模式(屏幕、页面或容器),默认是 screen。详见下文。
initialPosition: 元素的初始位置,默认 x = 0,y = 0。
dragArea (HTMLElement): 拖动区域(默认为 null,即全屏)。如果 mode 为 container,则需要设置该参数。
lockAxis ('x' | 'y' | 'none'): 锁定拖动轴(x 轴、y 轴或无)。
edgeBuffer (number): 边缘缓冲区。
gridSize (number): 拖动网格大小(默认为 undefined,即无网格对齐)。
snapMode ('none' | 'auto' | 'right' | 'left' | 'top' | 'bottom'): 自动吸附模式,默认为 none。
shouldSave: 是否将拖拽位置保存到本地存储。
onDragStart: 拖拽开始时的回调函数。
onDrag: 拖拽过程中的回调函数。
onDragEnd: 拖拽结束时的回调函数。
mode 参数详细说明
mode 参数定义了拖拽元素的拖动区域,决定了拖拽元素可以移动的范围:
screen 模式
元素只能在当前 可视区域 内拖拽,拖动范围受到屏幕边界限制。适用于需要固定在屏幕上的 UI 元素,如对话框、工具栏等。
page 模式
元素可以在整个 页面范围 内拖动,不受视口限制,即使页面有滚动条,元素也能被拖动到页面的任意位置,超出当前可视区域的部分可以通过滚动显示。
container 模式
元素只能在指定的 容器 内拖动,拖动区域受到容器边界的限制。通过设置 dragArea 参数来指定容器元素。适合局部拖动的场景,如面板或对话框内部的元素拖动。
为了避免性能开销,建议在不需要拖拽功能时销毁实例,特别是在元素被移除或视图销毁时。
在 Vue 中销毁实例
<template>
  <div id="draggableElement" style="display: none;">Drag me!</div>
</template>

<script lang="ts">
import { onMounted } from 'vue';
import { createDraggable } from 'drag-kit';

export default {
  setup() {
    let draggable;

    onMounted(() => {
      draggable = createDraggable('draggableElement', {
        initialPosition: { x: '100px', y: '200px' }
      });
    });

    onBeforeUnmount(() => {
      draggable?.destroy();
    });
  }
};
</script>
在 React 中销毁实例
import React, { useEffect } from 'react';
import { createDraggable } from 'drag-kit';

const DraggableComponent: React.FC = () => {
  useEffect(() => {
    const draggable = createDraggable('draggableElement', {
      initialPosition: { x: '100px', y: '200px' }
    });

    return () => {
      draggable?.destroy();
    };
  }, []);

  return <div id="draggableElement" style={{ display: 'none' }}>Drag me!</div>;
};

export default DraggableComponent;
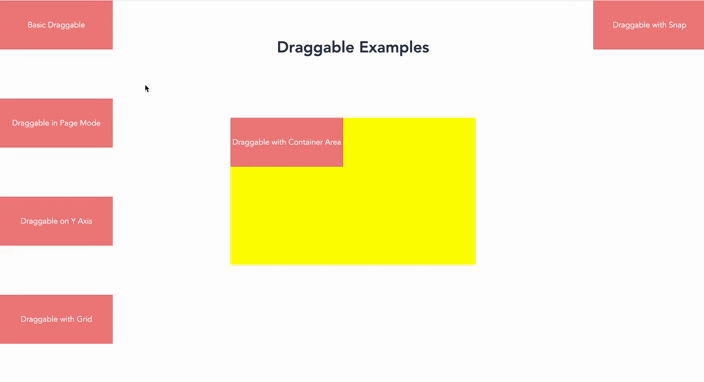
<template>
    <div class="example-container">
        <h1 style="padding-top: 80px;">拖拽示例</h1>

        <!-- 基本拖拽功能(screen 模式) -->
        <div id="draggable-screen" class="draggable" ref="basic" style="display: none;">
            基本拖拽
        </div>

        <!-- 页面范围模式(page 模式) -->
        <div id="draggable-page" class="draggable" ref="page" style="display: none;">
            页面模式拖拽
        </div>

        <!-- 设置边界 -->
        <div id="drag-container">
            <div id="draggable-bounds" class="draggable" ref="bounds" style="display: none;">
                容器内拖拽
            </div>
        </div>

        <!-- 锁定 x 轴拖拽 -->
        <div id="draggable-x-axis" class="draggable" ref="yAxis" style="display: none;">
            锁定 Y 轴拖拽
        </div>

        <!-- 网格模式拖拽 -->
        <div id="draggable-grid" class="draggable" ref="grid" style="display: none;">
            网格对齐拖拽
        </div>

        <!-- 吸附模式 (screen 模式下) -->
        <div id="draggable-snap" class="draggable" ref="snap" style="display: none;">
            吸附模式拖拽
        </div>
    </div>
</template>

<script lang="ts" setup>
import { ref, onMounted } from 'vue';
import { createDraggable } from 'drag-kit';

const basic = ref<HTMLElement | null>(null);
const page = ref<HTMLElement | null>(null);
const bounds = ref<HTMLElement | null>(null);
const yAxis = ref<HTMLElement | null>(null);
const grid = ref<HTMLElement | null>(null);
const snap = ref<HTMLElement | null>(null); // 新增吸附示例

onMounted(() => {
    // 基本拖拽功能
    createDraggable(basic.value!.id);

    // 页面模式拖拽
    createDraggable(page.value!.id, {
        mode: 'page',
        initialPosition: { x: '0px', y: '200px' },
    });

    // 设置边界
    createDraggable(bounds.value!.id, {
        mode: 'container',
        dragArea: document.getElementById('drag-container')!, // 拖拽区域为指定元素
        edgeBuffer: 20,          // 设置缓冲区域,防止超出边界
    });

    // 锁定 x 轴拖拽
    createDraggable(yAxis.value!.id, {
        lockAxis: 'y',
        initialPosition: { x: '0px', y: '400px' }
    });

    // 网格模式拖拽
    createDraggable(grid.value!.id, {
        gridSize: 50,
        // snapMode: 'auto', // 拖拽时每 50px 吸附
        initialPosition: { x: '0px', y: '600px' },
    });

    // 吸附模式拖拽 (screen 模式下)
    createDraggable(snap.value!.id, {
      mode: 'screen', // 使用 screen 模式
      snapMode: 'auto',
      initialPosition: { x: 'calc(100vw - 230px)', y: '0' },
    });
});
</script>
<style scoped>
.example-container {
    height: 1000px;
}
.draggable {
    width: 230px;
    height: 100px;
    line-height: 40px;
    background-color: lightcoral;
    display: flex;
    justify-content: center;
    align-items: center;
    color: white;
    cursor: pointer;
    z-index: 111;
}
#drag-container {
    width: 500px;
    height: 300px;
    background: yellow;
    position: fixed;
    left: 50%;
    top: 50%;
    transform: translate(-50%, -50%);
}
</style>
drag-kit 是一个简洁高效的解决方案,适用于多种拖拽场景。若有任何建议或问题,欢迎在GitHub Issue 中反馈。
FAQs
实现元素的拖拽功能,支持vue2、vue3、react
We found that drag-kit demonstrated a healthy version release cadence and project activity because the last version was released less than a year ago. It has 0 open source maintainers collaborating on the project.
Did you know?

Socket for GitHub automatically highlights issues in each pull request and monitors the health of all your open source dependencies. Discover the contents of your packages and block harmful activity before you install or update your dependencies.
Product
Socket's Rust support is moving to Beta: all users can scan Cargo projects and generate SBOMs, including Cargo.toml-only crates, with Rust-aware supply chain checks.

Product
Socket Fix 2.0 brings targeted CVE remediation, smarter upgrade planning, and broader ecosystem support to help developers get to zero alerts.

Security News
Socket CEO Feross Aboukhadijeh joins Risky Business Weekly to unpack recent npm phishing attacks, their limited impact, and the risks if attackers get smarter.