KernelPlayJS
A 2D/3D JavaScript game engine that feels like Unity — but lives in your browser.
Built on an Entity–Component architecture, KernelPlayJS is fast, flexible, and surprisingly fun to use.
v0.2.3-alpha · MIT License · Built by Soubhik Mukherjee
🔴 Live Demo
👉 https://soubhik-rjs.github.io/kernelplay-js-demo/examples/Canvas2D/
🏁 Benchmark Demo · 📚 Full Documentation
⚡ Why KernelPlayJS?
Most browser game engines either hold your hand too much or leave you drowning in boilerplate. KernelPlayJS hits the sweet spot — it handles the hard stuff (physics [AABB], rendering [Canvas 2D, Pixi JS, Three JS], collision, object pooling) so you can focus on making your game actually fun.
- 10,000+ objects at 60 FPS on a 7th gen i3 — yes, really
- 3,000 physics objects with full collision detection at 40+ FPS
- Spatial grid turns O(n²) collision into O(n) — automatic, no config needed
- Frustum culling — skips anything off-screen entirely
- Object pooling — spawn 1000+ bullets/sec with zero GC stutters
- Dirty flag system — 91% fewer transform recalculations for static objects
- Batch rendering — groups draws by color to cut canvas state changes by 100×
📦 Installation
npm install kernelplay-js
Or drop it straight into HTML with a CDN:
<script type="importmap">
{
  "imports": {
    "kernelplay-js": "https://cdn.jsdelivr.net/npm/kernelplay-js/dist/kernelplay.es.js"
  }
}
</script>
Optional Renderer Plugins
The core engine ships with Canvas 2D — zero external dependencies. When your game needs more visual firepower, bolt on a renderer plugin:
npm install @kernelplay/pixi-renderer
npm install @kernelplay/three-renderer
🎥 CameraComponent (New in v0.2.3)
No more hassle with manual game camera handling.
❌ Old Way (Manual Camera)
Previously, you had to manually sync the camera with the player:
this.camera.x = transform.position.x - this.camera.width / 2;
this.camera.y = transform.position.y - this.camera.height / 2;
✅ New Way (Camera as a GameObject)
Now, the camera is just another Entity in your scene.
class GameScene extends Scene {
init() {
const player = new Player(400, 300);
this.addEntity(player);
const camera = new Entity("MainCamera");
camera.addComponent("transform", new TransformComponent({
position: { x: 400, y: 300, z: 0 }
}));
camera.addComponent("camera", new CameraComponent({
width: this.game.config.width,
height: this.game.config.height,
target: player,
followSpeed: 5,
offset: { x: 0, y: -50, z: 0 },
bounds: {
minX: 0,
maxX: 2000,
minY: 0,
maxY: 1500
},
isPrimary: true
}));
this.addEntity(camera);
}
}
🎮 Using Camera in Scripts
export class PlayerController extends ScriptComponent {
onStart() {
this.primaryCamera = this.entity.scene.getPrimaryCamera();
}
update(dt) {
this.camera;
}
}
🧠 CameraComponent Methods
this.camera.setTarget(this.entity);
this.camera.shake(20, 0.5);
const worldPos = this.camera.screenToWorld(Mouse.x, Mouse.y);
const screenPos = this.camera.worldToScreen(pos.x, pos.y);
this.camera.isInView(x, y);
🎥 Multiple Cameras Setup
const camera1 = new Entity("MainCamera");
camera1.id = 100;
camera1.addComponent("transform", new TransformComponent({
position: { x: 400, y: 300, z: 10 }
}));
camera1.addComponent("camera", new CameraComponent({
width: 800,
height: 600,
isPrimary: true
}));
const camera2 = new Entity("Camera2");
camera2.id = 101;
camera2.addComponent("transform", new TransformComponent({
position: { x: 0, y: 0, z: 10 }
}));
camera2.addComponent("camera", new CameraComponent({
width: 800,
height: 600,
isPrimary: false
}));
🔄 Switching Between Cameras
this.setPrimaryCamera(this.camera2);
⚡ Prop Injection System
ScriptComponent now supports automatic prop injection.
You can directly pass references and values — no manual lookup needed.
🔗 Setup
import { ref } from "kernelplay-js";

player.addComponent("playerController", new PlayerController({
  enemy: ref(5),
  force: 800,
  camera1: ref(100),
  camera2: ref(101),
}));
🚀 Usage
if (Keyboard.isPressed(KeyCode.ArrowRight)) {
rb.addForce(this.force, 0);
}
this.setPrimaryCamera(this.camera2);
this.enemy.destroy();
this.camera2.getComponent("camera").setTarget(this.enemy);
✨ Summary
- Camera is now a full Entity
- Built-in smooth follow system
- Supports multiple cameras
- Easy camera switching
- Powerful prop injection system
- Cleaner, modular, and scalable 🎯
🚀 Quick Start
import { Game, Scene, Entity, TransformComponent, BoxRenderComponent } from "kernelplay-js";

class MyScene extends Scene {
  init() {
    const box = new Entity();
    box.addComponent("transform", new TransformComponent({ position: { x: 300, y: 200 } }));
    box.addComponent("renderer", new BoxRenderComponent({ color: "red" }));
    this.addEntity(box);
  }
}

class MyGame extends Game {
  init() {
    this.sceneManager.addScene(new MyScene("Main"));
    this.sceneManager.startScene("Main");
  }
}

new MyGame({ width: 800, height: 600, fps: 60 }).start();
🎮 Core Concepts
Everything in KernelPlayJS is built around three ideas:
- Entities — your game objects (player, bullet, enemy, tree)
- Components — data attached to entities (position, physics, renderer)
- Scripts — the brains; custom logic that runs every frame
export class Player extends Entity {
constructor(x, y) {
super("Player");
this.tag = "player";
this.zIndex = 10;
this.addComponent("transform", new TransformComponent({ position: { x, y } }));
this.addComponent("rigidbody2d", new Rigidbody2DComponent({ mass: 1, gravityScale: 1 }));
this.addComponent("collider", new ColliderComponent({ width: 50, height: 50 }));
this.addComponent("renderer", new BoxRenderComponent({ color: "red" }));
this.addComponent("controller", new PlayerController());
}
}
🧠 Script Lifecycle
Scripts work just like Unity's MonoBehaviour — with clean hooks for every stage of an entity's life:
export class PlayerController extends ScriptComponent {
onStart() {
this.speed = 200;
this.jumpForce = 500;
}
update(dt) {
const rb = this.entity.getComponent("rigidbody2d");
rb.velocity.x = 0;
if (Keyboard.isDown(KeyCode.ArrowRight)) rb.velocity.x = this.speed;
if (Keyboard.isDown(KeyCode.ArrowLeft)) rb.velocity.x = -this.speed;
if (Keyboard.wasPressed(KeyCode.Space) && rb.isGrounded) {
rb.velocity.y = -this.jumpForce;
}
if (Mouse.wasPressed(MouseButton.Left)) {
this.instantiate(Bullet, this.transform.position.x, this.transform.position.y);
}
}
onCollision(other) {
if (other.tag === "enemy") this.takeDamage(10);
}
onDestroy() {
}
}
Lifecycle order: onAttach → onStart → update → lateUpdate → onDestroy
🔫 Object Pooling (Automatic)
Spawning hundreds of bullets per second? KernelPlayJS silently recycles destroyed entities back into a pool so they can be reused — no setup, no pool sizes to configure, no GC spikes to fight.
this.instantiate(Bullet, x, y);
this.destroy();
Bullet Prefab (Auto-pooled)
export function Bullet(entity, x = 100, y = 100) {
entity.name = "Bullet";
entity.tag = "bullet";
entity.addComponent("transform", new TransformComponent({
position: { x, y },
scale: { x: 0.2, y: 0.2 }
}));
entity.addComponent("rigidbody2d", new Rigidbody2DComponent({
mass: 1,
gravityScale: 1,
drag: 1,
useGravity: false
}));
entity.addComponent("collider", new ColliderComponent({
isTrigger: true
}));
entity.addComponent("renderer", new BoxRenderComponent({color:"#00ff11", zIndex:-20}));
entity.addComponent("bulletscript", new BulletScript());
}
class BulletScript extends ScriptComponent {
constructor(direction) {
super();
this.direction = direction;
this.lifetime = 2.0;
}
update(dt) {
this.transform.position.x += this.direction.x * 500 * dt;
this.transform.position.y += this.direction.y * 500 * dt;
this.lifetime -= dt;
if (this.lifetime <= 0) {
this.entity.destroy();
}
}
onTriggerEnter(other) {
if (other.tag === "enemy") {
other.destroy();
this.entity.destroy();
}
}
}
This is what lets bullet-hell games run at 60 FPS. The GC never sees a thing.
🖥️ Multi-Renderer & Performance
The rendering system is designed to be swapped out without touching your game logic. Your entities, scripts, and physics stay exactly the same — only the renderer changes. One line of code, completely different rendering backend.
Canvas 2D — Default, Zero Dependencies
The built-in renderer. Lightweight, fast, and no install required. Under the hood it uses batch rendering (groups draws by color) and frustum culling (skips off-screen objects entirely) to squeeze every bit of performance from the Canvas API.
new MyGame({ width: 800, height: 600, fps: 60 }).start();
When to use it: Prototypes, logic-heavy simulations, games up to ~10,000 objects, anything where you want zero external dependencies.
Pixi.js 2D — GPU-Accelerated Sprites
npm install @kernelplay/pixi-renderer
import { PixiRenderer, PixiSpriteRender } from "@kernelplay/pixi-renderer";
new MyGame({ renderer: new PixiRenderer(), width: 800, height: 600 }).start();
entity.addComponent("renderer", new PixiSpriteRender("./assets/player.png"));
Pixi.js runs on WebGL — it batches thousands of textured sprites into a handful of draw calls and pushes them straight to the GPU. The moment your game goes heavy on sprites, particle effects, or dense visual scenes, this is the renderer to reach for. The same ECS, the same physics, the same scripts — just dramatically more rendering throughput.
When to use it: Sprite-heavy games, particle systems, visual effects, scenes with 20,000+ objects, anything that makes Canvas 2D sweat.
Three.js 3D — Full 3D Rendering
npm install @kernelplay/three-renderer
import { ThreeRenderer } from "@kernelplay/three-renderer";
new MyGame({ renderer: new ThreeRenderer(), width: 800, height: 600 }).start();
const mesh = new THREE.Mesh(
new THREE.BoxGeometry(1, 1, 1),
new THREE.MeshStandardMaterial({ color: "royalblue" })
);
entity.addComponent("mesh", new MeshComponent(mesh));
entity.addComponent("collider3D", new BoxCollider3D());
Full Three.js under the hood — PBR materials, point lights, shadows, fog, post-processing — all wired into the same entity system you already know. Your physics scripts and game logic don't need to change at all.
When to use it: 3D games, isometric views, 2.5D hybrids, any game that needs lighting and depth.
Renderer Comparison
| Install | None | @kernelplay/pixi-renderer | @kernelplay/three-renderer |
| Rendering | CPU (Canvas API) | GPU (WebGL) | GPU (WebGL) |
| Best for | Prototypes, logic-heavy | Sprite games, VFX | 3D, isometric |
| Smooth object ceiling | ~10,000 | 20,000+ | Scene-dependent |
| External dependency | Zero | Pixi.js | Three.js |
The same ECS, scripts, physics, and input work across all three. Switching renderer is a one-liner.
Writing game logic just got cleaner. No more drilling through this.entity.scene.game... chains every single time.
Shorthand API
this.entity.destroy() → this.destroy()
this.entity.hasTag("wall") → this.hasTag("wall")
this.entity.scene.findByTag("wall") → this.findByTag("wall")
this.entity.scene.findAllByTag("wall") → this.findAllByTag("wall")
this.entity.scene.raycast(Mouse.x, Mouse.y) → this.raycast(Mouse.x, Mouse.y)
this.entity.scene.pick(Mouse.x, Mouse.y) → this.pick(Mouse.x, Mouse.y)
this.entity.scene → this.scene
this.entity.scene.game → this.game
this.entity.scene.game.camera → this.camera
KeyCode & MouseButton
No more magic strings or raw numbers buried in your input checks:
if (Keyboard.isPressed(KeyCode.W))
if (Keyboard.wasPressed(KeyCode.Space))
if (Mouse.wasPressed(MouseButton.Left))
if (Mouse.wasPressed(MouseButton.Right))
if (Mouse.wasPressed(MouseButton.Middle))
Vector2 / Vector3
const a = new Vector2(10, 5);
const b = new Vector2(3, 2);
Vector2.add(a, b)
Vector2.sub(a, b)
Vector2.distance(a, b)
Vector2.lerp(a, b, 0.5)
Vector2.dot(a, b)
a.normalize()
a.clone()
Mathf
Mathf.clamp(health, 0, 100)
Mathf.lerp(currentVal, target, 0.1)
Mathf.degToRad(90)
Mathf.radToDeg(Math.PI)
Timer & Cooldown
const waveTimer = new Timer(5.0, true);
update(dt) {
waveTimer.update(dt);
if (waveTimer.isFinished()) {
spawnNextWave();
waveTimer.start();
}
}
const fireCooldown = new Cooldown(0.2);
update(dt) {
fireCooldown.update(dt);
if (Mouse.wasPressed(MouseButton.Left) && fireCooldown.trigger()) {
this.instantiate(Bullet, x, y);
}
}
Utility Functions
Random.range(1, 10);
Random.int(1, 10);
HexToRGB("#ff0000")
RGBToHex(255, 0, 0)
Raycasting
const hit = this.raycast(Mouse.x, Mouse.y, {
  layerMask: Layers.Enemy,
  tag: "boss",
  ignore: this.entity
});

if (hit) {
  console.log("Hit:", hit.entity.name);
}
🏷️ Tags, Layers & Raycasting
entity.tag = "enemy";
entity.layer = Layers.Enemy;
const boss = this.findByTag("boss");
const allEnemies = this.findAllByTag("enemy");
const hit = this.raycast(Mouse.x, Mouse.y, { layerMask: Layers.Enemy, ignore: this.entity });
if (hit) console.log("Hit:", hit.entity.name);
🐛 Debug Mode
game.config.debugPhysics = true;
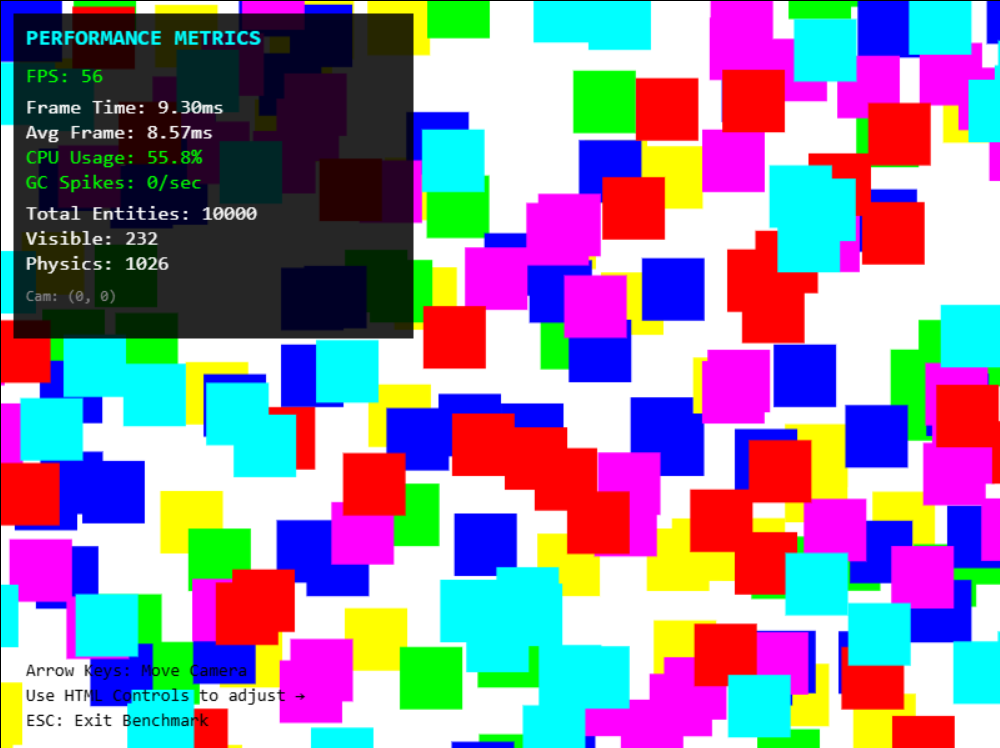
📊 Benchmarks
Tested on i3 7th Gen, 8GB RAM — a deliberately modest machine:
| Light | 1,000 | 10% | 60 |
| Medium | 5,000 | 10% | 60 |
| Heavy | 10,000 | 10% | 50–60 |
| Extreme | 20,000 | 5% | 30–40 |
| Physics Heavy | 3,000 | 100% | 40–45 |
On modern hardware (i5 10th gen+), 60 FPS holds even at Extreme.
🗺️ Roadmap
v0.2.3 (Current) — Helper Class Update
✅ Shorthand script API · ✅ KeyCode & MouseButton · ✅ Vector2/Vector3 · ✅ Mathf · ✅ Timer & Cooldown · ✅ Utility helpers
v0.3.0 — Audio system · Particle effects · Scene save/load · Static object optimization · Continuous collision detection
v0.4.0 — UI system · Animation · State machine component · Physics constraints · Tilemap support
🤝 Contributing
Contributions are welcome — especially in these areas: audio system, particle effects, documentation, bug fixes, and renderer plugin improvements.
See CONTRIBUTING.md to get started.
🔗 Links
Built with ❤️ by Soubhik Mukherjee · KernelPlayJS — Production speed, Unity feel