Product
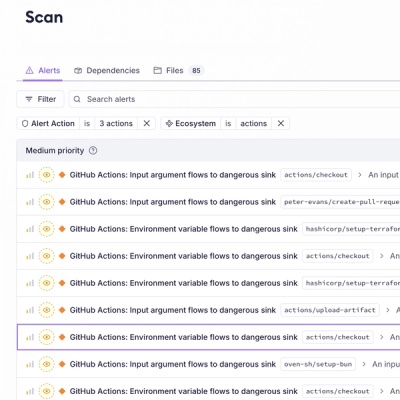
Introducing GitHub Actions Scanning Support
Detect malware, unsafe data flows, and license issues in GitHub Actions with Socket’s new workflow scanning support.
By Rakesh Chatrath, Greg Tystahl - Oct 23, 2025


Please reference the /sample/implementation.js file for an example on how you can implement the Lenddo REST services.
Please perform the following command to install Lenddo into your
node.js codebase: npm install lenddo
All of the following examples assume you you have used the setup defined immediately below. This is used to structure your request to our API.
// Configuration - Both of these can be found after logging into the Partners Dashboard.
// If you have difficulty obtaining these please contact your Lenddo account manager.
var id = '{YOUR_API_USER_ID}';
var secret = '{YOUR_API_SECRET}';

// Import clients
var lenddo_clients = require('lenddo').clients;
// this is the application_id (formerly client_id) that you sent us initially.
var application_id = '{YOUR_APPLICATION_ID}';
var application_id = '{THE_UNIQUE_APPLICATION_IDENTIFIER}';
var partner_script_id = '{THE_PARTNER_SCRIPT_FOR_THE_APPLICATION_ID}';
var priority_data = '{THE_PARTNER_DATA_AND_VERIFICATION_DATA_TO_USE}';

// begin main script
var AuthorizeService = lenddo_clients.Authorize;
var authorize_client = new AuthorizeService(application_id, client_secret);
authorize_client.PriorityData.post(application_id, partner_script_id, priority_data)
    .exec(function(err, result) {
    	if (err) { //there should be no error
    		throw err;
    	} else if (result.response.code !== 200) {
    		throw new Error(result.response.raw); //throw the failed response from AUTHORIZE
    	}
      var response = result.response;
      /**
      * the submission should be a success from here
      **/
      console.log(response.data);
    });
// this is the client ID that you sent us initially.
var application_id = '{YOUR_APPLICATION_ID}';
var partner_script_id = '{THE_PARTNER_SCRIPT_IDENTIFIER}';

// begin main script
var ScoreService = lenddo_clients.Score;
var client_instance = new ScoreService(id, secret);
client_instance.ApplicationScoreCard.get(application_id, partner_script_id)
    .exec(function(err, result) {
      var response = result.response;
      console.log(response.data);
    });
client_instance.ApplicationFeatures.get(application_id, partner_script_id)
    .exec(function(err, result) {
      var response = result.response;
      console.log(response.data);
    });
client_instance.ApplicationMultipleScores.get(application_id, partner_script_id)
    .exec(function(err, result) {
      var response = result.response;
      console.log(response.data);
    });
client_instance.ClientScore.get(application_id, partner_script_id)
    .exec(function(err, result) {
      var response = result.response;
      /**
      * response.data should look like the following:
      * { score: 521, flags: [] }
      **/
      console.log(response.data);
    });
client_instance.ClientVerification.get(application_id, partner_script_id)
    .exec(function(err, result) {
      var response = result.response;
      /**
      * response.data should contain a large object detailing the verification results.
      **/
      console.log(response.data);
    });
If you have an implementation with our android SDK and want access to the mobile data stream please use the following API call:
// this is the partner script ID you used in the data SDK
var partner_script_id = '{YOUR_PARTNER_SCRIPT_ID}';

var NetworkService = lenddo_clients.Network;
var client_instance = new NetworkService(id, secret);

client_instance.MobileData.get(partner_script_id).exec(function(err, response) {
    /**
    * Here you will see a dump of the data received. Please consult with your Lenddo account manager
    * for documentation regarding the schema that you can expect to see here.
    */
    console.log(response.data);
});
If you with to use Lenddo directly with your existing OAuth Access tokens you may submit a user for scoring by using the SDK functions. This method of integration requires that you generate the OAuth tokens with your own Social Network Applications.
To use the whitelabel functionality you must use both of the following commands in order. In addition to this you should use the Verification object to take advantage of Lenddos Verification services.
All of the Whitelabel functionality relies on the Network Service. You'll need to instantiate the Network Service Client in the following manner:
var NetworkService = require('lenddo').clients.Network;
var client_instance = new NetworkService(id, secret);
The remainder of the WhiteLabel functionality documentation section will assume you're using client_instance as the variable name for your Network Service client, as the above example shows.
Tokens must be submitted to Lenddo before submitting the application. Every time you submit an access token, the Lenddo service will return a Profile ID. You may repeat this step for each access token you have, collecting all of the response Profile ID's in the process.
At this stage you must have:
var profile_ids = [];

client_instance.ClientToken.post(application_id, partner_script_id, provider, token).exec(function (err, data) {
	if (err) {
		// This is only triggered during network connectivity issues
		throw err;
	}

	if (data.response.code >= 500) {
		// Something went wrong on Lenddo's side. If this continues, contact Lenddo.
		throw data.response.data;
	}

	if (data.response.code >= 400) {
		// This occurs when the request was incorrect
		throw data.response.data;
	}

	// The profile ID returned from the Service. This is very important. Save it.
	profile_ids.push( data.response.data.profile_id );

	// !!! Begin Step 2 of Whitelabel Integration Here.
});
After you've submitted all of your access tokens you'll need to send the application to Lenddo. At this stage you may optionally take advantage of the provided Lenddo Verification class to provide any additional verification probes.
This step is optional and not necessary if you are not using Lenddo's Verification Service. You must use it otherwise. This SDK exposes a Verification object at require('lenddo').verification. You should instantiate this object and record any relevant information to it.
var VerificationObject = require('lenddo').verification;

// Get an instance of the verification object
var user_verification = new VerificationObject();
// Define probes to be verified (Everything is optional)
user_verification.set.firstName('John')
                .middleName('J')
                .lastName('Doe')
                .dateOfBirth('YYYY-MM-DD')
                .employer('Lenddo')
                .mobilePhone('555-124-56789')
                .university('University Name')
                .email('user@domain.com');
The remainder of this section will assume you've created a verification object with the variable name user_verification.
client_instance.CommitClientJob.post(application_id, partner_script_id, profile_ids, user_verification)
    .exec(function(err, data) {
    	if (err) {
            // This is only triggered during network connectivity issues
            throw err;
        }

        if (data.response.code >= 500) {
            // Something went wrong on Lenddo's side. If this continues, contact Lenddo.
            throw data.response.data;
        }

        if (data.response.code >= 400) {
            // This occurs when the request was incorrect
            throw data.response.data;
        }

        if (data.response.data.success) {
    		// Application was successfully submitted
        } else {
    		// Application submission failed.
    		throw data.response.data;
        }
    });
FAQs
client base for lenddo services
We found that lenddo demonstrated a not healthy version release cadence and project activity because the last version was released a year ago. It has 2 open source maintainers collaborating on the project.
Did you know?

Socket for GitHub automatically highlights issues in each pull request and monitors the health of all your open source dependencies. Discover the contents of your packages and block harmful activity before you install or update your dependencies.
Product
Detect malware, unsafe data flows, and license issues in GitHub Actions with Socket’s new workflow scanning support.
Product
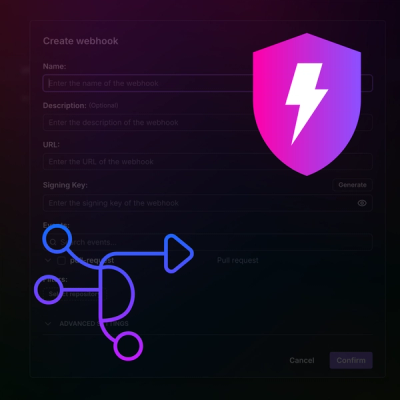
Add real-time Socket webhook events to your workflows to automatically receive pull request scan results and security alerts in real time.

Research
The Socket Threat Research Team uncovered malicious NuGet packages typosquatting the popular Nethereum project to steal wallet keys.