
Research
Two Malicious Rust Crates Impersonate Popular Logger to Steal Wallet Keys
Socket uncovers malicious Rust crates impersonating fast_log to steal Solana and Ethereum wallet keys from source code.
By Kirill Boychenko - Sep 24, 2025
micro-app-remote-control
Advanced tools
This remote control provides a remote control GUI that can be used to control devices that can be signaled through mqtt. This can be be used with X10 based devices, 433Mhz devices as well as IR controlled devices through the [micro-app-mqtt-x10-bridge] (https://github.com/mhdawson/micro-app-mqtt-x10-bridge), [arduino-sensors/ACRemote/] (https://github.com/mhdawson/arduino-sensors/tree/master/ACRemote), and [PI433WirelessTXManager] (https://github.com/mhdawson/PI433WirelessTXManager) projects. It can also be used with any other device which an be controlled through mqtt.
The buttons on the remote control are fully customizable in terms of location, size, color and what mqtt topic/message is invoked when the button is pressed.
The remote can be realized as a browser window by simply pointing a browser at the appropriate server/port or as a native desktop application or native mobile app using the [micro-app-electron-launcher] (https://github.com/mhdawson/micro-app-electron-launcher), or [micro-app-cordova-launcher] (https://github.com/mhdawson/micro-app-cordova-launcher) projects.
These are examples of my initial remote as a browser window and native android application:
![remote control browser] (https://raw.githubusercontent.com/mhdawson/micro-app-remote-control/master/pictures/browser-remote.jpg)
![remote control phone] (https://raw.githubusercontent.com/mhdawson/micro-app-remote-control/master/pictures/phone-remote.jpg)
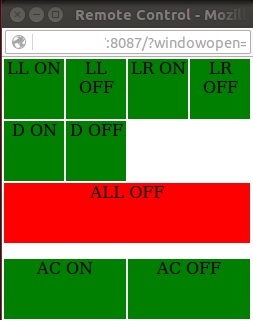
Right now I've configured it to allow me to turn on/off lights in our living room and dining room, turn off all lights at once and to turn on/off the split air conditioner in our bedroom.
After installation modify ../lib/config.json to match your configuration.
The configuration entries that must be updated include:
As a micro-app the dashboard also supports other options like authentication and tls for the connection to the GUI. See the documentation for the [micro-app-framework] (https://github.com/mhdawson/micro-app-framework) for additional details.
The following is an example configuration file:
{
  "title": "Remote Control",
  "size": {"x": 252, "y": 264},
  "serverPort": 3000,
  "mqttServerUrl": "tcp://10.1.1.186:1883",
  "buttons": [ { "label": "LR ON", "size": {"x": 60, "y": 60}, "position": {"x":  126, "y": 2}, "color": "green", "commands": [ {"topic": "house/x10" , "message": "A,1,1" }] },
               { "label": "LR OFF", "size": {"x": 60, "y": 60}, "position": {"x":  188, "y": 2}, "color": "green", "commands": [ {"topic": "house/x10" , "message": "A,1,0" }] },
               { "label": "LL ON", "size": {"x": 60, "y": 60}, "position": {"x":  2, "y": 2}, "color": "green", "commands": [ {"topic": "house/x10" , "message": "A,2,1" }] },
               { "label": "LL OFF", "size": {"x": 60, "y": 60}, "position": {"x":  64, "y": 2}, "color": "green", "commands": [ {"topic": "house/x10" , "message": "A,2,0" }] },
               { "label": "D ON", "size": {"x": 60, "y": 60}, "position": {"x": 2, "y": 64}, "color": "green", "commands": [ {"topic": "house/x10" , "message": "A,5,1" }] },
               { "label": "D OFF", "size": {"x": 60, "y": 60}, "position": {"x": 64, "y": 64}, "color": "green", "commands": [ {"topic": "house/x10" , "message": "A,5,0" }] },
               { "label": "ALL OFF", "size": {"x": 246, "y": 60}, "position": {"x": 2, "y": 126}, "color": "red",  "commands": [ { "delay": 0, "topic": "house/x10" , "message": "A,5,0" },
                                                                                                                                 { "delay": 1000, "topic": "house/x10" , "message": "A,1,0" },
                                                                                                                                 { "delay": 2000, "topic": "house/x10" , "message": "A,2,0" }] },
               { "label": "AC ON", "size": {"x": 122, "y": 60}, "position": {"x": 2, "y": 202}, "color": "green", "commands": [ {"topic": "home/2272" , "message": "0F0FFFFF0110" }] },
               { "label": "AC OFF", "size": {"x": 122, "y": 60}, "position": {"x": 126, "y": 202}, "color": "green", "commands": [ {"topic": "home/2272" , "message": "0F0FFFFF0101" }] }
             ]
}
Simply run:
npm install micro-app-remote-control
and then configure as described in the section above. Alternatively you can clone the github repo and then run "npm install" from the directory for the project.
To run the micro-app-remote-control app, add node.js to your path (currently requires 4.x or better) and then run:
npm start
from the directory in the micro-app-remote-control was installed.
Once the server is started. Point your browser at the host/port for the server. If you have configured your browser to allow javascript to close the current page the original window will be closed and one with the correct size of the alert-dashboard app page will be created.
As a micro-app the micro-app-remote-control app depends on the micro-app-framework:
See the documentation on the micro-app-framework for more information on general configurtion options that are availble (ex using tls, authentication, serverPort, etc)
FAQs
Remote control in node
We found that micro-app-remote-control demonstrated a not healthy version release cadence and project activity because the last version was released a year ago. It has 1 open source maintainer collaborating on the project.
Did you know?

Socket for GitHub automatically highlights issues in each pull request and monitors the health of all your open source dependencies. Discover the contents of your packages and block harmful activity before you install or update your dependencies.
Research
Socket uncovers malicious Rust crates impersonating fast_log to steal Solana and Ethereum wallet keys from source code.

Research
A malicious package uses a QR code as steganography in an innovative technique.

Research
/Security News
Socket identified 80 fake candidates targeting engineering roles, including suspected North Korean operators, exposing the new reality of hiring as a security function.