API Analytics
A free and lightweight API analytics solution, complete with a dashboard.
Getting Started
1. Generate an API key
Head to apianalytics.dev/generate to generate your unique API key with a single click. This key is used to monitor your specific API and should be stored privately. It will be required when accessing your API analytics dashboard and logged data.
2. Add middleware to your API
Add the lightweight middleware to your API. Almost all data processing is handled by the server so there is minimal impact on the performance of your API.

npm install node-api-analytics
Express
import express from 'express';
import { expressAnalytics } from 'node-api-analytics';
const app = express();
app.use(expressAnalytics(<API-KEY>));
app.get('/', (req, res) => {
res.send({message: 'Hello World!'});
});
app.listen(8080, () => {
console.log('Server listening at localhost:8080');
})
Fastify
import fastify from 'Fastify';
import { useFastifyAnalytics } from 'node-api-analytics';

const fastify = Fastify();

useFastifyAnalytics(fastify, apiKey);

fastify.get('/', function (request, reply) {
    reply.send({ message: 'Hello World!' });
})

fastify.listen({ port: 8080 }, function (err, address) {
    console.log('Server listening at https://localhost:8080');
    if (err) {
        fastify.log.error(err);
        process.exit(1);
    }
})
Koa
import Koa from 'koa';
import { koaAnalytics } from 'node-api-analytics';
const app = new Koa();
app.use(koaAnalytics(<API-KEY>));
app.use((ctx) => {
ctx.body = { message: 'Hello World!' };
});
app.listen(8080, () =>
console.log('Server listening at https://localhost:8080');
);
Hono
import { Hono } from 'hono';
import { serve } from '@hono/node-server';
import { honoAnalytics } from 'node-api-analytics';

const app = new Hono();

app.use('*', honoAnalytics(<API-KEY>));

app.get('/', (c) => c.text('Hello, world!'));

serve(app, (info) => {
	console.log(`Server running at http://localhost:${info.port}`);
});
3. View your analytics
Your API will now log and store incoming request data on all routes. Logged data can be viewed using two methods:
- Through visualizations and statistics on the dashboard
- Accessed directly via the data API
You can use the same API key across multiple APIs, but all requests will appear in the same dashboard. It's recommended to generate a new API key for each of your API servers.
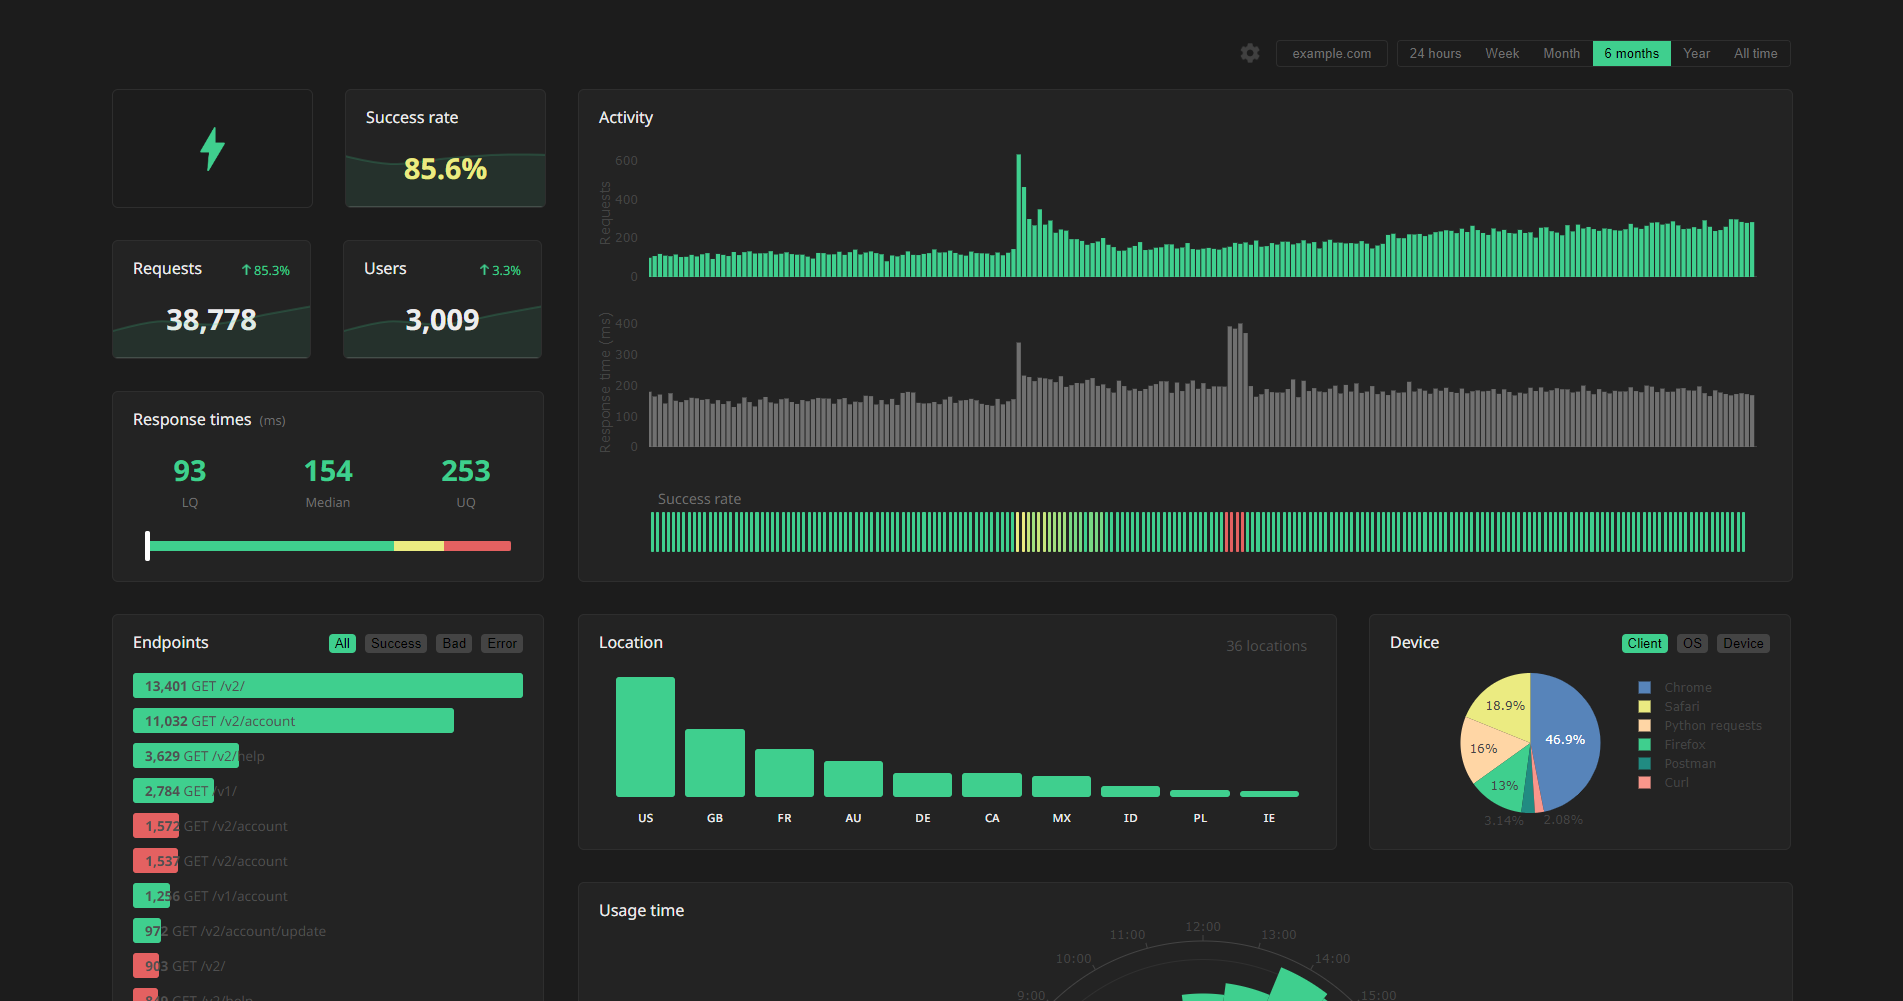
Dashboard
Head to apianalytics.dev/dashboard and paste in your API key to access your dashboard.
Demo: apianalytics.dev/dashboard/demo
Data API
Raw logged request data can be fetched from the data API. Simply send a GET request to https://apianalytics-server.com/api/data with your API key set as X-AUTH-TOKEN in the headers.
Python
import requests

headers = {
    "X-AUTH-TOKEN": <API-KEY>
}

response = requests.get("https://apianalytics-server.com/api/data", headers=headers)
print(response.json())
Node.js
fetch("https://apianalytics-server.com/api/data", {
    headers: { "X-AUTH-TOKEN": <API-KEY> },
})
    .then((response) => {
        return response.json();
    })
    .then((data) => {
        console.log(data);
    });
cURL
curl --header "X-AUTH-TOKEN: <API-KEY>" https://apianalytics-server.com/api/data
Parameters
You can filter your data by providing URL parameters in your request.
page - the page number, with a max page size of 50,000 (defaults to 1)date - the day the requests occurred on (YYYY-MM-DD)dateFrom - a lower bound of a date range the requests occurred in (YYYY-MM-DD)dateTo - a upper bound of a date range the requests occurred in (YYYY-MM-DD)hostname - the hostname of your serviceipAddress - the IP address of the clientstatus - the status code of the responselocation - a two-character location code of the clientuser_id - a custom user identifier (only relevant if a getUserID mapper function has been set within config)
Example:
curl --header "X-AUTH-TOKEN: <API-KEY>" https://apianalytics-server.com/api/data?page=3&dateFrom=2022-01-01&hostname=apianalytics.dev&status=200&user_id=b56cbd92-1168-4d7b-8d94-0418da207908
Customisation
Custom mapping functions can be assigned to override the default behaviour and define how values are extracted from each incoming request to better suit your specific API.
Express
import express from 'express';
import { expressAnalytics, Config } from 'node-api-analytics';
const app = express();
const config = new Config();
config.getIPAddress = (req) => {
return req.headers["X-Forwarded-For"];
}
config.getUserAgent = (req) => {
return req.headers["User-Agent"];
}
app.use(expressAnalytics(<API-KEY>, config));
Fastify
import Fastify from 'fastify';
import { fastifyAnalytics, Config } from 'node-api-analytics;

const fastify = Fastify();

const config = new Config();
config.getIPAddress = (req) => {
    return req.headers["X-Forwarded-For"];
}
config.getUserAgent = (req) => {
    return req.headers["User-Agent"];
}
fastify.addHook('onRequest', fastifyAnalytics(<API-KEY>, config));  // Add middleware
Koa
import Koa from "koa";
import { koaAnalytics, Config } from "node-api-analytics";
const app = new Koa();
const config = new Config();
config.getIPAddress = (req) => {
return req.headers["X-Forwarded-For"];
}
config.getUserAgent = (req) => {
return req.headers["User-Agent"];
}
app.use(koaAnalytics(<API-KEY>, config));
Hono
import { Hono } from "hono";
import { honoAnalytics, Config } from "node-api-analytics";
const app = new Hono();
const config = new Config();
config.getIPAddress = (req) => {
return req.headers["X-Forwarded-For"];
}
config.getUserAgent = (req) => {
return req.headers["User-Agent"];
}
app.use(honoAnalytics(<API-KEY>, config));
Client ID and Privacy
By default, API Analytics logs and stores the client IP address of all incoming requests made to your API and infers a location (country) from each IP address if possible. The IP address is used as a form of client identification in the dashboard to estimate the number of users accessing your service.
This behaviour can be controlled through a privacy level defined in the configuration of the API middleware. There are three privacy levels to choose from 0 (default) to a maximum of 2. A privacy level of 1 will disable IP address storing, and a value of 2 will also disable location inference.
Privacy Levels:
0 - The client IP address is used to infer a location and then stored for user identification. (default)1 - The client IP address is used to infer a location and then discarded.2 - The client IP address is never accessed and location is never inferred.
const config = new Config();
config.privacyLevel = 2;
With any of these privacy levels, you have the option to define a custom user ID as a function of a request by providing a mapper function in the API middleware configuration. For example, your service may require an API key held in the X-AUTH-TOKEN header field which is used to identify a user of your service. In the dashboard, this custom user ID will identify the user in conjunction with the IP address or as an alternative depending on the privacy level set.
const config = new Config();
config.getUserID = (req) => {
    return req.headers["X-AUTH-TOKEN"] ?? '';
}
Data and Security
All data is stored securely, and in compliance with The EU General Data Protection Regulation (GDPR).
For any given request to your API, data recorded is strictly limited to:
- Request method (GET, POST, PUT, etc.)
- Endpoint requested
- User agent
- Client IP address (optional)
- Timestamp of the request
- Response status code
- Response time
- Hostname of API
- API framework in use (FastAPI, Flask, Express, etc.)
Data collected is only ever used to populate your analytics dashboard, and never shared with a third-party. All stored data is pseudo-anonymous, with the API key the only link between you and your logged request data. Should you lose your API key, you will have no method to access your API analytics.
View our full privacy policy and frequently asked questions on our website.
Data Deletion
At any time, you can delete all stored data associated with your API key by going to apianalytics.dev/delete and entering your API key.
API keys and their associated logged request data are scheduled to be deleted after 6 months of inactivity, or 3 months have elapsed without logging a request.
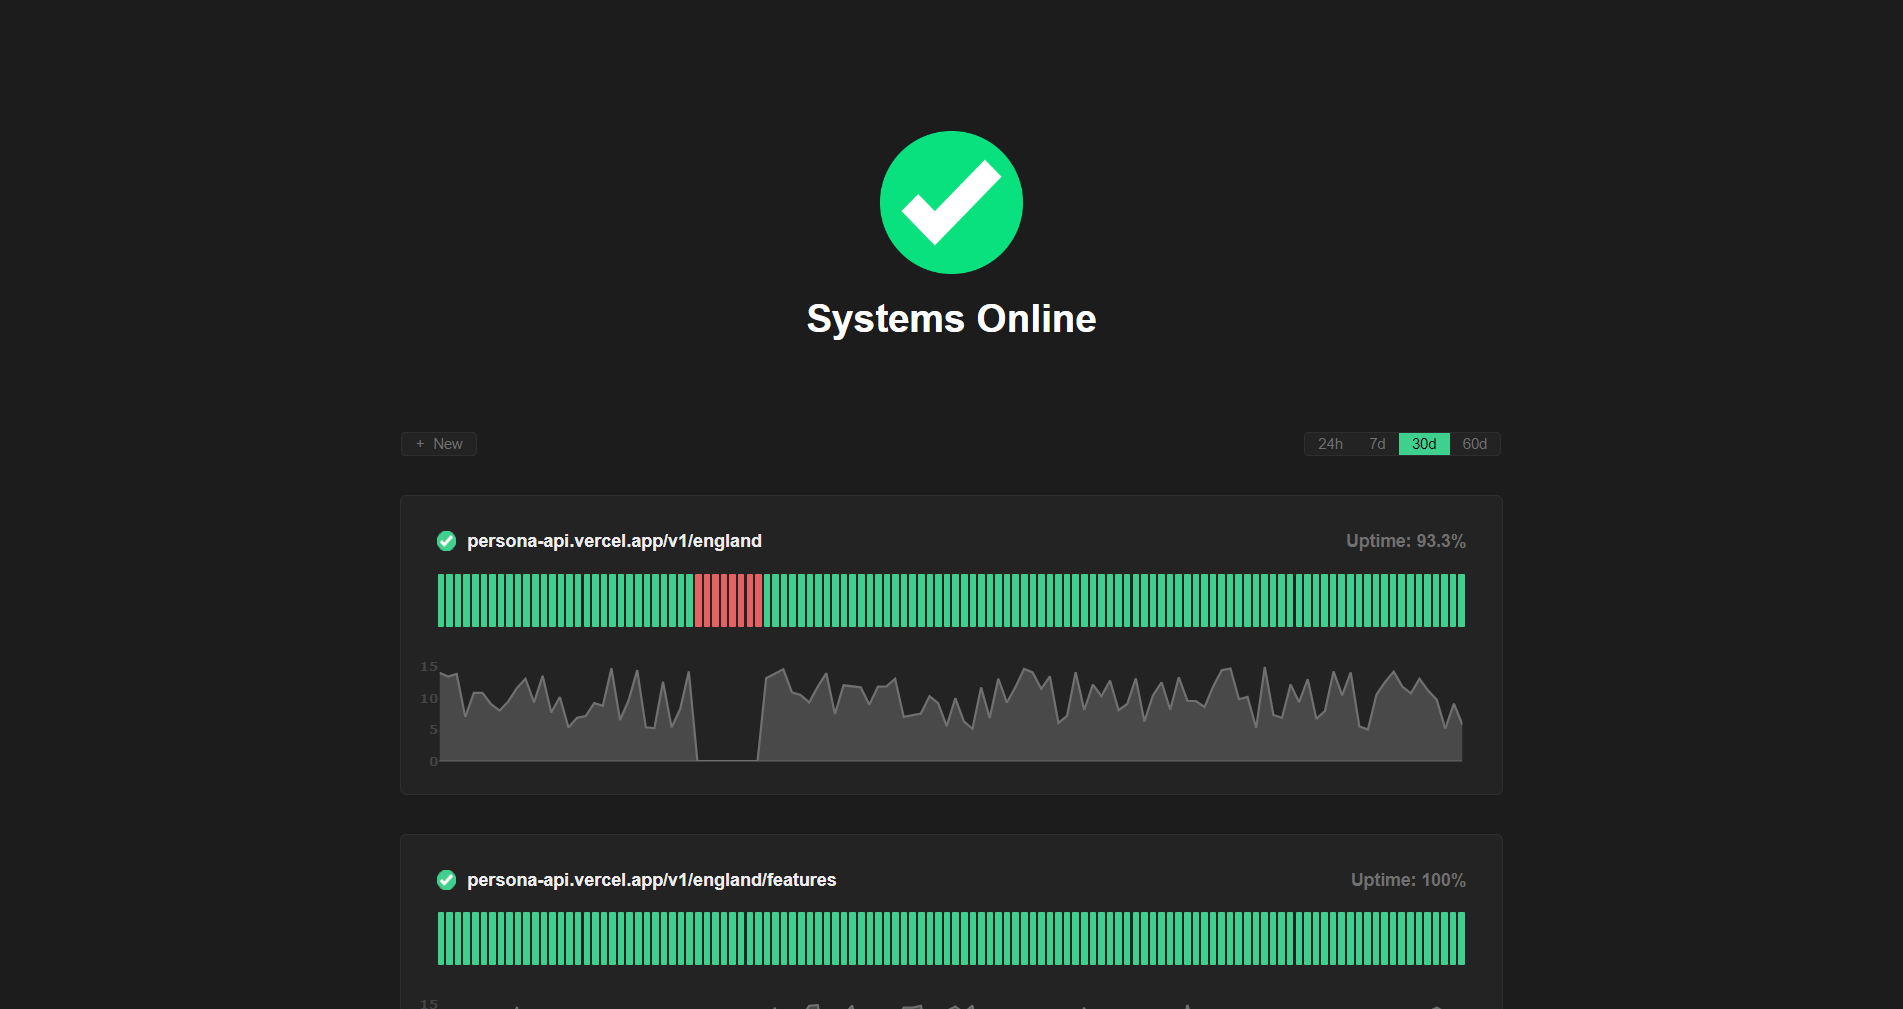
Monitoring
Active API monitoring can be set up by heading to apianalytics.dev/monitoring to enter your API key. Our servers will regularly ping chosen endpoints to monitor uptime and response time.
Limitations
In order to keep the service free, up to 1.5 million requests can be stored against an API key. This is enforced as a rolling limit; old requests will be replaced by new requests. If your API would rapidly exceed this limit, we recommend you try other solutions or check out self-hosting.
Self-Hosting
The project can be self-hosted by following the guide.
Please note: Self-hosting is still undergoing testing, development and further improvements to make it as easy as possible to deploy. It is currently recommended that you avoid self-hosting for production use.
Contributions
Contributions, issues and feature requests are welcome.
- Fork it (https://github.com/tom-draper/api-analytics)
- Create your feature branch (
git checkout -b my-new-feature)
- Commit your changes (
git commit -am 'Add some feature')
- Push to the branch (
git push origin my-new-feature)
- Create a new Pull Request
If you find value in my work consider supporting me.
Buy Me a Coffee: https://www.buymeacoffee.com/tomdraper
PayPal: https://www.paypal.com/paypalme/tomdraper