Security Fundamentals
Turtles, Clams, and Cyber Threat Actors: Shell Usage
The Socket Threat Research Team uncovers how threat actors weaponize shell techniques across npm, PyPI, and Go ecosystems to maintain persistence and exfiltrate data.
pulsar-client
Advanced tools
The Pulsar Node.js client can be used to create Pulsar producers and consumers in Node.js. For the supported Pulsar features, see Client Feature Matrix.
This library works only in Node.js 12.3 or later because it uses:
Note
These instructions are only available for versions after 1.8.0. For versions previous to 1.8.0, you need to install the C++ client first. Please switch to the corresponding version branch of this repo to read the specific instructions.
To run the examples, skip this section.
To use the Pulsar Node.js client in your project, run:
npm install pulsar-client
or
yarn add pulsar-client
Then you can run the following simple end-to-end example:
const Pulsar = require('pulsar-client');

(async () => {
  // Create a client
  const client = new Pulsar.Client({
    serviceUrl: 'pulsar://localhost:6650'
  });

  // Create a producer
  const producer = await client.createProducer({
    topic: 'persistent://public/default/my-topic',
  });

  // Create a consumer
  const consumer = await client.subscribe({
    topic: 'persistent://public/default/my-topic',
    subscription: 'sub1'
  });

  // Send a message
  producer.send({
    data: Buffer.from("hello")
  });

  // Receive the message
  const msg = await consumer.receive();
  console.log(msg.getData().toString());
  consumer.acknowledge(msg);

  await producer.close();
  await consumer.close();
  await client.close();
})();
You should find the output as:
hello
You can see more examples in the examples directory. However, since these examples might use an API that was not released yet, you need to build this module. See the next section.
Note
Building from source code requires a Node.js version greater than 16.18.
First, clone the repository.
git clone https://github.com/apache/pulsar-client-node.git
cd pulsar-client-node
Since this client is a C++ addon that depends on the Pulsar C++ client, you need to install the C++ client first. You need to ensure there is a C++ compiler that supports C++11 installed in your system.
pkg/linux/download-cpp-client.sh
pkg\windows\download-cpp-client.bat
pkg/mac/download-cpp-client.sh
After the C++ client is installed, run the following command to build this C++ addon.
npm install
To verify it has been installed successfully, you can run an example like:
Note
A running Pulsar server is required. The example uses
pulsar://localhost:6650to connect to the server.
node examples/producer
You should find the output as:
Sent message: my-message-0
Sent message: my-message-1
Sent message: my-message-2
Sent message: my-message-3
Sent message: my-message-4
Sent message: my-message-5
Sent message: my-message-6
Sent message: my-message-7
Sent message: my-message-8
Sent message: my-message-9
For more details about Pulsar Node.js clients, see Pulsar docs.
Contributions are welcomed and greatly appreciated.
If your contribution adds Pulsar features for Node.js clients, you need to update both the Pulsar docs and the Client Feature Matrix. See Contribution Guide for more details.
npm install
npx typedoc
# Documentation generated at ./apidocs
FAQs
Pulsar Node.js client
The npm package pulsar-client receives a total of 13,442 weekly downloads. As such, pulsar-client popularity was classified as popular.
We found that pulsar-client demonstrated a healthy version release cadence and project activity because the last version was released less than a year ago. It has 0 open source maintainers collaborating on the project.
Did you know?

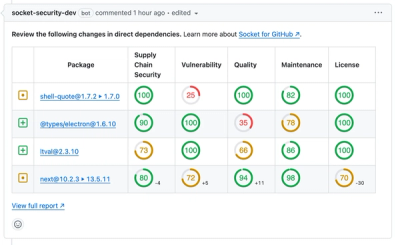
Socket for GitHub automatically highlights issues in each pull request and monitors the health of all your open source dependencies. Discover the contents of your packages and block harmful activity before you install or update your dependencies.

Security Fundamentals
The Socket Threat Research Team uncovers how threat actors weaponize shell techniques across npm, PyPI, and Go ecosystems to maintain persistence and exfiltrate data.

Security News
At VulnCon 2025, NIST scrapped its NVD consortium plans, admitted it can't keep up with CVEs, and outlined automation efforts amid a mounting backlog.

Product
We redesigned our GitHub PR comments to deliver clear, actionable security insights without adding noise to your workflow.