Security News
Deno 2.6 + Socket: Supply Chain Defense In Your CLI
Deno 2.6 introduces deno audit with a new --socket flag that plugs directly into Socket to bring supply chain security checks into the Deno CLI.
react-native-livechat-custom
Advanced tools
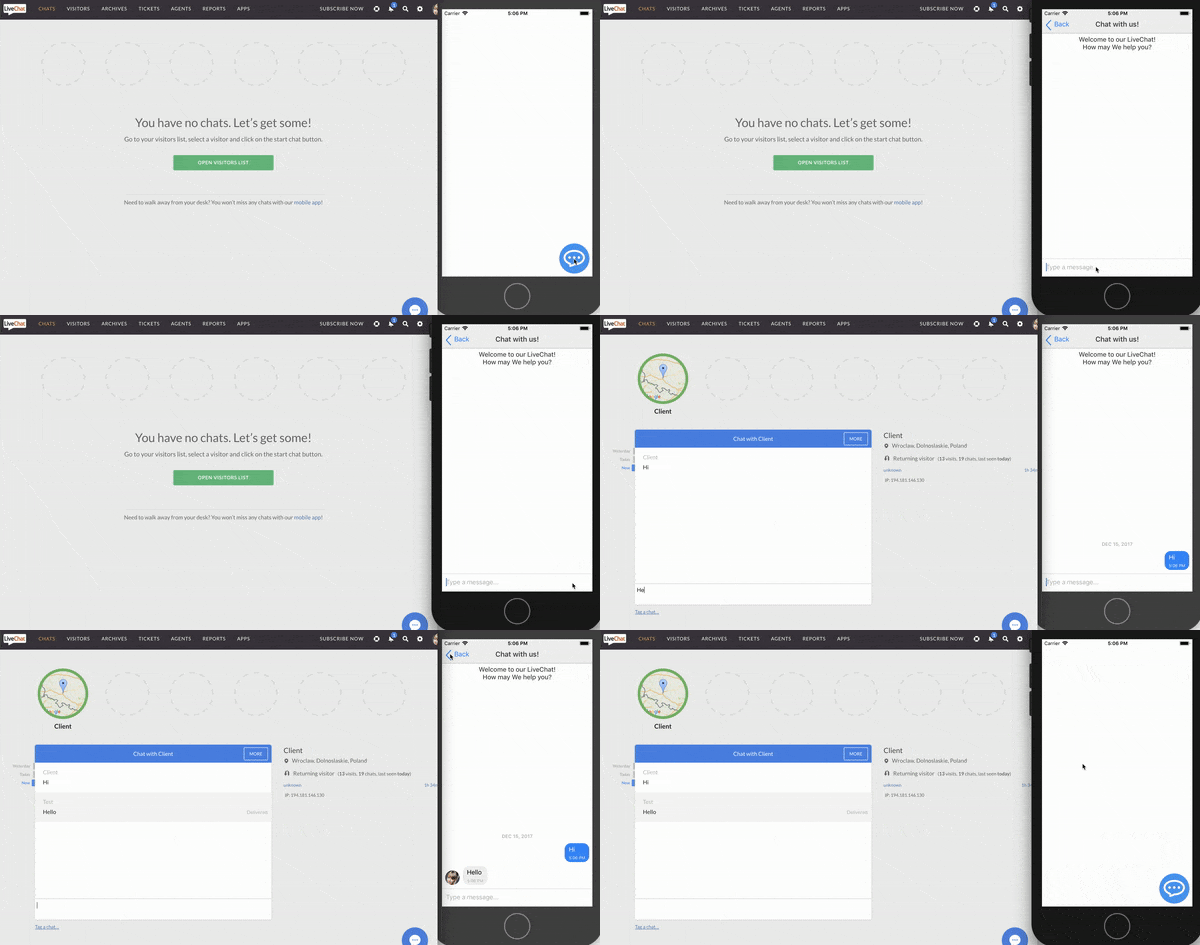
React Native component to integrate LiveChat with your application
This is a React Native component to easily add LiveChat widget to your application.
It works for both iOS and Android.

To use LiveChat in your React application, you will need LiveChat license ID.
If you already have a LiveChat account, get your license_id here.

If you don't have an account, you can create one here.
To import LiveChat for React Native, run the following command:
npm install react-native-livechat --save
Having imported LiveChat for React Native, put it in your render method:
import LiveChat from 'react-native-livechat'

...

<LiveChat license={your_license_id} />
Chat bubble is the round icon (chat trigger) in the bottom right corner of the screen.
You can control the position of the bubble with bubbleLeft and bubbleTop props:
<LiveChat bubbleLeft={0} bubbleTop={0} license={your_license_id} />
By default, the bubble component is draggable and movable. You can disable this option by sending movable prop with false value:
Example:
<LiveChat movable={false} license={your_license_id} />
You can change the color of the bubble by passing bubbleColor prop:
<LiveChat bubbleColor='red' license={your_license_id} />
If you don't like the default bubble, you can send bubble prop with your own component:
<LiveChat license={your_license_id}
  bubble={
  <View style={{ width: 60, height: 60, backgroundColor: 'green' }} />
  }
/>
This module uses react-native-gifted-chat for chat UI.
You can customise your chat widget by sending props to LiveChat component (like you would normally do with GiftedChat component).
For example, if you want onPressAvatar to show agent's details, you can do it like this:
<LiveChat license={your_license_id}
  onPressAvatar={ info => console.warn(info) } />
You can find all props in the official react-native-gifted-chat documentation.
This module uses LiveChat Customer SDK. All methods are described here.
To use LiveChat Visitor SDK method, you have to create LiveChat reference:
<LiveChat onLoaded={ ref => this.livechat = ref }
	license={your_license_id}/>
Let's say you want to close the current chat. You can do it in two ways:
 this.livechat.closeChat();
 // is the same as:
 GLOBAL.visitorSDK.closeChat();
| Name | Note |
|---|---|
| closeChat | Closes the chat. |
| sendMessage | Sends a message. More information about message format you can find here. |
| rateChat | Enables chat ratings. More info here. |
| setSneakPeek | Enables sneak peeks to see what the visitor is typing in before they actually send the message. More info here. |
| getVisitorData | Collects the visitor information. More info here. |
| setVisitorData | Set the visitor information. More info here. |
| getTicketForm | Get ticket form fields configured in chat window settings section in agent app. |
| sendTicketForm | Send ticket form filled in by visitor. Ticket form should be rendered using fields fetched by getTicketForm method. More info here. |
| disconnect | Disconnect Visitor SDK. A visitor won't be tracked, and you won't be notified about agent's availability status. You will be automatically connected again after using sendMessage or setVisitorData methods. |
| destroy | Disconnect Visitor SDK and unsubscribe from all callbacks. |
If you need any help, you can chat with us here.
I hope you will find this module useful. Happy coding!
FAQs
React Native component to integrate LiveChat with your application
We found that react-native-livechat-custom demonstrated a not healthy version release cadence and project activity because the last version was released a year ago. It has 1 open source maintainer collaborating on the project.
Did you know?

Socket for GitHub automatically highlights issues in each pull request and monitors the health of all your open source dependencies. Discover the contents of your packages and block harmful activity before you install or update your dependencies.

Security News
Deno 2.6 introduces deno audit with a new --socket flag that plugs directly into Socket to bring supply chain security checks into the Deno CLI.

Security News
New DoS and source code exposure bugs in React Server Components and Next.js: what’s affected and how to update safely.

Security News
Socket CEO Feross Aboukhadijeh joins Software Engineering Daily to discuss modern software supply chain attacks and rising AI-driven security risks.