react-native-logs
Performance-aware simple logger for React-Native, Expo (managed and bare) and react-native-web with custom levels and transports (colored console,
file writing, etc.).
Each level has its severity: a number that represents its importance in
ascending order from the least important to the most important. Eg. debug:0, info:1, warn:2,
error:3.
By config the logger with a minium severity level, you will see only the logs that have it
highest. Then logs will be managed by transport: the function that will display/save/send log
messages.
It is also possible to extend the logger to create namespaced logs. In this way you will be able to see the log messages only for one or some parts of the code of your choice
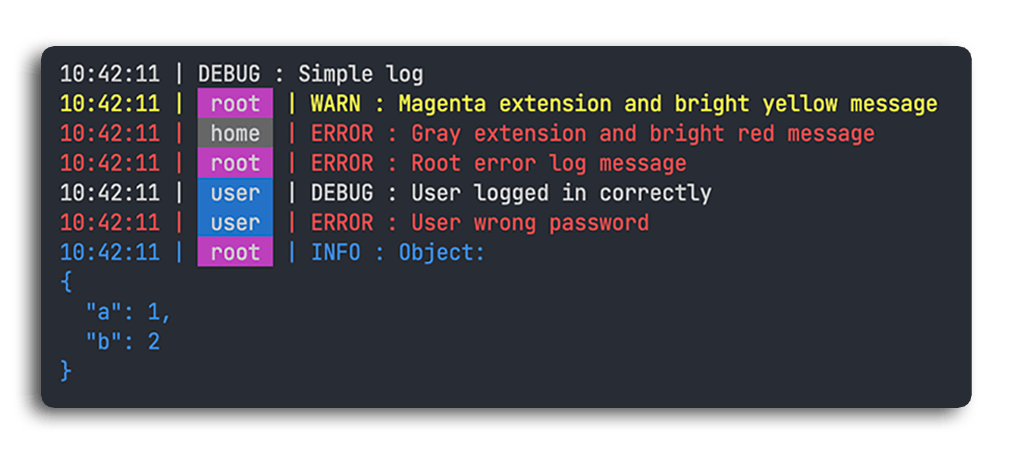
Demo console transport with custom colored levels and namespaces:
Why another logging library?
After trying the most known logging libraries, like winston and bunyan, we found that for
react-native we needed something simpler, but still flexible, and without dependencies on nodejs. Comments and suggestions are welcome.
Installation
npm install --save react-native-logs
OR
yarn add react-native-logs
OR
expo install react-native-logs
Quick Start
import { logger } from "react-native-logs";

var log = logger.createLogger();

log.debug("This is a Debug log");
log.info("This is an Info log");
log.warn("This is a Warning log");
log.error("This is an Error log");
By default the createLogger() method (called without arguments) will create a simple console logger with debug, info, warn
and error levels.
Configuration
You can customize the logger by passing a config object to the createLogger method (see example
below). All params are optional and will take default values if no corresponding argument is passed.
| severity | string | Init logs severity (least important level you want to see) | debug (or the first custom level) |
| transport | function or [function] | The transport function/s for logs (see below for presets) | The preset transport consoleTransport |
| transportOptions | Object | Set custom options for transports | null |
| levels | Object | Set custom log levels: {name:power} | false |
| async | boolean | Set to true for async logs (to improve app performance) | false |
| asyncFunc | function | Set a cutom async function (cb: Function) => {return cb()} | setTimeout |
| stringifyFunc | function | Set a cutom stringify function (msg: any) => string | a customized JSON.stringify |
| formatFunc | function | Set a custom format function (level: string, extension?: string, msg: any) => string | default string format function |
| dateFormat | string or function | time, local, utc, iso or (date: Date) => string | time |
| printLevel | boolean | Choose whether to print the log level | true |
| printDate | boolean | Choose whether to print the log date/time | true |
| fixedExtLvlLength | boolean | Ensure consistent character count alignment when printing extensions and levels | false |
| enabled | boolean | Enable or disable logging | true |
| enabledExtensions | string[] | Enable only certain namespaces | null |
Example with common configuration
import { logger, consoleTransport } from "react-native-logs";

var log = logger.createLogger({
  levels: {
    debug: 0,
    info: 1,
    warn: 2,
    error: 3,
  },
  severity: "debug",
  transport: consoleTransport,
  transportOptions: {
    colors: {
      info: "blueBright",
      warn: "yellowBright",
      error: "redBright",
    },
  },
  async: true,
  dateFormat: "time",
  printLevel: true,
  printDate: true,
  fixedExtLvlLength: false,
  enabled: true,
});

log.debug("Debug message");
log.info({ message: "hi!" });
Custom levels
Log levels have this format: { name : severity } and you can create your personalized list, Eg:
import { logger } from "react-native-logs";

var log = logger.createLogger({
  levels: {
    trace: 0,
    info: 1,
    silly: 2,
    error: 3,
    mad: 4,
  },
});

log.silly("Silly message");
Levels typing
(available only if you use typescript)
The package will take the types of log levels directly from the configuration, or the default ones if not specified.
import { logger } from "react-native-logs";
var log = logger.createLogger({
levels: {
trace: 0,
info: 1,
error: 2,
},
});
log.trace("message");
log.silly("message");
Custom transport
You can write your own transport to send logs to a cloud service, save it in to a database, or do
whatever you want. The following parameters are received by the function:
msg: any: the message formatted by logger "[time] | [namespace] | [level] | [msg]"rawMsg: any: the message (or array of messages) in its original formlevel: { severity: number; text: string }: the log levelextension?: string | null: its namespace if it is an extended logoptions?: any: the transportOptions object
You can define your custom transport as follow (example in typescript):
import { logger, transportFunctionType } from "react-native-logs";
const customTransport: transportFunctionType<{ myCustomOption: string }> = (
props
) => {
};
var log = logger.createLogger({
transport: customTransport,
transportOptions: {
myCustomOption: "option",
},
});
log.debug("Debug message");
Transport Options
By setting the transportOptions parameter you can insert the options that will be passed to
transports. For some transports these may be mandatory, as in the case of the FS option for the fileAsyncTransport
(see preset transports list for details).
import { logger, fileAsyncTransport } from "react-native-logs";
import RNFS from "react-native-fs";

var log = logger.createLogger({
  transport: fileAsyncTransport,
  transportOptions: {
    FS: RNFS,
    fileName: `log.txt`,
  },
});

log.debug("Debug message");
Multiple Arguments
Log messages can be concatenated by adding arguments to the log function:
var errorObject = {
  staus: 404,
  message: "Undefined Error",
};
log.error("New error occured", errorObject);
Preset transports
react-native-logs includes some preset transports. You can import the one of your choice:
import { logger, <transportName> } from 'react-native-logs';
Example
import { logger, mapConsoleTransport } from "react-native-logs";

var log = logger.createLogger({
  transport: mapConsoleTransport,
});

log.debug("Debug message");
List of included preset transports
consoleTransport
Print the logs with a formatted console.log output.
If you need a different console or method to be used instead of console.log you can set the consoleFunc option with your custom console.
| colors | object | If setted you can choose the log colors, defined by level: {level:color} | null |
| extensionColors | object | If setted you can choose the extension label colors: {extension:color} | null |
| consoleFunc | (msg:any)=>any | If setted you can choose the console object | null |
Available colors
| default | null | default console color |
| black | 30 | |
| red | 31 | |
| green | 32 | |
| yellow | 33 | |
| blue | 34 | |
| magenta | 35 | |
| cyan | 36 | |
| white | 37 | |
| grey | 90 | |
| redBright | 91 | |
| greenBright | 92 | |
| yellowBright | 93 | |
| blueBright | 94 | |
| magentaBright | 95 | |
| cyanBright | 96 | |
| whiteBright | 97 | |
Example
import { logger, consoleTransport } from "react-native-logs";

var log = logger.createLogger({
  levels: {
    debug: 0,
    info: 1,
    warn: 2,
    error: 3,
  },
  transport: consoleTransport,
  transportOptions: {
    colors: {
      info: "blueBright",
      warn: "yellowBright",
      error: "redBright",
    },
    extensionColors: {
      root: "magenta",
      home: "green",
    },
  },
});

var rootLog = log.extend("root");
var homeLog = log.extend("home");

rootLog.info("Magenta Extension and bright blue message");
homeLog.error("Green Extension and bright red message");
mapConsoleTransport
Print the logs with a selected console method (console.log, console.warn, console.error, etc.).
| mapLevels | object | Select the console method by level: {level:method} | null |
If mapLevels is not setted, the transport will try to map the console methods with the level name.
Example
import { logger, mapConsoleTransport } from "react-native-logs";

var log = logger.createLogger({
  levels: {
    debug: 0,
    info: 1,
    warn: 2,
    err: 3,
  },
  transport: mapConsoleTransport,
  transportOptions: {
    mapLevels: {
      debug: "log",
      info: "info",
      warn: "warn",
      err: "error",
    },
  },
});

log.debug("Print this with console.log");
log.err("Print this with console.error");
fileAsyncTransport
This transport requires the installation of react-native-fs(install tutorial here) or expo-file-system, and allows you to save the
logs on the <filePath>/<fileName>.txt file.
If you want a new file to be created every day you can use {date-today} in the fileName: app_logs_{date-today}.log -> app_logs_D-M-YYYY.log.
Accepted Options:
| FS | Object | MANDATORY, filesystem instance for the transport (RNFS or expo FileSystem) | null |
| fileName | string | set logs file name (insert {date-today} for current date) | |
| fileNameDateType | eu,us,iso | {date-today} date type eu "DD-MM-YYYY", us "MM-DD-YYYY", iso "YYYY-MM-DD" | eu |
| filePath | string | set logs file path | RNFS.DocumentDirectoryPath or expo FileSystem.documentDirectory |
Example:
import { logger, fileAsyncTransport } from "react-native-logs";
import RNFS from "react-native-fs";
let today = new Date();
let date = today.getDate();
let month = today.getMonth() + 1;
let year = today.getFullYear();
var log = logger.createLogger({
severity: "debug",
transport: fileAsyncTransport,
transportOptions: {
FS: RNFS,
fileName: `logs_{date-today}`,
},
});
log.info("Print this string to a file");
NOTE: Following
this example it will
be possible to upload the file to your remote server
sentryTransport
Send logs to Sentry. The transport allows setting which log levels are errors, so that all others are treated as breadcrumbs, meaning log messages related to the next error that will occur. Otherwise, if not set, all messages will be treated as errors.
Accepted Options:
| SENTRY | Object | MANDATORY, Sentry instance for the transport | null |
| errorLevels | Array or string | Specify which log levels are errors (If null, all msg will be treated as errors) | null |
Example:
import { logger, sentryTransport } from "react-native-logs";
import * as Sentry from "@sentry/react-native";
var log = logger.createLogger({
severity: "debug",
transport: sentryTransport,
transportOptions: {
SENTRY: Sentry,
errorLevels: "error",
},
});
log.warn("Send this log to Sentry as breadcumb");
log.error("Send this log to Sentry as error");
Extensions (Namespaced loggers)
To enable logging only for certain parts of the app, you can extend the logger to different namespaces using the "extend" method. You can enable these extensions from the configuration (config.enabledExtensions) or by using the enable/disable methods.
Example:
import { logger, consoleTransport } from "react-native-logs";
var log = logger.createLogger({
transport: consoleTransport,
enabledExtensions: ["ROOT", "HOME"],
});
var rootLog = log.extend("ROOT");
var homeLog = log.extend("HOME");
var profileLog = log.extend("PROFILE");
log.debug("print this");
rootLog.debug("print this");
homeLog.debug("print this");
profileLog.debug("not print this");
Methods
enable/disable
Dynamically enable/disable loggers and extensions, if it is called without parameters then it will disable/enable the whole logger:
import { logger, consoleTransport } from "react-native-logs";
var log = logger.createLogger({
transport: consoleTransport,
enabledExtensions: ["ROOT", "HOME"],
});
var rootLog = log.extend("ROOT");
var homeLog = log.extend("HOME");
log.info("print this");
homeLog.info("print this");
log.disable("HOME");
homeLog.info("not print this");
rootLog.info("print this");
log.disable();
homeLog.info("not print this");
rootLog.info("not print this");
log.info("not print this");
getExtensions
Get an array of currently created extensions.
setSeverity
You can set the severity level by passing the name(string) of the least important level you want to
see. This method will overwrite any config.severity option set in logger creation.
var log = logger.createLogger();

log.setSeverity("info");
log.debug("This log will not be printed");
log.info("This log will be printed correctly");
log.error("This log will be printed correctly");
getSeverity
You can get the current severity level setted.
var log = logger.createLogger();
var defaultseverity = log.getSeverity();
log.setSeverity("info");
var severity = log.getSeverity();
log.setSeverity("error");
var newseverity = log.getSeverity();
patchConsole
(Experimental)
With this method you are going to overwrite the default console, which is useful in case you are installing this package in an existing software where you use the default console.
Any levels you specify in configuration, if they exist, will be mapped to the console methods (console.log, console.info, console.error, etc...).
If you do not specify a log level in configuration then your first level will be mapped to it.
All calls to console.* will then be handled by your react-native-logs logger and then you can manage their visibility via severity, or change their transports.
This method may have undesirable effects, so I recommend using it only if necessary.
import { logger, consoleTransport } from "react-native-logs";
const config = {
levels: {
debug: 0,
log: 1,
warn: 2,
error: 3,
},
severity: "log",
printLevel: true,
printDate: true,
};
var log = logger.createLogger(defaultConfig);
console.log("This method use console");
log.patchConsole();
console.log("This method use your logger");
console.warn("This method use your logger too");
console.debug("this message will not be shown");
Usage Tips
Logs only in development mode
In reacly-native, after you have create your logger, you can set to log only in development using
the __DEV__ as follows:
import {
  logger,
  consoleTransport,
  fileAsyncTransport,
} from "react-native-logs";
import RNFS from "react-native-fs";

const config = {
  transport: __DEV__ ? consoleTransport : fileAsyncTransport,
  severity: __DEV__ ? "debug" : "error",
  transportOptions: {
    colors
    FS: RNFS,
  },
};

var log = logger.createLogger();
This will block all the logs in production, but not the errors, so the app performance will not be
affected. This will also change the transport: print to console in development and save to file in production.
Global logger in react-native
In order to have a global logger throughout the app, i recommend using a config.js file to
initialize the logger so it can be imported wherever it is needed. Example:
import {
logger,
consoleTransport,
fileAsyncTransport,
} from "react-native-logs";
import RNFS from "react-native-fs";
var LOG = logger.createLogger({
transport: __DEV__ ? consoleTransport : fileAsyncTransport,
severity: __DEV__ ? "debug" : "error",
transportOptions: {
colors: {
info: "blueBright",
warn: "yellowBright",
error: "redBright",
},
FS: RNFS,
},
});
export { LOG };
import { LOG } from "./config";
LOG.info("app log test");
To use extended loggers in all files you can also re-declare them:
import { LOG } from "./config";
var log = LOG.extend("ROOT");
log.info("root log test");
import { LOG } from "./config";
var log = LOG.extend("ROOT");
log.info("root log test");
import { LOG } from "./config";
var log = LOG.extend("HOME");
log.info("home log test");
Use multiple transports
To use multiple transports by passing it as an Array:
import {
logger,
consoleTransport,
fileAsyncTransport,
sentryTransport,
crashlyticsTransport,
transportFunctionType,
} from "react-native-logs";
import RNFS from "react-native-fs";
import * as Sentry from "@sentry/react-native";
import crashlytics from "@react-native-firebase/crashlytics";
const crashlyticsModule = crashlytics();
var customTransport: transportFunctionType = (props) => {
};
const log = logger.createLogger({
transport: [
consoleTransport,
fileAsyncTransport,
sentryTransport,
crashlyticsTransport,
customTransport,
],
transportOptions: {
FS: RNFS,
SENTRY: Sentry,
CRASHLYTICS: crashlyticsModule,
colors: {
info: "blueBright",
warn: "yellowBright",
error: "redBright",
},
},
});
Improve performance
In react-native you can improve performance by setting the InteractionManager.runAfterInteractions async function:
import { logger } from "react-native-logs";

const InteractionManager = require("react-native").InteractionManager;

const log = logger.createLogger({
  async: true,
  asyncFunc: InteractionManager.runAfterInteractions,
});