Product
Introducing Custom Tabs for Org Alerts
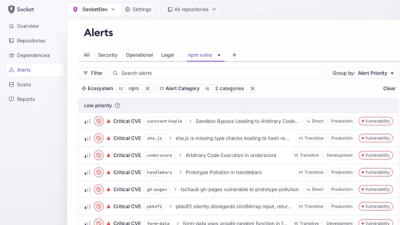
Create and share saved alert views with custom tabs on the org alerts page, making it easier for teams to return to consistent, named filter sets.
By André Staltz - Jan 20, 2026
react-native-meteor-oauth
Advanced tools
Oauth2 login to a Meteor server in React Native
import React, { Component } from 'react'
import View from 'react-native'
import Meteor from 'react-native-meteor'
import Login from 'react-native-meteor-oauth'
const meteorHost = '192.168.1.73:3000' // Put your local IP here if running in dev
Meteor.connect(`ws://${meteorHost}/websocket`)
export default () => {
return (<View>
<Login
provider='Github'
callbackUrl='http://localhost:3000/_oauth/github'
meteorServerDomain={meteorHost}
meteorServerProtocol='http'
clientId='YOUR_GITHUB_CLIENT_ID'
/>
</View>)
}
This module depends on react-native-meteor under the hood, which should then be used for subscriptions, method calling and so on once login has occurred.
The react-native-meteor docs specify that you should Meteor.connect only once in your app's parent component. The example above is reductive, but in a more realistic app this would involve having the Meteor.connect line in the parent component and requiring/using react-native-meter-oauth in subcomponents.
Currently: Github, Google and Facebook.
Any other provider which allow login with Oauth2 can easily be added, which unfortunately does not presently include Twitter.
provider (required): one of ["Github", "Google", "Facebook"] for automatic config, but can be anything if you supply url and possibly extraRequestParam (see below).clientId (required): the client ID given by the OAuth provider.callbackUrl (required): the callback URL you specified to the OAuth provider corresponding to this clientId.meteorServerDomain (required): the domain of the Meteor server you're intending to log in to. Note localhost:3000 will not work here, as a device (even running in an emulator) has to connect over the (local) network. Use your dev server's local IP in dev.meteorServerProtocol (required): either http or https.scope (optional): a space-delimited string of requested scopes. Sensible but limited defaults are provided.url (optional): the url you want to use to request authorization from the OAuth provider. Theoretically, this (along with the param below) allows you to connect to any arbitary provider.extraRequestParams (optional): a dictionary of extra parameters which need to be provided in the authorization request to make OAuth work. For example, Google requires response_type="code", but this is already set by default.styles (optional): a dictionary of styles to overwrite the defaults, which are as follows:{
buttonContainer: { flexDirection: 'row', justifyContent: 'space-around' },
button: { flex: -1 },
buttonLogin: { backgroundColor: '#bbb'},
buttonLogout: { backgroundColor: '#bbb'},
buttonLoginText: { textAlign: 'center', paddingVertical: 12, paddingHorizontal: 40 },
buttonLogoutText: { textAlign: 'center', paddingVertical: 12, paddingHorizontal: 40 },
text: { textAlign: 'center', marginBottom: 15 },
view: { flex: 1, alignSelf: 'stretch', justifyContent: 'center' }
}
Provider-specific styles are also merged into these for the Github, Google and Facebook.
FAQs
OAuth login to a Meteor back-end from React Native
We found that react-native-meteor-oauth demonstrated a not healthy version release cadence and project activity because the last version was released a year ago. It has 1 open source maintainer collaborating on the project.
Did you know?

Socket for GitHub automatically highlights issues in each pull request and monitors the health of all your open source dependencies. Discover the contents of your packages and block harmful activity before you install or update your dependencies.
Product
Create and share saved alert views with custom tabs on the org alerts page, making it easier for teams to return to consistent, named filter sets.
Product
Socket’s Rust and Cargo support is now generally available, providing dependency analysis and supply chain visibility for Rust projects.

Security News
Chrome 144 introduces the Temporal API, a modern approach to date and time handling designed to fix long-standing issues with JavaScript’s Date object.