
Product
Introducing Reports: An Extensible Reporting Framework for Socket Data
Explore exportable charts for vulnerabilities, dependencies, and usage with Reports, Socket’s new extensible reporting framework.
By André Staltz - Apr 21, 2026
ssh-tunneling
Advanced tools
A ssh tunneling client based on ssh2, which can do command executing and port forwarding.
npm i ssh-tunneling
new SshTunnel(config)options
import { SshTunnel } from 'ssh-tunneling';
import type { SshConfig } from 'ssh-tunneling';

const sshConfig: SshConfig = {
  host: '192.168.1.1',
  port: 22,
  username: 'myUsername',
  privateKey: fs.readFileSync('~/.ssh/myPrivateKey'),
};
const client = new SshTunnel(sshConfig);
or establish a connection behind a socks5 server
import { SshTunnel } from 'ssh-tunneling';
import type { SshConfig } from 'ssh-tunneling';

const sshConfig: SshConfig = {
  host: '192.168.1.1',
  port: 22,
  username: 'myUsername',
  privateKey: fs.readFileSync('~/.ssh/myPrivateKey'),
  // or password
  // password: 'myPassword',
  hoppingServer: 'socks://180.80.80.80:1080'
};
const client = new SshTunnel(sshConfig);
forwardOutForward local port to remote port.
import { SshTunnel } from 'ssh-tunneling';
import type { SshConfig } from 'ssh-tunneling';

const sshConfig: SshConfig = {
  host: '192.168.1.1',
  port: 22,
  username: 'myUsername',
  privateKey: fs.readFileSync('~/.ssh/myPrivateKey'),
};
const client = new SshTunnel(sshConfig);
const forwardInfo1 = client.forwardOut('3000:192.168.1.1:3000');
console.log(forwardInfo1);
// { localPort: 3000, destPort: 3000, destHost: '192.168.1.1', id: '3000:192.168.1.1:3000', type: 'out' }
// or passing an id, it'll use that id.
const forwardInfo2 = await client.forwardOut({
  id: 'my-id',
  proxy: '3001:192.168.1.1:3000'
});
console.log(forwardInfo2);
// { localPort: 3000, destPort: 3000, destHost: '192.168.1.1', id: 'my-id', type: 'out' }
If the local port is occupied, it will choose a idle local port to listen and return the info in result.
import { SshTunnel } from 'ssh-tunneling';
import type { SshConfig } from 'ssh-tunneling';

const sshConfig: SshConfig = {
  host: '192.168.1.1',
  port: 22,
  username: 'myUsername',
  privateKey: fs.readFileSync('~/.ssh/myPrivateKey'),
};
const client = new SshTunnel(sshConfig);
const forwardInfo1 = client.forwardOut('3000:192.168.1.1:3000');
const forwardInfo2 = client.forwardOut('3000:192.168.1.1:3000');
console.log(forwardInfo1);
// port 3000 is idle
// { localPort: 3000, destPort: 3000, destHost: '192.168.1.1', id: '3000:192.168.1.1:3000', type: 'out' }
console.log(forwardInfo2);
// port 3000 is using, so it use another idle port 3001
// { localPort: 3001, destPort: 3000, destHost: '192.168.1.1', id: '3000:192.168.1.1:3000', type: 'out' }
Also, you can pass an array to forward multiple ports and it will return the result array too.
import { SshTunnel } from 'ssh-tunneling';
import type { SshConfig } from 'ssh-tunneling';

const sshConfig: SshConfig = {
  host: '192.168.1.1',
  port: 22,
  username: 'myUsername',
  privateKey: fs.readFileSync('~/.ssh/myPrivateKey'),
};
const client = new SshTunnel(sshConfig);
const forwardInfo1 = client.forwardOut(['3000:192.168.1.1:3000', '3001:192.168.1.1:3001']);
console.log(forwardInfo1);
// [
//   { localPort: 3000, destPort: 3000, destHost: '192.168.1.1', id: '3000:192.168.1.1:3000', type: 'out' },
//   { localPort: 3001, destPort: 3001, destHost: '192.168.1.1', id: '3001:192.168.1.1:3001', type: 'out' },
// ]

// or passing an id and it'll use that id
const forwardInfo2 = client.forwardOut([
  {
    id: 'my-id-1',
    proxy: '3000:192.168.1.1:3000'
  },
  {
    id: 'my-id-2',
    proxy: '3001:192.168.1.1:3000'
  }
]);
console.log(forwardInfo2);
// [
//   { localPort: 3000, destPort: 3000, destHost: '192.168.1.1', id: 'my-id-1', type: 'out' },
//   { localPort: 3001, destPort: 3001, destHost: '192.168.1.1', id: 'my-id-2', type: 'out' },
// ]
execimport { SshTunnel } from 'ssh-tunneling';
import type { SshConfig } from 'ssh-tunneling';
const sshConfig: SshConfig = {
host: '192.168.1.1',
port: 22,
username: 'myUsername',
privateKey: fs.readFileSync('~/.ssh/myPrivateKey'),
};
const client = new SshTunnel(sshConfig);
// execute echo command
const echo = await client.exec('echo 1');
console.log(echo);
// 1
// Also, if passing a command array, it will execute every commands one time and return by order
const batchEcho = await sshTunnel.exec([
'echo 1',
'echo 2',
'echo 3'
]);
// batchEcho: [{ command: 'echo 1', result: '1' }, { command: 'echo 2', result: '2' }, { command: 'echo 3', result: '3' }]
closeSince the ssh connection is established, it can be closed manualy.
close(serverKey)close()import { SshTunnel } from 'ssh-tunneling';
import type { SshConfig } from 'ssh-tunneling';
const sshConfig: SshConfig = {
host: '192.168.1.1',
port: 22,
username: 'myUsername',
privateKey: fs.readFileSync('~/.ssh/myPrivateKey'),
};
const client = new SshTunnel(sshConfig);
// execute echo command
const echo = await client.exec('echo 1');
const forwardInfo = client.forwardOut(['3000:192.168.1.1:3000', '3001:192.168.1.1:3001']);
// close one proxy server
client.close(forwardInfo[0].id);
// close all proxy server
client.close();
An example that fowarding port 3000 to 192.168.1.1:3000 through a ssh tunnel.
The original ssh command is ssh -L 3000:192.168.1.1:3000 -i ~/.ssh/myPrivateKey myUsername@192.168.1.1
import { SshTunnel } from 'ssh-tunneling';
import type { SshConfig } from 'ssh-tunneling';

const sshConfig: SshConfig = {
  host: '192.168.1.1',
  port: 22,
  username: 'myUsername',
  privateKey: fs.readFileSync('~/.ssh/myPrivateKey'),
};
const client = new SshTunnel(sshConfig);
const forwardInfo = await client.forwardOut('3000:192.168.1.1:3000');
// { localPort: 3000, destHost: '192.168.1.1', destPort: 3000, id: '3000:192.168.1.1:3000', type: 'out' }
An example that fowarding port 3000 to 192.168.1.1:3000 through a ssh tunnel which only can be connect through a sock5 server.
The original ssh command is ssh -o ProxyCommand="nc -X 5 -x 180.80.80.80:1080 %h %p" -L 3000:192.168.1.1:3000 -i ~/.ssh/myPrivateKey myUsername@192.168.1.1
import { SshTunnel } from 'ssh-tunneling';
import type { SshConfig } from 'ssh-tunneling';

const sshConfig: SshConfig = {
  host: '192.168.1.1',
  port: 22,
  username: 'myUsername',
  privateKey: fs.readFileSync('~/.ssh/myPrivateKey'),
  hoppingServer: 'socks5://180.80.80.80:1080',
};
const client = new SshTunnel(sshConfig);
const forwardInfo = await client.forwardOut('3000:192.168.1.1:3000');
// { localPort: 3000, destHost: '192.168.1.1', destPort: 3000, id: '3000:192.168.1.1:3000', type: 'out' }
import { SshTunnel } from 'ssh-tunneling';
import type { SshConfig } from 'ssh-tunneling';

const sshConfig: SshConfig = {
  host: '192.168.1.1',
  port: 22,
  username: 'myUsername',
  privateKey: fs.readFileSync('~/.ssh/myPrivateKey'),
};
const client = new SshTunnel(sshConfig);
const result = await client.exec('echo 1');
// 1
FAQs
a ssh-tunneling client for nodejs
The npm package ssh-tunneling receives a total of 774 weekly downloads. As such, ssh-tunneling popularity was classified as not popular.
We found that ssh-tunneling demonstrated a not healthy version release cadence and project activity because the last version was released a year ago. It has 1 open source maintainer collaborating on the project.
Did you know?

Socket for GitHub automatically highlights issues in each pull request and monitors the health of all your open source dependencies. Discover the contents of your packages and block harmful activity before you install or update your dependencies.
Product
Explore exportable charts for vulnerabilities, dependencies, and usage with Reports, Socket’s new extensible reporting framework.
Product
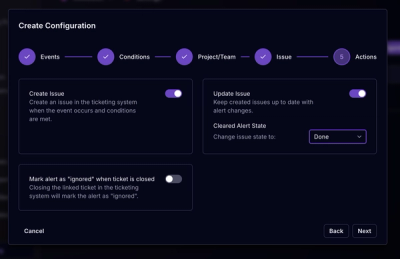
Socket for Jira lets teams turn alerts into Jira tickets with manual creation, automated ticketing rules, and two-way sync.

Company News
Socket won two 2026 Reppy Awards from RepVue, ranking in the top 5% of all sales orgs. AE Alexandra Lister shares what it's like to grow a sales career here.