Security News
Meet Socket at Black Hat and DEF CON 2025 in Las Vegas
Meet Socket at Black Hat & DEF CON 2025 for 1:1s, insider security talks at Allegiant Stadium, and a private dinner with top minds in software supply chain security.
vue-contextmenu-saya
Advanced tools
Contextmenu component for vue2


npm install vue-contextmenu-saya --save
// mount with global
import VueContextMenuSaYa from 'vue-contextmenu-saya'
Vue.use(VueContextMenuSaYa)
<template>
<div id="app" @contextmenu="showMenu"
    style="width: 100px;height: 100px;margin-top: 20px;background: red;">
    <vue-context-menu-saya :contextMenuData="contextMenuData"
        @savedata="savedata"
        @newdata="newdata"></vue-context-menu-saya>
</div>
</template>
<script>
export default {
  name: 'app',
  data () {
    return {
      	// contextmenu data (菜单数据)
      contextMenuData: {
        // the contextmenu name(@1.4.1 updated)
        menuName: 'demo',
        // The coordinates of the display(菜单显示的位置)
        axis: {
          x: null,
          y: null
        },
        // Menu options (菜单选项)
        menulists: [{
          fnHandler: 'savedata', // Binding events(绑定事件)
          icoName: 'fa fa-home fa-fw', // icon (icon图标 )
          btnName: 'Save' // The name of the menu option (菜单名称)
        }, {
            fnHandler: 'newdata',
            icoName: 'fa fa-home fa-fw',
            btnName: 'New'
        }]
      }
    }
  },
  methods: {
    showMenu () {
        event.preventDefault()
        var x = event.clientX
        var y = event.clientY
        // Get the current location
      this.contextMenuData.axis = {
        x, y
      }
    },
    savedata () {
      alert(1)
    },
    newdata () {
      console.log('newdata!')
    }
  }
}
</script>
<template>
  <div style="position: fixed;left:0px;top:0;">
    <div
      @contextmenu="showMenu(index)"
      style="width: 100px;height: 100px;margin-top: 20px;background: red;"
      v-for="(n, index) in 4"
      :key="n"
    >
      <vue-context-menu-saya
        :contextMenuData="contextMenuData"
        :transferIndex="transferIndex"
        @Handler1="Handler_A(index)"
        @Handler2="Handler_B(index)"
        @Handler3="Handler_C(index)"
        @Handler4="Handler_D(index)"
        @Handler5="Handler_E(index)"
      ></vue-context-menu-saya>
    </div>
  </div>
</template>
<script>
export default {
  name: "app",
  data() {
    return {
      transferIndex: null, // Show the menu that was clicked
      contextMenuData: {
        menuName: "demo",
        axis: {
          x: null,
          y: null
        },
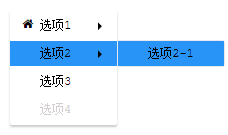
        menulists: [
          {
            btnName: "选项1",
            icoName: "fa fa-home fa-fw",
            children: [
              {
                icoName: "fa fa-adn",
                btnName: "选项1-1",
		// submenu (子菜单)
                children: [
                  {
                    icoName: "fa fa-file",
		    // submenu (子菜单)
		    btnName: "选项1-1-1",
                    children: [
                      {
                        icoName: "fa fa-android",
                        fnHandler: "Handler1",
                        btnName: "选项1-1-1"
                      }
                    ]
                  }
                ]
              }
            ]
          },
          {
            btnName: "选项2",
            children: [
              {
                fnHandler: "Handler5",
                btnName: "选项2-1"
              }
            ]
          },
          {
            btnName: "选项3",
            fnHandler: "Handler4"
          },
          {
            btnName: "选项4",
            disabled: true
          }
        ]
      }
    };
  },
  methods: {
    showMenu(index) {
      this.transferIndex = index; // tranfer index to child component
      event.preventDefault();
      var x = event.clientX;
      var y = event.clientY;
      this.contextMenuData.axis = {
        x,
        y
      };
    },
    Handler_A (index) {
      console.log('index:', index, '选项1-1-1绑定事件执行');
    },
    Handler_B (index) {
      console.log('index:', index, '选项1-1-2绑定事件执行');
    },
    Handler_C (index) {
      console.log('index:', index, '选项1-2-1绑定事件执行');
    },
    Handler_D (index) {
      console.log('index:', index, '选项1-2-2绑定事件执行');
    },
    Handler_E (index) {
      console.log('index:', index, '选项2-1绑定事件执行');
    }
  }
};
</script>
<style>
* {
  margin: 0;
  padding: 0;
}
</style>
use font Awesome,also you can use other UI components icon,for example elementUI.And add the icon class to "icoName". if you set like (icoName: 'el-icon-delete'), that will be add a "Trash" to your page. you can add the style file into html like this:
<link href="//netdna.bootstrapcdn.com/font-awesome/4.7.0/css/font-awesome.min.css" rel="stylesheet">
also if you use like elementUI, maybe you can use by
import 'element-ui/lib/theme-chalk/index.css';
FAQs
Did you know?

Socket for GitHub automatically highlights issues in each pull request and monitors the health of all your open source dependencies. Discover the contents of your packages and block harmful activity before you install or update your dependencies.

Security News
Meet Socket at Black Hat & DEF CON 2025 for 1:1s, insider security talks at Allegiant Stadium, and a private dinner with top minds in software supply chain security.

Security News
CAI is a new open source AI framework that automates penetration testing tasks like scanning and exploitation up to 3,600× faster than humans.

Security News
Deno 2.4 brings back bundling, improves dependency updates and telemetry, and makes the runtime more practical for real-world JavaScript projects.