a2p2 |A2P2Badge|
Move your Aspro2 observation details to an observatory proposal database.
Description
Prepare your observations within Aspro2_ ( V0.9.9.3+ ) and run a2p2_ to submit your OB.
Once setup ready, select your target and use Interop Menu
CHARA OB are only displayed in the GUI for the first implementations.
ESO OB are ready to be submitted through P2_. You can use the demo account for tests or have to provide your credential for real cases.
A tutorial_ is provided for your first steps with Aspro2_.
Installation
The package is uploaded to PyPI_, so you can install the package (and/or upgrade it) using pip:
pip install --upgrade [--user] a2p2
We advice to use python environment. Prefer to use the --user option over running sudo that can break you system modules.
You can also build and install from sources using git:
git clone https://github.com/JMMC-OpenDev/a2p2.git
pip install [--user] ./a2p2
or pip :
pip install git+https://github.com/JMMC-OpenDev/a2p2
Prerequisites
Some basic tests have been operated on windows, Linux and Mac OS. pytest-datafiles must be installed previously.
a2p2 should launch the program.
You may have to install some package to run tk GUI (python-tk on linux).
Usage
a2p2 [-h] [-c] [-v]
optional arguments:
-h, --help show this help message and exit
-c, --createprefs Create preferences file
-v, --verbose Verbose
A GUI is provided using tkinter.
Once Aspro2_ is running and a2p2_ is connected to an OB submission service (using P2API_) :
- select your target
- enter the Aspro2's menu
Interop/Send Obs. block(s) to A2p2
After few seconds, you shoud get a report of your new submission.
Each facilities get it's own code directory to manage specific GUI and specific OB processing. You can get associated inline help in the HELP tab.
Please fill an issue_ for any question, remark or enhancement request.
Release notes
Check file <release-notes.md>_
License
A2P2 is released under GPL license. Please have a look in the LICENSE file for any detail and feel free to fill issues.
Screenshot
|screenshot1|
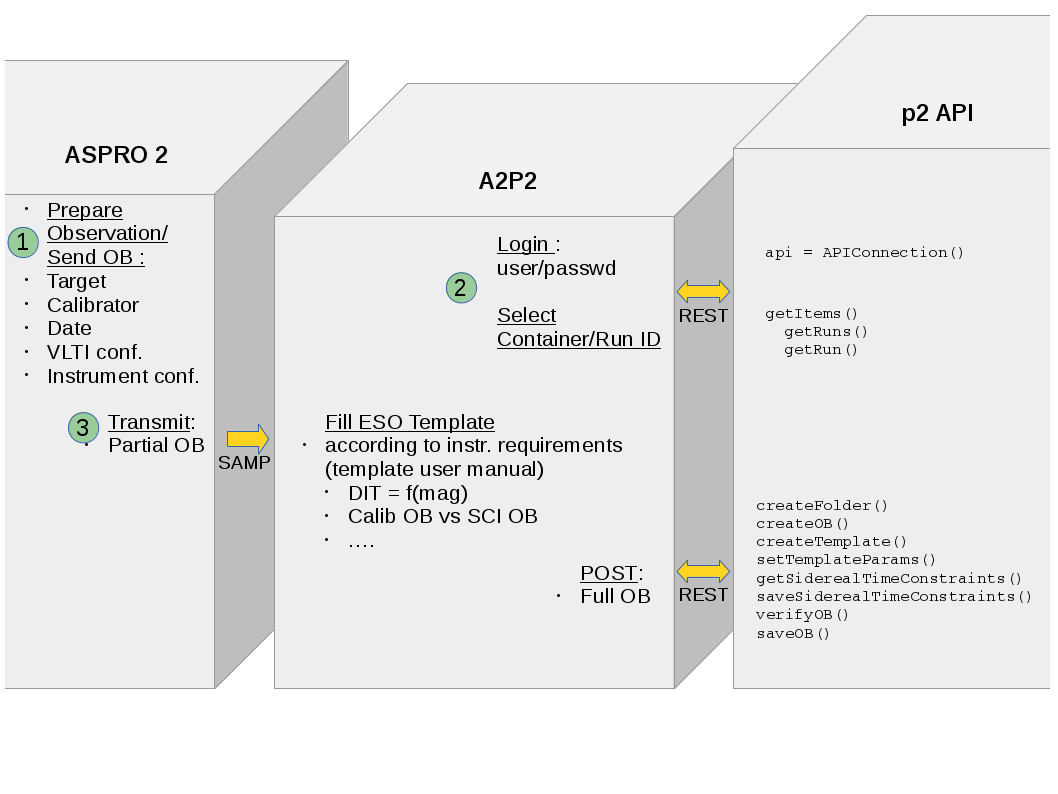
Interaction diagram
|flowchart|
.. |screenshot1| image:: https://raw.githubusercontent.com/JMMC-OpenDev/a2p2/master/doc/screenshot_demo.png
:alt: A2P2 screenshot
:target: https://raw.githubusercontent.com/JMMC-OpenDev/a2p2/master/doc/screenshot_demo.png
.. |flowchart| image:: https://raw.githubusercontent.com/JMMC-OpenDev/a2p2/master/doc/A2P2_in_3steps.png
:alt: A2P2 interaction diagram
:target: https://raw.githubusercontent.com/JMMC-OpenDev/a2p2/master/doc/A2P2_in_3steps.png
.. |A2P2Badge| image:: https://travis-ci.org/JMMC-OpenDev/a2p2.svg?branch=master
:alt: A2P2 Badge on master branch
:target: https://travis-ci.org/JMMC-OpenDev/a2p2
.. _PyPI: https://pypi.org/project/a2p2/
.. _P2: https://www.eso.org/sci/observing/phase2/p2intro.html
.. _P2API: https://www.eso.org/copdemo/apidoc/
.. _Aspro2: http://www.jmmc.fr/aspro2
.. _a2p2: http://www.jmmc.fr/a2p2
.. _tutorial: https://github.com/JMMC-OpenDev/a2p2/wiki/ASPRO2-A2P2-Tutorial
.. _issue: https://github.com/JMMC-OpenDev/a2p2/issues


