
Research
2025 Report: Destructive Malware in Open Source Packages
Destructive malware is rising across open source registries, using delays and kill switches to wipe code, break builds, and disrupt CI/CD.
By Kush Pandya - Dec 24, 2025
deepcomp
Advanced tools
![]()
![]()


Multi-Agent Deep Reinforcement Learning for Coordinated Multipoint in Mobile Networks
Three variants: DeepCoMP (central agent), DD-CoMP (distributed agents using central policy), D3-CoMP (distributed agents with separate policies). All three approaches self-learn and adapt to various scenarios in mobile networks without expert knowledge, human intervention, or detailed assumptions about the underlying system. Compared to other approaches, they are more flexible and achieve higher Quality of Experience.
For a high-level overview of DeepCoMP, please refer to my blog post. More details are available in our research paper presenting DeepCoMP (preprint). I also talked about DeepCoMP at the Ray Summit 2021 (YouTube).
The simulation environment used to train DeepCoMP is available separately as mobile-env.
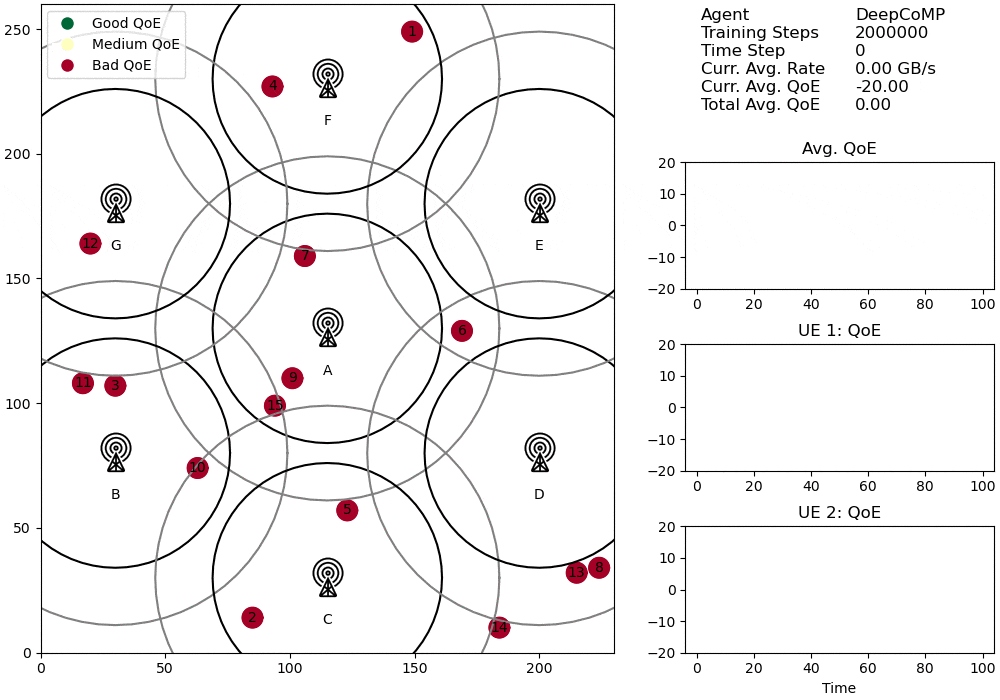
Visualized cell selection policy of DeepCoMP after 2M training steps.
Base station icon by Clea Doltz from the Noun Project
If you use this code, please cite our paper (preprint; accepted at IEEE TNSM 2023):
@article{schneider2023deepcomp,
title={Multi-Agent Deep Reinforcement Learning for Coordinated Multipoint in Mobile Networks},
author={Schneider, Stefan and Karl, Holger and Khalili, Ramin and Hecker, Artur},
journal={IEEE Transactions on Network and Service Management (TNSM)},
year={2023},
}
You need Python 3.8+. You can install deepcomp either directly from PyPi or manually after cloning this repository.
sudo apt update
sudo apt upgrade
sudo apt install cmake build-essential zlib1g-dev python3-dev

pip install deepcomp
For adjusting or further developing DeepCoMP, it's better to install manually rather than from PyPi. Clone the repository. Then install everything, following these steps:
# only on ubuntu
sudo apt update
sudo apt upgrade
sudo apt install cmake build-essential zlib1g-dev python3-dev

# clone
git clone git@github.com:CN-UPB/DeepCoMP.git
cd DeepCoMP

# install all python dependencies
pip install .
# "python setup.py install" does not work for some reason: https://stackoverflow.com/a/66267232/2745116
# for development install (when changing code): pip install -e .
Tested on Ubuntu 20.04 and Windows 10 with Python 3.8.
For saving videos and gifs, you also need to install ffmpeg (not on Windows) and ImageMagick. On Ubuntu:
sudo apt install ffmpeg imagemagick
There is a Docker image that comes with deepcomp preinstalled.
To use the Docker image, simply pull the latest version from Docker Hub:
docker pull stefanbschneider/deepcomp
# tag image with just "deepcomp". alternatively, write out "stefanbschneider/deepcomp" in all following commands.
docker tag stefanbschneider/deepcomp:latest deepcomp
Alternatively, to build the Docker image manually from the Dockerfile, clone this repository and run
docker build -t deepcomp .
Use the --no-cache option is to force a rebuild of the image, pulling the latest deepcomp version from PyPI.
# get an overview of all options
deepcomp -h
For example:
deepcomp --env medium --slow-ues 3 --agent central --workers 2 --train-steps 50000 --seed 42 --video both
To run DeepCoMP, use --alg ppo --agent central.
For DD-CoMP, use --alg ppo --agent multi, and for D3-CoMP, use --alg ppo --agent multi --separate-agent-nns.
By default, training logs, results, videos, and trained agents are saved in <project-root>/results,
where <project-root> is the root directory of DeepCoMP.
If you cloned the repo from GitHub, this is where the Readme is.
If you installed via PyPi, this is in your virtualenv's site packages.
You can choose a custom location with --result-dir <custom-path>.
Note: By default, results within the Docker container are not stored persistently. To save them, copy them from the Docker container or use a Docker volume.
If you want to use the deepcomp Docker container and pulled the corresponding image from Docker Hub,
you can use it as follows:
docker run -d -p 6006:6006 -p 8000:8000 --rm --shm-size=3gb --name deepcomp deepcomp
This starts the Docker container in the background, publishing port 6006 for TensorBoard and port 8000 for the
HTTP server (described below).
The container automatically starts TensorBoard and the HTTP server, so this does not need to be done manually.
The --rm flag automatically removes the container once it is stopped.
The --shm-size=3gb sets the size of /dev/shm inside the Docker container to 3 GB, which is too small by default.
To execute commands on the running Docker container, use docker exec <container-name> <command> as follows:
docker exec deepcomp deepcomp <deepcomp-args>
Here, the arguments are identical with the ones described above. For example, the following command lists all CLI options:
docker exec deepcomp deepcomp -h
Or to train the central DeepCoMP agent for a short duration of 4000 steps:
docker exec -t deepcomp deepcomp --approach deepcomp --train-steps 4000 --batch-size 200 --ues 2 --result-dir results
Important: Specify --result-dir results as argument.
Otherwise, the results will be stored elsewhere and TensorFlow and the HTTP server will not find and display them.
The other deepcomp arguments can be set as desired.
The Docker -t flag ensures that the output is printed continuously during training, not just after completion.
To inspect training progress or view create files (e.g., rendered videos), use TensorBoard and the HTTP server,
which are available via localhost:6006 and localhost:8000.
Important: Stopping the container will remove any files and training progress within the container.
Stop the container with
docker stop deepcomp
When running remotely, you can serve the replay video by running:
cd results
python -m http.server
Then access at <remote-ip>:8000.
To view learning curves (and other metrics) when training an agent, use Tensorboard:
tensorboard --logdir results/train/ (--host 0.0.0.0)
Tensorboard is available at http://localhost:6006 (or <remote-ip>:6006 when running remotely).
To train DeepCoMP on multiple cores in parallel, configure the number of workers (corresponding to CPU cores) with --workers.
To scale training to a multi-node cluster, adjust cluster.yaml and follow the steps described here.
Set --workers to the total number of CPU cores you want to use on the entire cluster.
API documentation is on https://cn-upb.github.io/DeepCoMP/.
Documentation is generated based on docstrings using pdoc3:
# from project root
pip install pdoc3
pdoc --force --html --output-dir docs deepcomp
# move files to be picked up by GitHub pages
mv docs/deepcomp/ docs/
# then manually adjust index.html to link to GitHub repo
Development: @stefanbschneider
Feature requests, questions, issues, and pull requests via GitHub are welcome.
DeepCoMP is an outcome of a joint project between Paderborn University, Germany, and Huawei Germany.


Base station icon (used in rendered videos) by Clea Doltz from the Noun Project.
FAQs
DeepCoMP: Self-Learning Dynamic Multi-Cell Selection for Coordinated Multipoint (CoMP)
We found that deepcomp demonstrated a healthy version release cadence and project activity because the last version was released less than a year ago. It has 1 open source maintainer collaborating on the project.
Did you know?

Socket for GitHub automatically highlights issues in each pull request and monitors the health of all your open source dependencies. Discover the contents of your packages and block harmful activity before you install or update your dependencies.
Research
Destructive malware is rising across open source registries, using delays and kill switches to wipe code, break builds, and disrupt CI/CD.
Security News
Socket CTO Ahmad Nassri shares practical AI coding techniques, tools, and team workflows, plus what still feels noisy and why shipping remains human-led.

Research
/Security News
A five-month operation turned 27 npm packages into durable hosting for browser-run lures that mimic document-sharing portals and Microsoft sign-in, targeting 25 organizations across manufacturing, industrial automation, plastics, and healthcare for credential theft.