Research
2025 Report: Destructive Malware in Open Source Packages
Destructive malware is rising across open source registries, using delays and kill switches to wipe code, break builds, and disrupt CI/CD.
fastapi-cloudauth
Advanced tools
fastapi-cloudauth supports simple integration between FastAPI and cloud authentication services (AWS Cognito, Auth0, Firebase Authentication).
fastapi-cloudauth standardizes and simplifies the integration between FastAPI and cloud authentication services (AWS Cognito, Auth0, Firebase Authentication).
Python 3.6+
$ pip install fastapi-cloudauth
region, userPoolID and AppClientID of AWS Cognito that you manage toread:users permission in AWS CognitoNOTE: access token is valid for verification, scope-based authentication, and getting user info (optional). ID token is valid for verification and getting full user info from claims.
Create a main.py file with the following content:
import os
from pydantic import BaseModel
from fastapi import FastAPI, Depends
from fastapi_cloudauth.cognito import Cognito, CognitoCurrentUser, CognitoClaims

app = FastAPI()
auth = Cognito(
    region=os.environ["REGION"],
    userPoolId=os.environ["USERPOOLID"],
    client_id=os.environ["APPCLIENTID"]
)

@app.get("/", dependencies=[Depends(auth.scope(["read:users"]))])
def secure():
    # access token is valid
    return "Hello"


class AccessUser(BaseModel):
    sub: str


@app.get("/access/")
def secure_access(current_user: AccessUser = Depends(auth.claim(AccessUser))):
    # access token is valid and getting user info from access token
    return f"Hello", {current_user.sub}


get_current_user = CognitoCurrentUser(
    region=os.environ["REGION"],
    userPoolId=os.environ["USERPOOLID"],
    client_id=os.environ["APPCLIENTID"]
)


@app.get("/user/")
def secure_user(current_user: CognitoClaims = Depends(get_current_user)):
    # ID token is valid and getting user info from ID token
    return f"Hello, {current_user.username}"
Run the server with:
$ uvicorn main:app

INFO:     Started server process [15332]
INFO:     Waiting for application startup.
INFO:     Application startup complete.
INFO:     Uvicorn running on http://127.0.0.1:8000 (Press CTRL+C to quit)
Go to http://127.0.0.1:8000/docs.
You will see the automatic interactive API documentation (provided by Swagger UI).
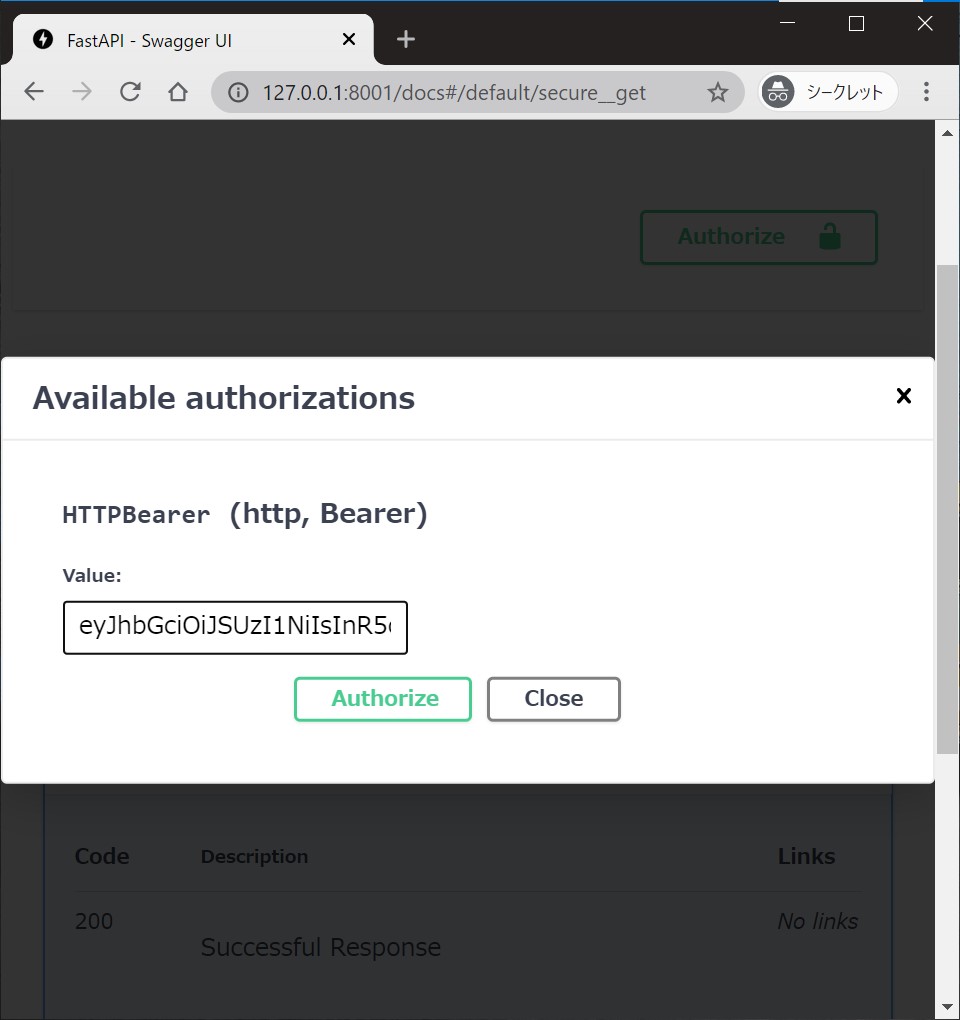
Authorize :unlock: button can be available at the endpoint's injected dependency.
You can supply a token and try the endpoint interactively.

domain, customAPI (Audience) and ClientID of Auth0 that you manage toread:users permission in Auth0Create a file main.py with:
import os
from pydantic import BaseModel
from fastapi import FastAPI, Depends
from fastapi_cloudauth.auth0 import Auth0, Auth0CurrentUser, Auth0Claims

app = FastAPI()

auth = Auth0(domain=os.environ["DOMAIN"], customAPI=os.environ["CUSTOMAPI"])


@app.get("/", dependencies=[Depends(auth.scope(["read:users"]))])
def secure():
    # access token is valid
    return "Hello"


class AccessUser(BaseModel):
    sub: str


@app.get("/access/")
def secure_access(current_user: AccessUser = Depends(auth.claim(AccessUser))):
    # access token is valid and getting user info from access token
    return f"Hello", {current_user.sub}


get_current_user = Auth0CurrentUser(
    domain=os.environ["DOMAIN"],
    client_id=os.environ["CLIENTID"]
)


@app.get("/user/")
def secure_user(current_user: Auth0Claims = Depends(get_current_user)):
    # ID token is valid and getting user info from ID token
    return f"Hello, {current_user.username}"
Try to run the server and see interactive UI in the same way.
project IDCreate a file main.py with:
from fastapi import FastAPI, Depends
from fastapi_cloudauth.firebase import FirebaseCurrentUser, FirebaseClaims

app = FastAPI()

get_current_user = FirebaseCurrentUser(
    project_id=os.environ["PROJECT_ID"]
)


@app.get("/user/")
def secure_user(current_user: FirebaseClaims = Depends(get_current_user)):
    # ID token is valid and getting user info from ID token
    return f"Hello, {current_user.user_id}"
Try to run the server and see the interactive UI in the same way.
We can get values for the current user from access/ID token by writing a few lines.
For Auth0, the ID token contains the following extra values (Ref at Auth0 official doc):
{
  "iss": "http://YOUR_DOMAIN/",
  "sub": "auth0|123456",
  "aud": "YOUR_CLIENT_ID",
  "exp": 1311281970,
  "iat": 1311280970,
  "name": "Jane Doe",
  "given_name": "Jane",
  "family_name": "Doe",
  "gender": "female",
  "birthdate": "0000-10-31",
  "email": "janedoe@example.com",
  "picture": "http://example.com/janedoe/me.jpg"
}
By default, Auth0CurrentUser gives pydantic.BaseModel object, which has username (name) and email fields.
Here is sample code for extracting extra user information (adding user_id) from ID token:
from pydantic import Field
from fastapi_cloudauth.auth0 import Auth0Claims  # base current user info model (inheriting `pydantic`).

# extend current user info model by `pydantic`.
class CustomAuth0Claims(Auth0Claims):
    user_id: str = Field(alias="sub")

get_current_user = Auth0CurrentUser(domain=DOMAIN, client_id=CLIENTID)
get_current_user.user_info = CustomAuth0Claims  # override user info model with a custom one.
Or, we can set new custom claims as follows:
get_user_detail = get_current_user.claim(CustomAuth0Claims)

@app.get("/new/")
async def detail(user: CustomAuth0Claims = Depends(get_user_detail)):
    return f"Hello, {user.user_id}"
If you don't require pydantic data serialization (validation), FastAPI-CloudAuth has an option to extract the raw payload.
All you need is:
get_raw_info = get_current_user.claim(None)

@app.get("/new/")
async def raw_detail(user = Depends(get_raw_info)):
    # user has all items (ex. iss, sub, aud, exp, ... it depends on passed token)
    return f"Hello, {user.get('sub')}"
Advanced user-SCOPE verification to protect your API.
Supports:
Use as (auth is this instanse and app is fastapi.FastAPI instanse):
from fastapi import Depends
from fastapi_cloudauth import Operator

@app.get("/", dependencies=[Depends(auth.scope(["allowned", "scopes"]))])
def api_all_scope():
    return "user has 'allowned' and 'scopes' scopes"

@app.get("/", dependencies=[Depends(auth.scope(["allowned", "scopes"], op=Operator._any))])
def api_any_scope():
    return "user has at least one of scopes (allowned, scopes)"
Please read CONTRIBUTING for how to set up the development environment and testing.
FAQs
fastapi-cloudauth supports simple integration between FastAPI and cloud authentication services (AWS Cognito, Auth0, Firebase Authentication).
We found that fastapi-cloudauth demonstrated a healthy version release cadence and project activity because the last version was released less than a year ago. It has 1 open source maintainer collaborating on the project.
Did you know?

Socket for GitHub automatically highlights issues in each pull request and monitors the health of all your open source dependencies. Discover the contents of your packages and block harmful activity before you install or update your dependencies.

Research
Destructive malware is rising across open source registries, using delays and kill switches to wipe code, break builds, and disrupt CI/CD.

Security News
Socket CTO Ahmad Nassri shares practical AI coding techniques, tools, and team workflows, plus what still feels noisy and why shipping remains human-led.

Research
/Security News
A five-month operation turned 27 npm packages into durable hosting for browser-run lures that mimic document-sharing portals and Microsoft sign-in, targeting 25 organizations across manufacturing, industrial automation, plastics, and healthcare for credential theft.