
Research
2025 Report: Destructive Malware in Open Source Packages
Destructive malware is rising across open source registries, using delays and kill switches to wipe code, break builds, and disrupt CI/CD.
By Kush Pandya - Dec 24, 2025
PyMessager
Advanced tools
![]()
![]()
PyMessager is a Python API for Facebook Messenger and a sample project to demonstrate how to develop a chatbot on Facebook Messenger.
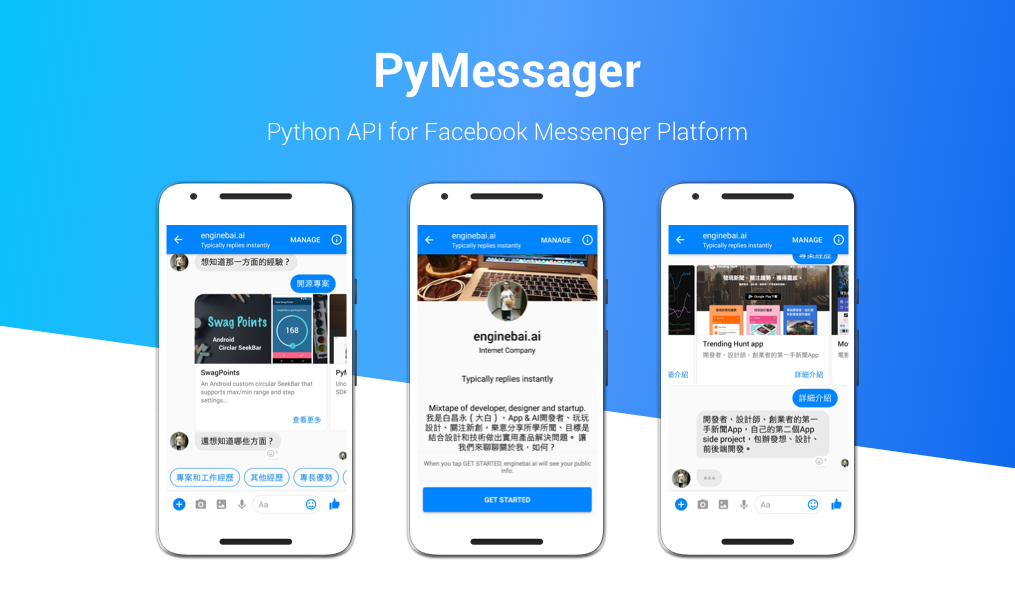
Complete tutorials are on Develop a Facebook Bot Using Python and Chatbot: From 0 To 1 where you can find more detailed information to setup and develop.
To install PyMessager, simply run:
$ pip install pymessager
or install from the repository:
$ git clone git@github.com:enginebai/PyMessager.git
$ cd PyMessager
$ pip install -r requirements.txt
from pymessager.message import Messager, ... # something else you need
You can initialize a messager client via a Facebook Access Token from the developer console:
from pymessager.message import Messager
client = Messager(config.facebook_access_token)
The following code is used to build a message receiver, there are three main steps to prepare for your bot:
@app.route(API_ROOT + FB_WEBHOOK, methods=["GET"])
def fb_webhook():
    verification_code = 'I_AM_VERIFICIATION_CODE'
    verify_token = request.args.get('hub.verify_token')
    if verification_code == verify_token:
        return request.args.get('hub.challenge')
@app.route(API_ROOT + FB_WEBHOOK, methods=['POST'])
def fb_receive_message():
    message_entries = json.loads(request.data.decode('utf8'))['entry']
    for entry in message_entries:
        for message in entry['messaging']:
            if message.get('message'):
                print("{sender[id]} says {message[text]}".format(**message))
    return "Hi"
if __name__ == '__main__':
    context = ('ssl/fullchain.pem', 'ssl/privkey.pem')
    app.run(host='0.0.0.0', debug=True, ssl_context=context)
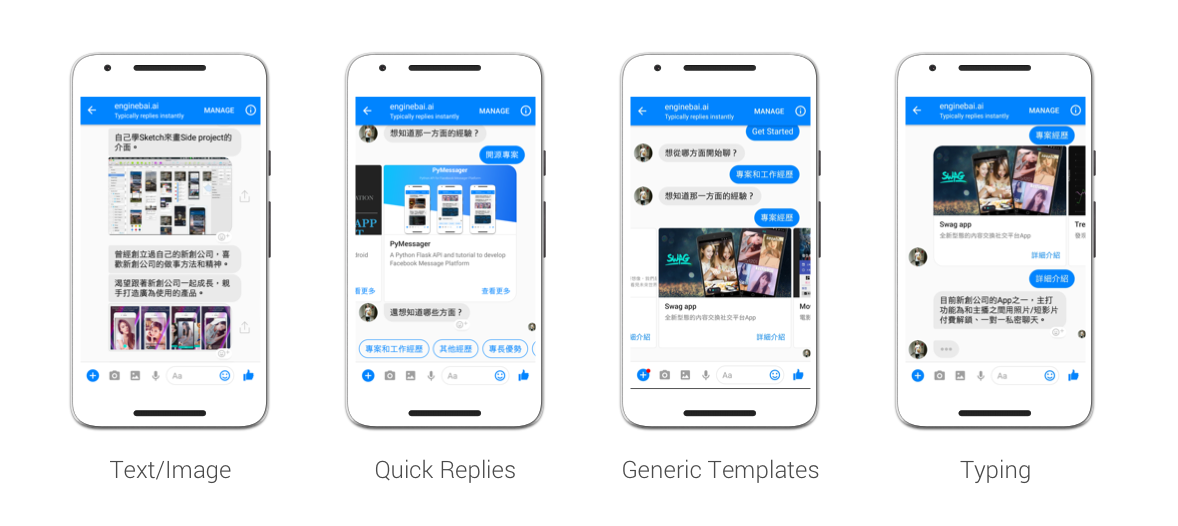
There are several types of message: text, image, quick replies, button template or generic template. API provides different classes to generate the message template.
Send a simple text or an image to a recipient, just make sure that image URL is a valid link.
client.send_text(recipient_id, "Hello, I'm enginebai."
client.send_image(recipient_id, "http://image-url.jpg")
The QuickReply(title, payload, image_url, content_type) class defines a present buttons to the user in response to a message.
| Parameter | Description | Required |
|---|---|---|
title | The button title | Y |
payload | The click payload string | Y |
image_url | The icon image URL | N |
content_type | TEXT or LOCATION | Y |
client.send_quick_replies(recipient_id, "Help", [
         QuickReply("Projects", Intent.PROJECT),
         QuickReply("Blog", Intent.BLOG),
         QuickReply("Contact Me", Intent.CONTACT_ME)
     ])
The ActionButton(button_type, title, url, payload) class defines button template which contains a text and buttons attachment to request input from the user.
| Parameter | Description | Required |
|---|---|---|
button_type | WEB_URL or POSTBACK | Y |
title | The button title | Y |
url | The link | Only if button_type is url |
payload | The click payload string | Only if button_type is POSTBACK |
client.send_buttons(recipient_id, "You can find me with below", [
    ActionButton(ButtonType.WEB_URL, "Blog", "http://blog.enginebai.com"),
	ActionButton(ButtonType.POSTBACK, "Email", Intent.EMAIL)
])
The GenericElement(title, subtitle, image_url, buttons) class defines a horizontal scrollable carousel of items, each composed of an image attachment, short description and buttons to request input from the user.
| Parameter | Description | Required |
|---|---|---|
title_text | The message main title | Y |
subtitle_text | The message subtitle, leave it empty if you don't need it | N |
button_list | The list of ActionButton | Y |
project_list = []
for project_id, project in projects.items():
    project_list.append(GenericElement(
        project["title"],
        project["description"],
        config.api_root + project["image_url"], [
            ActionButton(ButtonType.POSTBACK,
                         self._get_string("button_more"),
                         # Payload use Intent for the beginning
                         payload=Intent.PROJECTS.name + project_id)
        ]))
client.send_generic(recipient_id, project_list)
Before your chatbot starts to receive messages, you have to subscribe the application to your chatbot page. To subscribe a page, just call it:
client.subscribe_to_page()
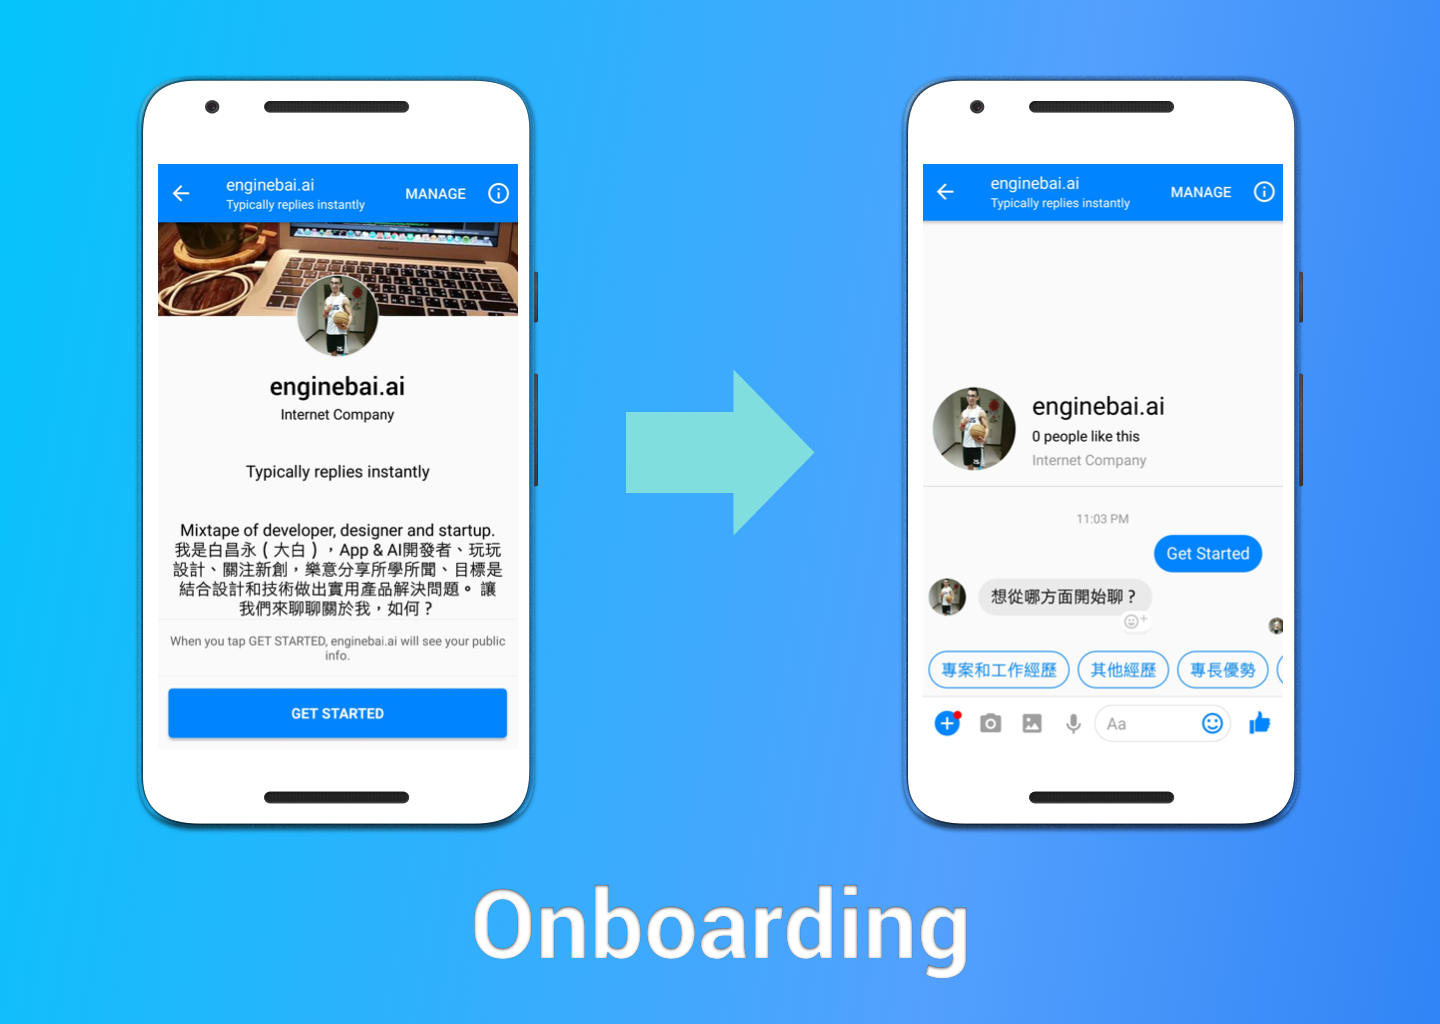
The greeting text will show at the first time you open this chatbot on mobile only. The payload is the trigger when the users click "Get Started" button.
client.set_greeting_text("Hi, this is Engine Bai. Nice to meet you!")
client.set_get_started_button_payload("HELP")  # Specify a payload string.
Feel free to submit bug reports or feature requests and make sure you read the contribution guideline before opening any issue.
feature/bug).The MIT License (MIT)
Copyright © 2017 Engine Bai.
Permission is hereby granted, free of charge, to any person obtaining a copy
of this software and associated documentation files (the "Software"), to deal
in the Software without restriction, including without limitation the rights
to use, copy, modify, merge, publish, distribute, sublicense, and/or sell
copies of the Software, and to permit persons to whom the Software is
furnished to do so, subject to the following conditions:
The above copyright notice and this permission notice shall be included in
all copies or substantial portions of the Software.
THE SOFTWARE IS PROVIDED "AS IS", WITHOUT WARRANTY OF ANY KIND, EXPRESS OR
IMPLIED, INCLUDING BUT NOT LIMITED TO THE WARRANTIES OF MERCHANTABILITY,
FITNESS FOR A PARTICULAR PURPOSE AND NONINFRINGEMENT. IN NO EVENT SHALL THE
AUTHORS OR COPYRIGHT HOLDERS BE LIABLE FOR ANY CLAIM, DAMAGES OR OTHER
LIABILITY, WHETHER IN AN ACTION OF CONTRACT, TORT OR OTHERWISE, ARISING FROM,
OUT OF OR IN CONNECTION WITH THE SOFTWARE OR THE USE OR OTHER DEALINGS IN
THE SOFTWARE.
FAQs
A Python SDK and Flask API to develop Facebook Messenger application
We found that PyMessager demonstrated a healthy version release cadence and project activity because the last version was released less than a year ago. It has 1 open source maintainer collaborating on the project.
Did you know?

Socket for GitHub automatically highlights issues in each pull request and monitors the health of all your open source dependencies. Discover the contents of your packages and block harmful activity before you install or update your dependencies.
Research
Destructive malware is rising across open source registries, using delays and kill switches to wipe code, break builds, and disrupt CI/CD.

Security News
Socket CTO Ahmad Nassri shares practical AI coding techniques, tools, and team workflows, plus what still feels noisy and why shipping remains human-led.

Research
/Security News
A five-month operation turned 27 npm packages into durable hosting for browser-run lures that mimic document-sharing portals and Microsoft sign-in, targeting 25 organizations across manufacturing, industrial automation, plastics, and healthcare for credential theft.