Company News
Socket Has Acquired Secure Annex
Socket has acquired Secure Annex to expand extension security across browsers, IDEs, and AI tools.
By Feross Aboukhadijeh - Apr 28, 2026
python-openstackclient
Advanced tools
.. image:: https://img.shields.io/pypi/v/python-openstackclient.svg :target: https://pypi.org/project/python-openstackclient/ :alt: Latest Version
OpenStackClient (OSC) is a command-line client for OpenStack that brings the command set for Compute, Identity, Image, Network, Object Store and Block Storage APIs together in a single shell with a uniform command structure. Support for additional service APIs is provided via plugins.
The primary goal is to provide a unified shell command structure and a common language to describe operations in OpenStack.
OpenStack Client can be installed from PyPI using pip:
.. code-block:: shell
python3 -m pip install python-openstackclient
You can use --help or the help command to get a list of global options
and supported commands:
.. code-block:: shell
openstack --help
openstack help
You can also get help for a specific command:
.. code-block:: shell
openstack server create --help
openstack help server create
You can add support for additional services by installing their clients. For example, to add support for the DNS service (designate):
.. code-block:: shell
python3 -m pip install python3-designateclient
A Dockerfile is provided for your convenience in the repository. You can
use this to build your own container images:
.. code-block:: shell
git clone https://opendev.org/openstack/python-openstackclient
cd python-openstackclient
podman build . -t example.com/myuser/openstackclient
For more information the available options and commands, refer to the Users Guide__.
.. __: https://docs.openstack.org/python-openstackclient/latest/cli/index.html
OpenStack Client must be configured with authentication information in order to
communicate with a given OpenStack cloud. This configuration can be achieved
via a clouds.yaml file, a set of environment variables (often shared via an
openrc file), a set of command-line options, or a combination of all three.
Your cloud provider or deployment tooling will typically provide either a
clouds.yaml file or openrc file for you. If using a clouds.yaml
file, OpenStack Client expects to find it in one of the following locations:
OS_CLIENT_CONFIG_FILE environment
variable. (the current directory)$HOME/.config/openstack/etc/openstackThe options you should set will depend on the configuration of your cloud and
the authentication mechanism(s) supported. For example, consider a cloud that
supports username/password authentication. Configuration for this cloud using a
clouds.yaml file would look like so:
.. code-block:: yaml
clouds:
  my-cloud:
    auth:
      auth_url: '<url-to-openstack-identity>'
      project_name: '<project-name>'
      project_domain_name: '<project-domain-name>'
      username: '<username>'
      user_domain_name: '<user-domain-name>'
      password: '<password>'  # (optional)
    region_name: '<region>'
The corresponding environment variables would look very similar:
.. code-block:: shell
export OS_AUTH_URL=<url-to-openstack-identity>
export OS_REGION_NAME=<region>
export OS_PROJECT_NAME=<project-name>
export OS_PROJECT_DOMAIN_NAME=<project-domain-name>
export OS_USERNAME=<username>
export OS_USER_DOMAIN_NAME=<user-domain-name>
export OS_PASSWORD=<password>  # (optional)
Likewise, the corresponding command-line options would look very similar:
::
openstack
--os-auth-url <url-to-openstack-identity>
--os-region <region>
--os-project-name <project-name>
--os-project-domain-name <project-domain-name>
--os-username <username>
--os-user-domain-name <user-domain-name>
[--os-password <password>]
.. note::
If a password is not provided above (in plaintext), you will be
interactively prompted to provide one securely.
Some clouds use federated authentication. If this is the case, your
configuration will be slightly more involved. For example, to configure
username/password authentication for a federated user using a clouds.yaml
file:
.. code-block:: yaml
clouds:
  my-cloud:
    auth:
      auth_url: '<url-to-openstack-identity>'
      project_name: '<project-name>'
      project_domain_name: '<project-domain-name>'
      username: '<username-in-idp>'
      user_domain_name: '<user-domain-name>'
      password: '<password-in-idp>'
      identity_provider: '<the-desired-idp-in-keystone>'
      client_id: '<the-client-id-configured-in-the-idp>'
      client_secret: '<the-client-secret-configured-in-the-idp>'
      openid_scope: '<the-scopes-of-desired-attributes-to-claim-from-idp>'
      protocol: '<the-protocol-used-in-the-apache2-oidc-proxy>'
      access_token_type: '<the-access-token-type-used-by-your-idp>'
      discovery_endpoint: '<the-well-known-endpoint-of-the-idp>'
    auth_type: 'v3oidcpassword'
    region_name: '<region>'
The corresponding environment variables would look very similar:
.. code-block:: shell
export OS_PROJECT_NAME=<project-name>
export OS_PROJECT_DOMAIN_NAME=<project-domain-name>
export OS_AUTH_URL=<url-to-openstack-identity>
export OS_IDENTITY_API_VERSION=3
export OS_AUTH_TYPE=v3oidcpassword
export OS_USERNAME=<username-in-idp>
export OS_PASSWORD=<password-in-idp>
export OS_IDENTITY_PROVIDER=<the-desired-idp-in-keystone>
export OS_CLIENT_ID=<the-client-id-configured-in-the-idp>
export OS_CLIENT_SECRET=<the-client-secred-configured-in-the-idp>
export OS_OPENID_SCOPE=<the-scopes-of-desired-attributes-to-claim-from-idp>
export OS_PROTOCOL=<the-protocol-used-in-the-apache2-oidc-proxy>
export OS_ACCESS_TOKEN_TYPE=<the-access-token-type-used-by-your-idp>
export OS_DISCOVERY_ENDPOINT=<the-well-known-endpoint-of-the-idp>
Likewise, the corresponding command-line options would look very similar:
.. code-block:: shell
--os-project-name <project-name>
--os-project-domain-name <project-domain-name>
--os-auth-url <url-to-openstack-identity>
--os-identity-api-version 3
--os-auth-plugin openid
--os-auth-type v3oidcpassword
--os-username <username-in-idp>
--os-password <password-in-idp>
--os-identity-provider <the-desired-idp-in-keystone>
--os-client-id <the-client-id-configured-in-the-idp>
--os-client-secret <the-client-secred-configured-in-the-idp>
--os-openid-scope <the-scopes-of-desired-attributes-to-claim-from-idp>
--os-protocol <the-protocol-used-in-the-apache2-oidc-proxy>
--os-access-token-type <the-access-token-type-used-by-your-idp>
--os-discovery-endpoint <the-well-known-endpoint-of-the-idp>
For more information on configuring authentication, including an overview of
the many authentication mechanisms supported, refer to the Authentication guide. For more information on configuration in general, refer to the
Configuration guide.
.. __: https://docs.openstack.org/python-openstackclient/latest/cli/authentication.html. .. __: https://docs.openstack.org/python-openstackclient/latest/configuration/index.html
You can clone the repository from opendev.org::
git clone https://opendev.org/openstack/python-openstackclient
cd python-openstackclient
OpenStack Client uses the same contributor process as other OpenStack projects.
For information on this process, including help on setting up you Gerrit
account and an overview of the CI process, refer to the OpenStack Contributors Guide__.
For more information on contributing to OpenStack Client itself, including
guidance on how to design new commands and how to report bugs, refer to the
Contributors Guide__.
.. __: https://docs.openstack.org/python-openstackclient/latest/contributor/index.html .. __: https://docs.opendev.org/opendev/infra-manual/latest/developers.html
Issue Tracker <https://bugs.launchpad.net/python-openstackclient>_Code Review <https://review.opendev.org/#/q/status:open+project:openstack/openstacksdk,n,z>_Documentation <https://docs.openstack.org/python-openstackclient/latest/>_PyPi <https://pypi.org/project/python-openstackclient>_Mailing list <https://lists.openstack.org/mailman3/lists/openstack-discuss.lists.openstack.org/>_Release Notes <https://docs.openstack.org/releasenotes/python-openstackclient>_IRC (#openstack-sdks on OFTC (irc.oftc.net)) <irc://irc.oftc.net/openstack-sdks>_FAQs
OpenStack Command-line Client
We found that python-openstackclient demonstrated a healthy version release cadence and project activity because the last version was released less than a year ago. It has 1 open source maintainer collaborating on the project.
Did you know?

Socket for GitHub automatically highlights issues in each pull request and monitors the health of all your open source dependencies. Discover the contents of your packages and block harmful activity before you install or update your dependencies.
Company News
Socket has acquired Secure Annex to expand extension security across browsers, IDEs, and AI tools.

Research
/Security News
Socket is tracking cloned Open VSX extensions tied to GlassWorm, with several updated from benign-looking sleepers into malware delivery vehicles.
Product
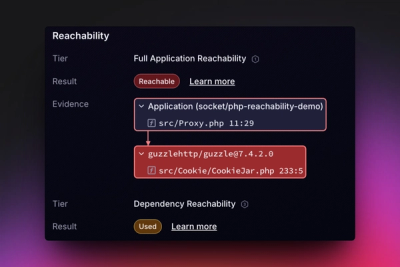
Reachability analysis for PHP is now available in experimental, helping teams identify which vulnerabilities are actually exploitable.