项目初衷
为什么已经有了rock4automation的自动化测试框架的项目,还要另起一个rtsf项目,并且rtsf中使用的技术,rock4automation项目中已经涵盖?
因为,它存在的痛点很明显:
- rock4automation项目的初衷,是为了能快速重拾技术,是技术的合集,包含了新旧测试的技术。里边一些模块,是冗余的存在,这让项目本身很臃肿。如整合的一些自动化框架,selenium、appium、autoitv3、Microsoft UI Automation等等,关于性能的测试,整合了locust的一些用法。
- rock4automation项目,打包发布的程序,会将源码封装了exe或者加密为pyd,也就是说,发布出来的程序,不是一个源码,而是一个客户端程序,这就有违我开源的意图了
- rock4automation项目,打包了相关工具,比如appium-server,java.exe 等等,大量冗余的非项目源码的工具
而rtsf(rock4 test service framework)项目的初衷:
- 参考rock4automation和httprunner的项目,我希望能精简一下rtsf,使它仅仅提供一个测试的关键字驱动和数据驱动的程序框架。
- 其次,我希望rtsf是个可扩展的服务框架,一些自动化技术的框架,可以依托rtsf,迅速形成一个有效的自动化测试相关的业务框架。如整合selenium形成web应用业务的自动化测试框架;整合requests等技术,形成http(s)接口层业务的自动化测试框架等。
- 另外,关于持续继承方面,我希望rtsf是个命令行的工具,依托它产生的自动化测试框架,可以接入持续集成的系统。
- 最后,我希望,依托rtsf产生的自动化测试项目,能够轻量,少造轮子,多复用标准库和优秀开源项目,
架构
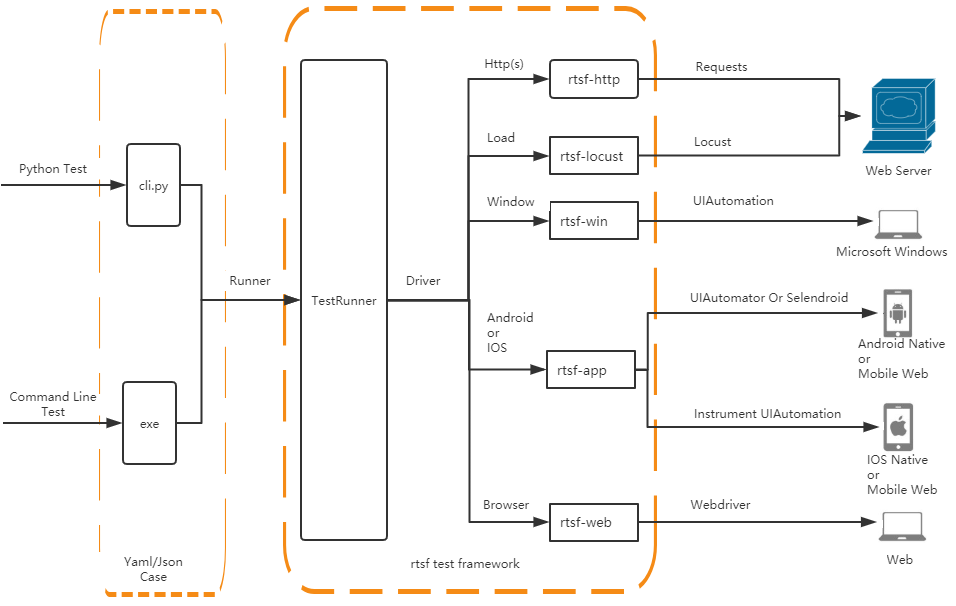
构建rtsf系列框架
我这里已经完成了几个rtsf+的项目,供大家参考和使用:
其他可接入的方案:
- 计算机视觉opencv
- 图形文字识别tesseract
- 基于像素点对比的图像ImageDiff
- 基于unity3d技术游戏控件识别pocoui
等等
测试用例模型,计划扩展为, yaml, xml, excel三种,目前已扩展的只有yaml测试用例模型
介绍
安装
pip install rtsf
rtsf-使用入门
rtsf提供测试执行、报告、日志的基本功能
测试用例介绍
- rtsf分三种用例: case、 api、 suite,所以rtsf支持测试用例分层,允许测试用例的组件化, 其中api和suite,比case多一个关键字: def
- 测试用例编写过程中,使用api关键字封装当前单个case,允许其他case进行调用,类似调用单个api一样
- 测试用例编写过程中,使用suite关键字,封装当前多个cases,允许其他case进行调用, 类似调用组件化模块一样
- def定义的api和suite,传递参数的替换过程: 当前用例调用api或suite时,会先将传递的参数值,替换被调用的api或suite中相应的参数
- api用例的调用过程: 当前用例调用api的时候,如果当前case与api重复定义键值对时,取当前case中键值对值
- suite用例的调用过程: 当前用例调用suite的时候,如果当前case与suite重复定义键值对,取suite中键值对值
注意: 其内在逻辑,其实是,先加载api和suite,以dict形式存储在内置变量中,然后,加载测试集的用例,如果测试用例使用了api则合并,如果测试用例使用了suite则扩展。
# test.yaml

- project:
    name: demo project
    module: the module name of testing project

- case:
    name: case 1

- case:
    name: case call api 1
    api: test1_api()

- case:
    name: case call suite
    api: test_suite(1, 2)
- 在api关键字中中,使用def,表示当前是个 api用例
- api测试用例,可被suite和case重复引入
- 存放路径, case用例同级目录下: dependencies/api/。yaml, dependencies/api/。yml, dependencies/api/*。json
- 沿用case中定义的关键字, 对外调用,使用了def关键字。 其中,def的解析,参照了httprunner项目
# test_api.yaml

- api:
    def: test1_api()

- api:
    def: test2_api($arg1, $arg2)
- 在project中,定义def,表示当前整个yaml文件,是一个suite
- suite测试用例, 可被case和其他suite重复引入
- suite测试用例,实际上是,由一些api或者一些case,封装后的,相对稳定的,测试用例
- 存放路径, 测试用例同级目录下: dependencies/suite/。yaml, dependencies/suite/。yml, dependencies/suite/*。json
suite的用例跟 case差别不大,主要的是,在project中,添加def关键字,定义引入suite的函数入口
# test_suite.yaml

- project:
    def: test_suite($arg1, $arg2)

- case:
    name: suite 1

- case:
    name: suite call api 2
    api: test2_api($arg1, $arg2)
测试用例中,函数及变量替换的格式
变量和函数的替换,参照了httprunner项目的格式 该格式取代了我的rock4automation项目中的, #var# 等替换规则
- 引用函数: ${function_str}
- 引用变量: $variable_str
- function_str 为字母、数字、下划线、横线、点号、等号、逗号组成的函数. 示例: /api/${add(1, 2)}?t=${get_timestamp()} 正则表示为: [a-zA-Z0-9.-=,]
- function_str若含有特殊字符,将不会被识别, 解决方法是,使用全局变量. 示例,如: a='@#$%^&'; $print($a)
- variable_str 为字母、数字、下划线组成的变量名. 正则表示为: [a-zA-Z0-9_]
运行测试用例
使用默认Runner类执行规则,执行test.yaml测试用例
from rtsf.p_executer import TestRunner, Runner

runner = TestRunner(runner = Runner).run(r'C:\xxx\xxx\test.yaml')
runner.gen_html_report()
- TestRunner(runner = Runner),runner参数用于指定重写了Runner子类,该子类重写了Runner.run_test方法。 默认值为Runner
- TestRunner.run, 该方法,用于运行指定yaml的case文件,或者运行指定文件夹路径中的yaml和json,如c:\case目录下*.yaml和*.json
- TestRunner。gen_html_report,该方法,用于生成测试报告,报告路径是yaml文件所在路径
简单实例
编写一个测试用例文件,如 example_1.yaml
# example_1.yaml

- project:
    name: demo project
    module: test baidu

- case:
    name: www.baidu.com
example_1执行后的报告:

代码,参见项目目录examples/example_1
数据驱动-实例
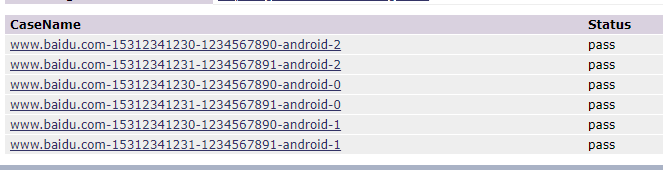
如下,创建三个文件,example_2.yaml, username_password.csv, devices.csv
# example_2.yaml

- project:
    name: demo project
    module: test baidu
    data:
        - csv: devices.csv
          by: Random
        - csv: username_password.csv

- case:
    name: www.baidu.com-$username-$password-$devices


# username_password.csv
username,password
15312341230,1234567890
15312341231,1234567891


# devices.csv
devices
android-0
android-1
android-2
数据驱动,其实很简单,在yaml的测试用例中,在project块,添加data关键字。
data关键字,以列表形式存在,每个列表项是一个字典,由两个key组成(csv, by)。跟loadrunner中参数化数据一样,csv第一行定义变量,第二行及以下行定义数据驱动的变量值
- csv后面接文件名称,该文件以csv形式存在于case同一路径。
- by是指读取csv格式的顺序, Random or Sequential。默认是Sequential,顺序读取。 该参数,可选填
- 笛卡儿积算法,会对多个data参数进行排列,rtsf会对排列的最终结果遍历执行当前测试集合
example_2执行后的报告,如下, 跑了6条用例,是username_password.csv和devices.csv里边参数的笛卡儿积,username_password默认是顺序,devices是随机。
代码,参见项目目录examples/example_2
重写Runner-实例
- rtsf提供入口,允许自定义执行模块的扩展,这个过程有点类似python中重写threading.Thread类.
- 不同的是,rtsf需要重写rtsf.p_executer.Runner.run_test方法
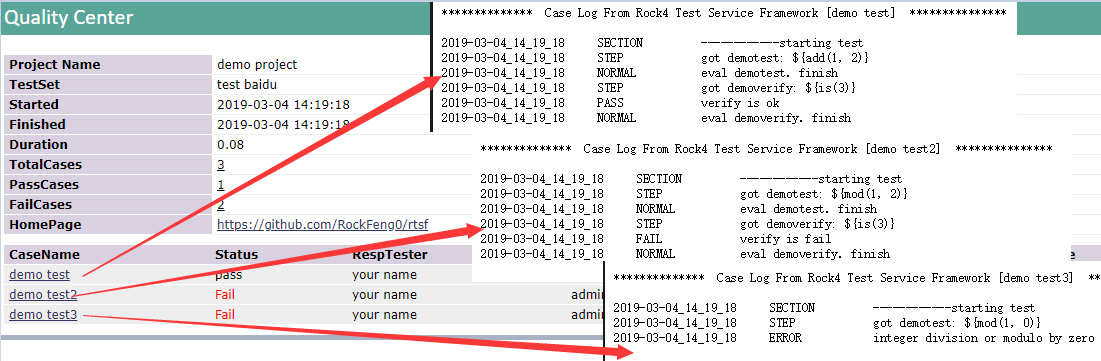
首先, 我们设计我们的yaml用例, 比如,在上面的例子中,加入了几个关键字, responsible, tester, demotest, demoverify
# example_3.yaml

- project:
    name: demo project
    module: test baidu

- case:
    name: demo test
    responsible: your name
    testser: other name
    demotest: ${add(1, 2)}
    demoverify: ${_is(3)}

- case:
    name: demo test2
    responsible: your name
    testser: other name
    demotest: ${mod(1, 2)}
    demoverify: ${_is(3)}

- case:
    name: demo test3
    responsible: your name
    testser: other name
    demotest: ${mod(1, 0)}
    demoverify: ${_is(3)}
然后,重写Runner, 对上面关键字进行功能设置, 重写 Runner.run_test的过程,是使用rtsf的主要工作
- run_test(testcase_dict, variables, driver_map), rtsf在执行测试的时候,调用run_test方法,传入这3个参数
注意: 重写的时候,第一个参数,是单个case,不是所有case,只需要写一个case的执行逻辑
# DemoRunner.py

# encoding:utf-8

from rtsf.p_executer import TestRunner, Runner

def test_add(x, y):
    global result
    result = x+y

def test_mod(x, y):
    global result
    result = x%y

def verify_is(x):
    return result == x

class DemoRunner(Runner):

    def __init__(self):
        ''' 继承Runner
        self._default_devices --> list,分布式设备标识。 默认 值 [""],表示本机
        self._default_drivers --》 list, 分布式driver标识与driver键值对。 默认值 [("",None)], 表示本机驱动
        self.parser --> TestCaseParser实例,用于解析用例
        self.tracers --> 每一台分布式设备初始化的Tracer实例,用于记录日志和生成报告
        self.proj_info --> 记录了用例的项目信息
        '''
        super(DemoRunner,self).__init__()

    def run_test(self, testcase_dict, variables, driver_map):
        ''' 重写 run_test,有三个参数
        @parm testcase_dict:  单条测试用例
        @param variables: dict; 用例采用数据驱动的情况下,variables是csv文件变量的笛卡儿积;默认情况下值是 {}
        @param driver_map:  tuple;  (唯一标识, driver or module or obj); 默认情况下的值是("",None),该参数适用于selenium的grid有多个 driver的情况
        '''

        # rtsf 遍历 self._default_drivers, 传给 driver_map   这里fn = ''  driver=None
        fn, driver = driver_map

        # 获取 fn 的跟踪对象, 用于记录日志 和 报告
        fn_logger = self.tracers[fn]

        # 获取用例解析对象
        parser = self.parser

        # 绑定测试用例关键字
        yaml_keys = {"add": test_add, "mod": test_mod, '_is': verify_is}
        parser.bind_functions(yaml_keys)

        # 更新传入的变量
        parser.update_binded_variables(variables)

        # 获取用例名字
        case_name = testcase_dict.get("name")

        # parser.eval_content_with_bind_actions 用于解析 字段中的变量和函数,  如:  引用函数: ${function_str} 引用变量: $variable_str
        case_name = parser.eval_content_with_bind_actions(case_name)

        try:
            # fn_logger 可以记录报告,使用:  start, section, step, normal, ok, fail, error, stop
            # start 用于 开始记录报告;  stop 用于结束报告记录
            fn_logger.start(self.proj_info["module"],  # yaml case中 module
                            case_name,  # yaml case中 用例名臣
                            testcase_dict.get("responsible",u"administrator"), # yaml case中responsible定义的责任人名称
                            testcase_dict.get("tester",u"administrator"), # yaml case中tester定义的测试人名称
                            )

            # fn_logger 可以使用了logging, 记录日志,使用:  log_debug, log_info, log_warning, log_error, log_critical
            fn_logger.log_debug(u"===== run_test\n\t{}".format(testcase_dict))

            fn_logger.section(u"------------starting test")
            # 获取demotest
            demotest = testcase_dict.get("demotest")
            fn_logger.step("got demotest: %s" %demotest)

            parser.eval_content_with_bind_actions(demotest)
            fn_logger.normal(u"eval demotest. finish")

            # 获取demoverify
            demoverify = testcase_dict.get("demoverify")
            fn_logger.step("got demoverify: %s" %demoverify)

            if parser.eval_content_with_bind_actions(demoverify):
                fn_logger.ok('verify is ok')
            else:
                fn_logger.fail('verify is fail')
            fn_logger.normal(u"eval demoverify. finish")

        except Exception as e:
            fn_logger.error(e)

        fn_logger.stop()
- DemoRunner中,三个内置函数 test_add test_mod verify_is 映射到 yaml函数: add, mod, _is
- DemoRunner中, 使用Tracer的实例fn_logger,对测试执行过程进行日志和报告的记录,最后使用 fn_logger.stop()结束测试
最后,我们设置runner参数为 DemoRunner, 执行我们自定义的用例逻辑
# example_3.py

# encoding:utf-8

from rtsf.p_executer import TestRunner, Runner
from DemoRunner import DemoRunner

runner = TestRunner(runner = DemoRunner).run(r'example_3.yaml')
runner.gen_html_report()
example_3执行后的报告,如下,跑了3条用例,1条通过,1条失败,1条报错
代码,参见项目目录examples/example_3
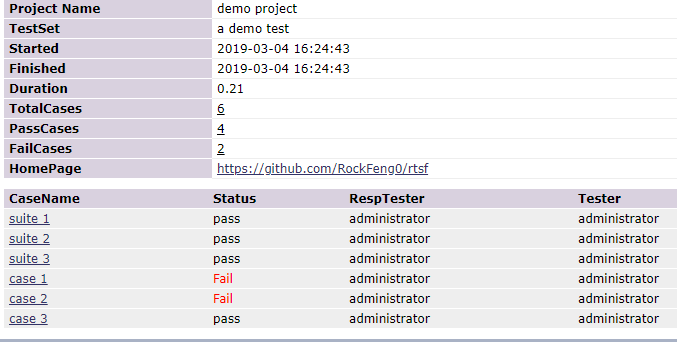
测试用例分层(测试组件化)-实例
使用上述的DemoRunner,我们设计下 分层的用例,创建如下三个文件, 文件名可以自定义,路径要正确
- api用例文件,我们使用参数化,使得api用例,可以重复使用
- suite用例文件,我们使用常规的测试手段,封装了正常的测试场景
- 最后,case用例文件,我们做一些异常测试场景
# ./dependencies/api/test_api.yaml

- api:
    def: add_api($arg1, $arg2, $exp)
    demotest: ${add($arg1, $arg2)}
    demoverify: ${_is($exp)}

- api:
    def: mod_api($arg1, $arg2, $exp)
    demotest: ${mod($arg1, $arg2)}
    demoverify: ${_is($exp)}

# ./dependencies/suite/test_suite.yaml

- project:
    def: suite_test()

- case:
    name: suite 1
    api: add_api(1, 2, 3)

- case:
    name: suite 2
    api: mod_api(2, 2, 0)

- case:
    name: suite 3
    demotest: ${add(1, 2)}
    demoverify: ${_is(3)}

# ./example_4.yaml

- project:
    name: demo project
    module: a demo test

- case:
    name: case 0
    suite: suite_test()

- case:
    name: case 1
    api: add_api(1, 2, 100)

- case:
    name: case 2
    api: mod_api(1, 2, 100)

- case:
    name: case 3
    demotest: ${add(1, 2)}
    demoverify: ${_is(3)}
example_4执行后的报告,如下,跑了6条用例,suite中3条通过,case的3条中,2条失败,1条成功
代码,参见项目目录examples/example_4
自定义内置函数
在上述DemoRunner重写 Runner.run_test的过程中,我们定义了三个yaml函数: add, mod, _is, 映射到内置函数, test_add test_mod verify_is
rtsf 提供了另一种更简单的方法
- 定义preference.py,将yaml函数写入
# preference.py

#encoding:utf-8

def add(x, y):
    global result
    result = x+y

def mod(x, y):
    global result
    result = x%y

def _is(x):
    return result == x
...

# 绑定测试用例关键字
# yaml_keys = {"add": test_add, "mod": test_mod, 'is': verify_is}
# parser.bind_functions(yaml_keys)
...
执行结果,同 example_4
代码,参见项目目录examples/example_5
rtsf-高阶用法
基于约定大于配置的原则,使用rsft构建自己的自动化测试框架
约定基本用例结构
,rtsf系列框架,约定的case基本结构 如下:
- project:
    name:
    module:
    data:
- case:
    name:
    responsible:
    tester:
    glob_var:
    glob_regx:
    pre_command:
    steps:
    post_command:
    verify:
执行顺序 pre_command(List) -> steps(List) -> post_command(List) -> verify(List)
preject定义测试集信息
| name | 项目名称或待测系统名称(必填) | 字符串 |
| module | 测试集或功能模块名称(必填) | 字符串 |
| data | 数据驱动,引用的数据(选填) | 列表 |
case定义测试用例
| name | 描述 用例 (必填),唯一性(必填) | 字符串 |
| responsible | 用例责任人或者编写人(选填) | 字符串 |
| tester | 用例执行者或者测试人(选填) | 字符串 |
| glob_var | 全局变量(选填) | 字典 |
| glob_regx | 全局正则(选填) | 字典 |
| pre_command | 测试的前置步骤或钩子(选填) | 列表 |
| steps | 测试步骤 (必填) | 列表 |
| post_command | 测试的后置步骤或钩子(选填) | 列表 |
| verify | 校验 (选填) | 列表 |