TinyTuya


Python module to interface with Tuya WiFi smart devices
Description
This python module controls and reads state of Tuya compatible WiFi Smart Devices (Plugs, Switches, Lights, Window Covers, etc.) using the local area network (LAN) or the cloud (TuyaCloud API). This is a compatible replacement for the pytuya PyPI module and currently supports Tuya Protocols 3.1, 3.2, 3.3, 3.4 and 3.5.
Tuya devices are designed to communicate with the TuyaCloud but most also expose a local area network API. This allows us to directly control the devices without using the cloud. This python module provides a way to poll status and issue commands to these devices.
TinyTuya can also connect to the Tuya Cloud to poll status and issue commands to Tuya devices.

import tinytuya
d = tinytuya.Device('DEVICE_ID_HERE', 'IP_ADDRESS_HERE', 'LOCAL_KEY_HERE', version=3.3)
data = d.status()
print('Device status: %r' % data)
NOTE: Devices need to be activated by Smart Life App.
TinyTuya Installation
python -m pip install tinytuya
pipx install tinytuya
Pip will attempt to install cryptography, requests and colorama if not already installed.
Tuya Device Preparation
Controlling and monitoring Tuya devices on your network requires the following:
- Address - Network address (IPv4) of the device e.g. 10.0.1.100
- Device ID - Unique identifier for the Tuya device
- Version - Tuya protocol version used (3.1, 3.2, 3.3, 3.4 or 3.5)
- Local_Key - Security key needed to access the Tuya device. See Setup Wizard to get these keys.
Network Scanner
TinyTuya has a built in network scanner that can be used to find Tuya Devices on your local network. It will show Address, Device ID and Version for each device. Your LAN and firewall will need to allow UDP (6666, 6667 and 7000) and TCP (6668) traffic.
python -m tinytuya scan
Setup Wizard - Getting Local Keys
TinyTuya has a built-in setup Wizard that uses the Tuya IoT Cloud Platform to generate a JSON list (devices.json) of all your registered devices, including secret Local_Key and Name of your devices. Follow the steps below:
-
PAIR - Download the Smart Life App or Tuya Smart App, available for iPhone or Android. Set up your SmartLife account and pair all of your Tuya devices (this is important as you cannot access a device that has not been paired). Do not use a 'guest' account, otherwise it will get deleted without confirmation at step 3.
-
SCAN (Optional) - Run the TinyTuya scan to get a list of Tuya devices on your network. It will show device Address, Device ID and Version number (3.x):
python -m tinytuya scan
NOTE: You will need to use one of the displayed Device IDs for step 4.
-
TUYA ACCOUNT - Set up a Tuya Account (see PDF Instructions):
- NOTE: Tuya often changes their portal and services. Please open an issue with screenshots if we need to update these instructions.
- Create a Tuya Developer account on iot.tuya.com. When it asks for the "Account Type", select "Skip this step..." (see screenshot).
- Click on "Cloud" icon -> "Create Cloud Project"
- Pick the correct Data Center "Region" for your location (check HERE to find your Region). This will be used by TinyTuya Wizard (screenshot).
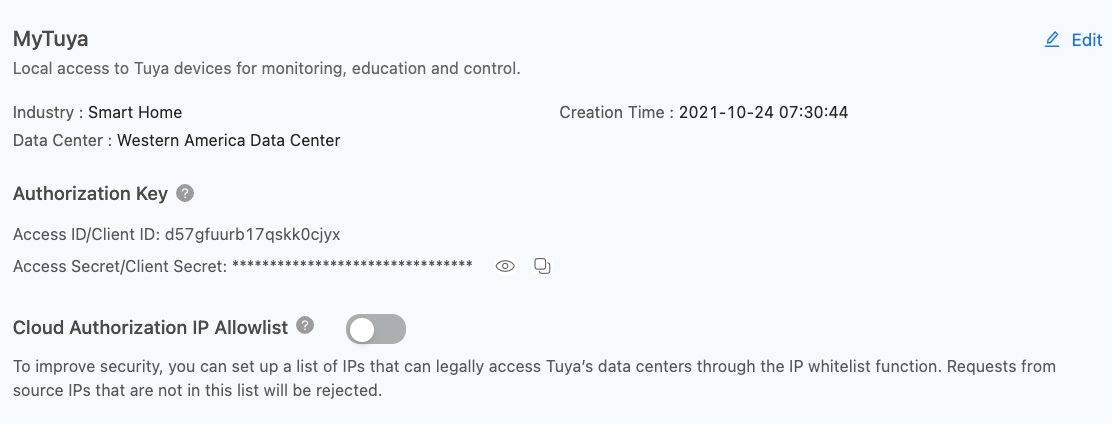
- Skip the configuration wizard but remember the Authorization Key: API ID and Secret for below (screenshot).
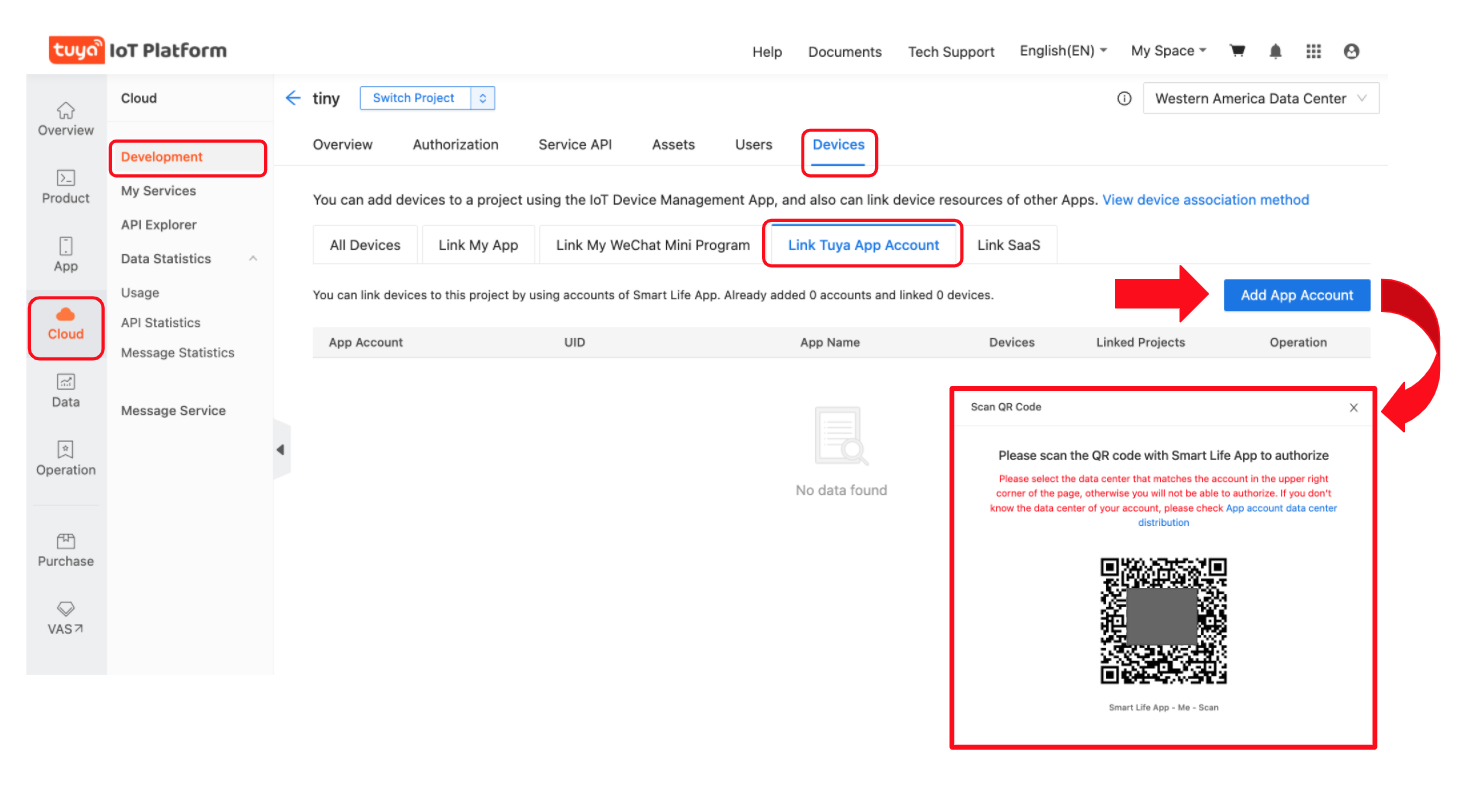
- Click on "Cloud" icon -> Select your project -> Devices -> Link Tuya App Account (see screenshot)
- Click Add App Account (screenshot) and it will pop-up a "Link Tuya App Account" dialog, chose "Automatic" and "Read Only Status" (it will still alow commands). Click OK and it will display a QR code. Scan the QR code with the Smart Life app on your Phone (see step 1 above) by going to the "Me" tab in the Smart Life app and clicking on the QR code button
[..] in the upper right hand corner of the app. When you scan the QR code, it will link all of the devices registered in your Smart Life app into your Tuya IoT project. If the QR code will not scan then make sure to disable any browser theming plug-ins (such as Dark Reader) and try again.
- NO DEVICES? If no devices show up after scanning the QR code, you will need to select a different data center and edit your project (or create a new one) until you see your paired devices from the Smart Life App show up. (screenshot). The data center may not be the most logical. As an example, some in the UK have reported needing to select "Central Europe" instead of "Western Europe".
- SERVICE API: Under "Service API" ensure these APIs are listed:
IoT Core and Authorization. To be sure, click subscribe again on every service. Very important: disable popup blockers otherwise subscribing won't work without providing any indication of a failure. Make sure you authorize your Project to use those APIs:
- Click "Service API" tab
- Click "Go to Authorize" button
- Select the API Groups from the dropdown and click
Subscribe (screenshot)
- RENEWAL: The subscription to the
IoT Core service expires after some time. By default, when you subscribe to it for the first time, it will last for one month. Once expired, the setup wizard won't be able to communicate with the Tuya account anymore, so it needs to be renewed. As of November 12th 2024, it can be renewed for a duration of 1, 3 or 6 months by simply filling in a form with some basic information (e.g. purpose of the project, type of developer).
-
WIZARD - Run Setup Wizard:
Notes:
- If you ever reset or re-pair your smart devices, the Local_Key will be reset and you will need to repeat the steps above.
- The TinyTuya Wizard was inspired by the TuyAPI CLI which is an alternative way to fetch the Local_Keys:
npm i @tuyapi/cli -g and run tuya-cli wizard
Programming with TinyTuya
After importing tinytuya, you create a device handle for the device you want to read or control. Here is an example for a Tuya smart switch or plug:
import tinytuya
d = tinytuya.OutletDevice(
dev_id='DEVICE_ID_HERE',
address='IP_ADDRESS_HERE',
local_key='LOCAL_KEY_HERE',
version=3.3)
data = d.status()
print('set_status() result %r' % data)
d.turn_on()
d.turn_off()
TinyTuya Module Classes and Functions
Classes

  AESCipher - Cryptography Helpers
  XenonDevice(args...) - Base Class
    Device(args...) - Tuya Class for Devices
      OutletDevice(args...)
      CoverDevice(args...)
      BulbDevice(args...)
        Where args:
          dev_id (str): Device ID e.g. 01234567891234567890
          address (str): Device Network IP Address e.g. 10.0.1.99 or "Auto" to auto-find
          local_key (str): The encryption key
          dev_type (str): Device type for payload options (see below)
          version = 3.1 (float): Tuya Protocol (e.g. 3.1, 3.2, 3.3, 3.4, 3.5)
          persist = False (bool): Keep TCP link open
          cid = None (str): Optional sub device id
          node_id = None (str): Alias for cid
          parent = None (object): Gateway device object this is a child of
          port = TCPPORT (int): The port to connect to device
          connection_timeout = 5 (int): Timeout in seconds
          connection_retry_limit = 5 (int)
          connection_retry_delay = 5 (int)

          Total timeout = (connection_timeout * connection_retry_limit) +
                          (connection_retry_delay * (connection_retry_limit - 1))
                          Defaults: (5 * 5) + (5 * (5 - 1)) = 45 seconds

  Cloud(apiRegion, apiKey, apiSecret, apiDeviceID, new_sign_algorithm)

TinyTuya Base Functions
    devices = deviceScan()                        # Returns dictionary of devices found on local network
    scan()                                        # Interactive scan of local network
    wizard()                                      # Interactive setup wizard
    set_debug(toggle, color)                      # Activate verbose debugging output
    pack_message(msg, hmac_key)                   # Packs a TuyaMessage(), encrypting or adding a CRC if required
    unpack_message(data, hmac_key, header,
                    no_retcode)                   # Unpacks a TuyaMessage()
    parse_header(data)                            # Unpacks just the header part of a message into a TuyaHeader()
    find_device(dev_id, address)                  # Scans network for Tuya devices with either ID = dev_id or IP = address
    device_info(dev_id)                           # Searches DEVICEFILE (usually devices.json) for device with ID
    assign_dp_mappings(tuyadevices, mappings)     # Adds mappings to all the devices in the tuyadevices list
    decrypt_udp(msg)                              # Decrypts a UDP network broadcast packet

 Device Functions (All Devices)
    json = status()                               # returns json payload
    subdev_query(nowait)                          # query sub-device status (only for gateway devices)
    set_version(version)                          # 3.1 [default], 3.2, 3.3 or 3.4
    set_socketPersistent(False/True)              # False [default] or True
    set_socketNODELAY(False/True)                 # False or True [default]
    set_socketRetryLimit(integer)                 # retry count limit [default 5]
    set_socketRetryDelay(integer)                 # retry delay [default 5]
    set_socketTimeout(timeout)                    # set connection timeout in seconds [default 5]
    set_dpsUsed(dps_to_request)                   # add data points (DPS) to request
    add_dps_to_request(index)                     # add data point (DPS) index set to None
    set_retry(retry=True)                         # retry if response payload is truncated
    set_status(on, switch=1, nowait)              # Set status of switch to 'on' or 'off' (bool)
    set_value(index, value, nowait)               # Set int value of any index.
    set_multiple_values(index_value_dict, nowait) # Set multiple values with a single request
    heartbeat(nowait)                             # Send heartbeat to device
    updatedps(index=[1], nowait)                  # Send updatedps command to device
    turn_on(switch=1, nowait)                     # Turn on device / switch #
    turn_off(switch=1, nowait)                    # Turn off
    set_timer(num_secs, nowait)                   # Set timer for num_secs
    set_sendWait(num_secs)                        # Time to wait after sending commands before pulling response
    detect_available_dps()                        # Return list of DPS available from device
    generate_payload(command, data,...            # Generate TuyaMessage payload for command with data
    send(payload)                                 # Send payload to device (do not wait for response)
    receive()                                     # Receive payload from device

OutletDevice Additional Functions
    set_dimmer(percentage):

BulbDevice Additional Functions
    set_colour(r, g, b, nowait):
    set_hsv(h, s, v, nowait):
    set_white(brightness, colourtemp, nowait):
    set_white_percentage(brightness=100, colourtemp=0, nowait):
    set_brightness(brightness, nowait):
    set_brightness_percentage(brightness=100, nowait):
    set_colourtemp(colourtemp, nowait):
    set_colourtemp_percentage(colourtemp=100, nowait):
    set_scene(scene, nowait):                     # 1=nature, 3=rave, 4=rainbow
    set_mode(mode='white', nowait):               # white, colour, scene, music
    result = brightness():
    result = colourtemp():
    (r, g, b) = colour_rgb():
    (h,s,v) = colour_hsv()
    result = state():

CoverDevice Additional Functions
    open_cover(switch=1):
    close_cover(switch=1):
    stop_cover(switch=1):

Cloud Functions
    setregion(apiRegion)
    cloudrequest(url, action=[POST if post else GET], post={}, query={})
    getdevices(verbose=False)
    getstatus(deviceid)
    getfunctions(deviceid)
    getproperties(deviceid)
    getdps(deviceid)
    sendcommand(deviceid, commands [, uri])
    getconnectstatus(deviceid)
    getdevicelog(deviceid, start=[now - 1 day], end=[now], evtype="1,2,3,4,5,6,7,8,9,10", size=100, params={})
      -> when start or end are negative, they are the number of days before "right now"
          i.e. "start=-1" is 1 day ago, "start=-7" is 7 days ago
TinyTuya Error Codes
Starting with v1.2.0 TinyTuya functions will return error details in the JSON data responses instead of raising exceptions. The format for this response:
{ "Error":"Invalid JSON Payload", "Err":"900", "Payload":"{Tuya Message}" }
The "Err" number will be one of these:
- 900 (ERR_JSON) - Invalid JSON Response from Device
- 901 (ERR_CONNECT) - Network Error: Unable to Connect
- 902 (ERR_TIMEOUT) - Timeout Waiting for Device
- 903 (ERR_RANGE) - Specified Value Out of Range
- 904 (ERR_PAYLOAD) - Unexpected Payload from Device
- 905 (ERR_OFFLINE) - Network Error: Device Unreachable
- 906 (ERR_STATE) - Device in Unknown State
- 907 (ERR_FUNCTION) - Function Not Supported by Device
- 908 (ERR_DEVTYPE) - Device22 Detected: Retry Command
- 909 (ERR_CLOUDKEY) - Missing Tuya Cloud Key and Secret
- 910 (ERR_CLOUDRESP) - Invalid JSON Response from Cloud
- 911 (ERR_CLOUDTOKEN) - Unable to Get Cloud Token
- 912 (ERR_PARAMS) - Missing Function Parameters
- 913 (ERR_CLOUD) - Error Response from Tuya Cloud
- 914 (ERR_KEY_OR_VER) - Check device key or version
Example Usage
See the sample python script test.py for an OutletDevice example or look in the examples directory for other scripts.
import tinytuya
"""
OUTLET Device
"""
d = tinytuya.Device('DEVICE_ID_HERE', 'IP_ADDRESS_HERE', 'LOCAL_KEY_HERE', version=3.3)
data = d.status()
print('Dictionary %r' % data)
print('State (bool, true is ON) %r' % data['dps']['1'])
switch_state = data['dps']['1']
data = d.set_status(not switch_state)
if data:
print('set_status() result %r' % data)
data = d.set_status(False, 4)
if data:
print('set_status() result %r' % data)
print('set_status() extra %r' % data[20:-8])
"""
RGB Bulb Device
"""
import time
d = tinytuya.BulbDevice('DEVICE_ID_HERE', 'IP_ADDRESS_HERE', 'LOCAL_KEY_HERE')
d.set_version(3.3)
d.set_socketPersistent(True)
data = d.status()
print('Dictionary %r' % data)
d.set_colour(255,0,0)
rainbow = {"red": [255, 0, 0], "orange": [255, 127, 0], "yellow": [255, 200, 0],
"green": [0, 255, 0], "blue": [0, 0, 255], "indigo": [46, 43, 95],
"violet": [139, 0, 255]}
for color in rainbow:
[r, g, b] = rainbow[color]
d.set_colour(r, g, b, nowait=True)
time.sleep(0.25)
d.set_brightness(1000)
d.set_white(1000,10)
d.set_mode('scene')
d.set_value(25, '07464602000003e803e800000000464602007803e803e80000000046460200f003e803e800000000464602003d03e803e80000000046460200ae03e803e800000000464602011303e803e800000000')
Example Device Monitor
You can set up a persistent connection to a device and then monitor the state changes with a continual loop. This is helpful for troubleshooting and discovering DPS values.
import tinytuya
d = tinytuya.OutletDevice('DEVICEID', 'DEVICEIP', 'DEVICEKEY', version=3.3, persist=True)
print(" > Send Request for Status < ")
d.status(nowait=True)
print(" > Begin Monitor Loop <")
while(True):
data = d.receive()
print('Received Payload: %r' % data)
if not data:
print(" > Send Heartbeat Ping < ")
d.heartbeat()
Tuya Cloud Access
You can poll and manage Tuya devices using the Cloud class and functions.
CAUTION: The free Tuya IoT Developer (Trial) account allows a very limited number of Cloud API calls. Be aware of the restrictions before enabling any automation that makes frequent calls.
import tinytuya
c = tinytuya.Cloud(
apiRegion="us",
apiKey="xxxxxxxxxxxxxxxxxxxx",
apiSecret="xxxxxxxxxxxxxxxxxxxxxxxxxxxxxxxx",
apiDeviceID="xxxxxxxxxxxxxxxxxxID")
devices = c.getdevices()
print("Device List: %r" % devices)
id = "xxxxxxxxxxxxxxxxxxID"
result = c.getproperties(id)
print("Properties of device:\n", result)
result = c.getstatus(id)
print("Status of device:\n", result)
commands = {
"commands": [
{"code": "switch_1", "value": True},
{"code": "countdown_1", "value": 0},
]
}
print("Sending command...")
result = c.sendcommand(id,commands)
print("Results\n:", result)
Up to one week of device logs can also be pulled from the Cloud. By default getdevicelog() will pull 1 day of logs or 5000 log entries, whichever comes first. The returned timestamps are unixtime*1000, and event_id 7 (data report) will probably be the most useful.
import tinytuya
import json
c = tinytuya.Cloud()
r = c.getdevicelog( '00112233445566778899' )
print( json.dumps(r, indent=2) )
Encryption Notes
Tuya devices use AES encryption which is not available in the Python standard library. PyCA/cryptography is recommended and installed by default. Other options include PyCryptodome , PyCrypto and pyaes.
- Deprecation notice for pyaes: The pyaes library works for Tuya Protocol <= 3.4 but will not work for 3.5 devices. This is because pyaes does not support GCM which is required for v3.5 devices.
Command Line
TinyTuya provides a built-in command line interface to get Local key, scan and poll devices.
Installation
python -m tinytuya
tinytuya
Command Line Usage
tinytuya <command> [-debug] [-nocolor] [-h] [-yes] [-no-poll] [-device-file FILE] [-snapshot-file FILE]

  wizard         Launch Setup Wizard to get Tuya Local KEYs.
  scan           Scan local network for Tuya devices.
  devices        Scan all devices listed in devices.json file.
  snapshot       Scan devices listed in snapshot.json file.
  json           Scan devices listed in snapshot.json file [JSON].

  Wizard
      tinytuya wizard [-h] [-debug] [-force [0.0.0.0/24 ...]] [-no-broadcasts] [-nocolor] [-yes] [-no-poll]
                [-device-file FILE] [-raw-response-file FILE] [-snapshot-file FILE] [-credentials-file FILE]
                [-key KEY] [-secret SECRET] [-region {cn,eu,eu-w,in,us,us-e}] [-device DEVICE [DEVICE ...]]
                [-dry-run] [max_time]

        Common Options
        max_time             Maximum time to find Tuya devices [Default: 18]
        -no-broadcasts       Ignore broadcast packets when force scanning
        -nocolor             Disable color text output.
        -debug               Activate debug mode.
        -h, -help            Show usage help for command.
        -yes, -y             Answer "yes" to all questions
        -no-poll, -no        Answer "no" to "Poll?" (overrides -yes)
        -device-file FILE    JSON file to load devices from [Default: devices.json]
        -snapshot-file FILE  JSON file to load/save snapshot from/to [Default: snapshot.json]
        -force [0.0.0.0/24 ...], -f [0.0.0.0/24 ...]
                             Force network scan of device IP addresses [Default: Auto-detects net/mask]
        -no-broadcasts       Ignore broadcast packets when force scanning
        -raw-response-file   JSON file to save the raw server response to [Default: tuya-raw.json]

        Wizard Cloud API Options
        -dry-run             Do not actually connect to the Cloud
        -credentials-file    JSON file to load/save Cloud credentials from/to [Default: tinytuya.json]
        -key KEY             Cloud API Key to use
        -secret SECRET       Cloud API Secret to use
        -region              Cloud API Region to use {cn,eu,eu-w,in,us,us-e}
        -device DEVICE(S)    One or more Device ID(s) to use

  Scan
      tinytuya scan [-h] [-debug] [-force [0.0.0.0/24 ...]] [-no-broadcasts] [-nocolor] [-yes]
                [-device-file FILE] [-snapshot-file FILE] [max_time]

  Devices
      tinytuya devices [-h] [-debug] [-force [0.0.0.0/24 ...]] [-no-broadcasts] [-nocolor] [-yes]
                [-no-poll] [-device-file FILE] [-snapshot-file FILE] [max_time]

  Snapshot
      tinytuya snapshot [-h] [-debug] [-nocolor] [-yes] [-no-poll] [-device-file FILE] [-snapshot-file FILE]

  JSON
      tinytuya json [-h] [-debug] [-device-file FILE] [-snapshot-file FILE]
Scan Tool
The function tinytuya.scan() will listen to your local network (UDP 6666 and 6667) and identify Tuya devices broadcasting their Address, Device ID, Product ID and Version and will print that and their stats to stdout. This can help you get a list of compatible devices on your network. The tinytuya.deviceScan() function returns all found devices and their stats (via dictionary result).
You can run the scanner from the command line using these interactive commands:
python -m tinytuya scan
python -m tinytuya snapshot
python -m tinytuya json
python -m tinytuya devices
By default, the scan functions will retry 15 times to find new devices. If you are not seeing all your devices, you can increase max_retries by passing an optional arguments (eg. 50 retries):
python -m tinytuya scan 50
tinytuya.scan(50)
devices = tinytuya.deviceScan(false, 50)
Troubleshooting
- Tuya devices only allow one TCP connection at a time. Make sure you close the TuyaSmart or SmartLife app before using TinyTuya to connect.
- Some devices ship with older firmware that may not work with TinyTuya. If you're experiencing issues, please try updating the device's firmware in the official app.
- The LOCAL KEY for Tuya devices will change every time a device is removed and re-added to the TuyaSmart app. If you're getting decrypt errors, try getting the key again as it might have changed.
- Devices running protocol version 3.1 (e.g. below Firmware 1.0.5) do not require a device Local_Key to read the status. All devices will require a device Local_Key to control the device.
- Some devices with 22 character IDs will require additional setting to poll correctly. TinyTuya will attempt to detect and accomodate for this, but it can be specified directly:
a = tinytuya.OutletDevice('here_is_my_key', '192.168.x.x', 'secret_key_here', 'device22')
a.set_version(3.3)
a.set_dpsUsed({"1": None})
data = a.status()
print(data)
- Windows 10 Users - TinyTuya
wizard and scan interactive tools use ANSI color. This will work correctly in PowerShell but will show cryptic escape codes when run in Windows CMD. You can fix this by using the -nocolor option on tinytuya, or by changing the Windows CMD console registry to process ANSI escape codes by doing something like this:
reg add HKEY_CURRENT_USER\Console /v VirtualTerminalLevel /t REG_DWORD /d 0x00000001 /f
User Contributed Device Modules
In addition to the built-in OutletDevice, BulbDevice and CoverDevice device support, the community is encourage to submit additional device modules which are available here: Contrib Library:
from tinytuya.Contrib import ThermostatDevice

thermo = ThermostatDevice( 'abcdefghijklmnop123456', '172.28.321.475', '1234567890123abc' )
Tuya Data Points - DPS Table
The Tuya devices send back data points (DPS) also called device function points, in a json string. The DPS attributes define the state of the device. Each key in the DPS dictionary refers to key value pair, the key is the DP ID and its value is the dpValue. You can refer to the Tuya developer platform for definition of function points for the products.
The following table represents several of the standard Tuya DPS values and their properties. It represents data compiled from Tuya documentation and self-discovery. Devices may vary. Feedback or additional data would would be appreciated. Please submit a Issue or Pull Request if you have additional data that would be helpful for others.
To find Tuya DPS for devices not listed below, you can discover the DPS values using the Tuya IoT platform. See this help here: Find your Data Point.
DPS Read and Set Example:
data = d.status()
print("Value of DPS 25 is ", data['dps']['25'])
d.set_value(25, '010e0d0000000000000003e803e8')
Version 3.1 Devices
Version 3.1 (and some 3.3) - Plug or Switch Type
| 1 | Switch | bool | True/False | |
| 2 | Countdown? | integer | 0-86400 | s |
| 4 | Current | integer | 0-30000 | mA |
| 5 | Power | integer | 0-50000 | W |
| 6 | Voltage | integer | 0-5000 | V |
Version 3.1 - Light Type (RGB)
| 1 | Switch | bool | True/False | |
| 2 | Mode | enum | white,colour,scene,music | |
| 3 | Bright | integer | 10-1000* | |
| 4 | Color Temp | integer | 0-1000* | |
| 5 | Color | hexstring | r:0-255,g:0-255,b:0-255,h:0-360,s:0-255,v:0-255 | rgb+hsv |
Version 3.3 Devices
Version 3.3 - Plug, Switch, Power Strip Type
| 1 | Switch 1 | bool | True/False | |
| 2 | Switch 2 | bool | True/False | |
| 3 | Switch 3 | bool | True/False | |
| 4 | Switch 4 | bool | True/False | |
| 5 | Switch 5 | bool | True/False | |
| 6 | Switch 6 | bool | True/False | |
| 7 | Switch 7/usb | bool | True/False | |
| 9 | Countdown 1 | integer | 0-86400 | s |
| 10 | Countdown 2 | integer | 0-86400 | s |
| 11 | Countdown 3 | integer | 0-86400 | s |
| 12 | Countdown 4 | integer | 0-86400 | s |
| 13 | Countdown 5 | integer | 0-86400 | s |
| 14 | Countdown 6 | integer | 0-86400 | s |
| 15 | Countdown 7 | integer | 0-86400 | s |
| 17 | Add Electricity | integer | 0-50000 | kwh |
| 18 | Current | integer | 0-30000 | mA |
| 19 | Power | integer | 0-50000 | W |
| 20 | Voltage | integer | 0-5000 | V |
| 21 | Test Bit | integer | 0-5 | n/a |
| 22 | Voltage coeff. | integer | 0-1000000 | |
| 23 | Current coeff. | integer | 0-1000000 | |
| 24 | Power coeff. | integer | 0-1000000 | |
| 25 | Electricity coeff. | integer | 0-1000000 | |
| 26 | Fault | fault | ov_cr | |
| 38 | Power-on state setting | enum | off, on, memory | |
| 39 | Overcharge Switch | bool | True/False | |
| 40 | Indicator status setting | enum | none, on, relay, pos | |
| 41 | Child Lock | bool | True/False | |
| 42 | UNKNOWN | | | |
| 43 | UNKNOWN | | | |
| 44 | UNKNOWN | | | |
Note: Some 3.3 energy management plugs use the DPS values of the 3.1 plug above.
Version 3.3 - Dimmer Switch
| 1 | Switch | bool | True/False | |
| 2 | Brightness | integer | 10-1000* | |
| 3 | Minimum of Brightness | integer | 10-1000* | |
| 4 | Type of light source1 | enum | LED,incandescent,halogen | |
| 5 | Mode | enum | white | |
Version 3.3 - Light Type (RGB)
| 20 | Switch | bool | True/False | |
| 21 | Mode | enum | white,colour,scene,music | |
| 22 | Bright | integer | 10-1000* | |
| 23 | Color Temp | integer | 0-1000 | |
| 24 | Color | hexstring | h:0-360,s:0-1000,v:0-1000 | hsv |
| 25 | Scene | string | n/a | |
| 26 | Left time | integer | 0-86400 | s |
| 27 | Music | string | n/a | |
| 28 | Debugger | string | n/a | |
| 29 | Debug | string | n/a | |
| 30 | Rhythms | n/a | n/a | |
| 31 | Go To Sleep | n/a | n/a | |
| 32 | Wake Up | n/a | n/a | |
| 33 | Power Off Memory | n/a | n/a | |
| 34 | Do not Disturb | n/a | n/a | |
| 41 | Remote Control Switch | n/a | n/a | |
| 209 | Cycle Timing | n/a | n/a | |
| 210 | Vaction Timing | n/a | n/a | |
Version 3.3 - Automated Curtain Type
| 1 | Curtain Switch 1 | enum | open, stop, close, continue | |
| 2 | Percent control 1 | integer | 0-100 | % |
| 3 | Accurate Calibration 1 | enum | start, end | |
| 4 | Curtain Switch 2 | enum | open, stop, close, continue | |
| 5 | Percent control 2 | integer | 0-100 | |
| 6 | Accurate Calibration 2 | enum | start, end | |
| 8 | Motor Steer 1 | enum | forward, back | |
| 9 | Motor steer 2 | enum | forward, back | |
| 10 | Quick Calibration 1 | integer | 1-180 | s |
| 11 | Quick Calibration 2 | integer | 1-180 | s |
| 12 | Motor Mode 1 | enum | strong_power, dry_contact | |
| 13 | Motor Mode 2 | enum | strong_power, dry_contact | |
| 14 | Light mode | enum | relay, pos, none | |
Version 3.3 - Fan Switch Type
| 1 | Fan switch | bool | True/False | n/a |
| 2 | Fan countdown | integer | 0-86400 | s |
| 3 | Fan speed | enum | level_1, level_2, level_3, level_4, level_5 | |
| 4 | Fan speed | integer | 1-100 | % |
| 5 | Fan light switch | bool | True/False | |
| 6 | Brightness integer | integer | 10-1000 | |
| 7 | Fan light countdown | integer | 0-86400 | |
| 8 | Minimum brightness | integer | 10-1000 | |
| 9 | Maximum brightness | integer | 10-1000 | |
| 10 | Mode | enum | white | |
| 11 | Power-on state setting | enum | off, on, memory | |
| 12 | Indicator status setting | enum | none, relay, pos | |
| 13 | Backlight switch | bool | True/False | |
Version 3.3 - Universal IR Controller with optional Temp/Humidity
| 101 | Current Temperature | integer | 0-600 | 10x Celsius |
| 102 | Current Humidity | integer | 0-100 | % |
| 201 | IR Commands (set only) | JSON* | n/a | n/a |
command = {
"control": "send_ir",
"head": "",
"key1": "[[TO_BE_REPLACED]]",
"type": 0,
"delay": 300,
}
payload = d.generate_payload(tinytuya.CONTROL, {"201": json.dumps(command)})
d.send(payload)
The key1 attribute is a base64 string that contains the IR signal. You can extract it using this procedure:
- Register a new IR device on Tuya Smart / Smart Life app (if not registered already) and map, setup or import your buttons.
- Tap multiple times on the button you wish to control.
- Go to Tuya IoT Platform and select your app under Cloud > Development section.
- Go to to the Device tab and select "Debug Device" on the parent device. Browse Device Logs section and retrieve the
key1 attribute that matches your tapping timestamp from step 2 above. Use that key1 attribute in the payload example above.
You need to repeat these steps for each button (cloud logging is not always sequential).
Version 3.3 - Sensor Type
Important Note:
Battery-powered Tuya sensors are usually designed to stay in sleep mode until a state change (eg.open or close alert). This means you will not be able to poll these devices except in the brief moment they awake, connect to the WiFi and send their state update payload the the Tuya Cloud. Keep in mind that if you manage to poll the device enough to keep it awake, you will likely quickly drain the battery.
| 1 | Door Sensor | bool | True/False | |
| 2 | Battery level state | enum | low, middle, high | |
| 3 | Battery level | integer | 0-100 | % |
| 4 | Temper alarm | bool | True/False | |
| 5 | Flooding Detection State | enum | alarm, normal | |
| 6 | Luminance detection state | enum | low, middle, high, strong | |
| 7 | Current Luminance | integer | 0-100 | % |
| 8 | Current Temperature | integer | 400-2000 | |
| 9 | Current Humidity | integer | 0-100 | % |
| 10 | Shake State | enum | normal, vibration, drop, tilt | |
| 11 | Pressure State | enum | alarm, normal | |
| 12 | PIR state | enum | pir, none | |
| 13 | Smoke Detection State | enum | alarm, normal | |
| 14 | Smoke value | integer | 0-1000 | |
| 15 | Alarm Volume | enum | low, middle, high, mute | |
| 16 | Alarm Ringtone | enum | 1, 2, 3, 4, 5 | |
| 17 | Alarm Time | integer | 0-60 | s |
| 18 | Auto-Detect | bool | True/False | |
| 19 | Auto-Detect Result | enum | checking, check_success, check_failure, others | |
| 20 | Preheat | bool | True/False | |
| 21 | Fault Alarm | fault | fault, serious_fault, sensor_fault, probe_fault, power_fault | Barrier |
| 22 | Lifecycle | bool | True/False | |
| 23 | Alarm Switch | bool | True/False | |
| 24 | Silence | bool | True/False | |
| 25 | Gas Detection State | enum | alarm, normal | |
| 26 | Detected Gas | integer | 0-1000 | |
| 27 | CH4 Detection State | enum | alarm, normal | |
| 28 | CH4 value | integer | 0-1000 | |
| 29 | Alarm state | enum | alarm_sound, alarm_light, alarm_sound_light, normal | |
| 30 | VOC Detection State | enum | alarm, normal | |
| 31 | VOC value | integer | 0-999 | |
| 32 | PM2.5 state | enum | alarm, normal | |
| 33 | PM2.5 value | integer | 0-999 | |
| 34 | CO state | enum | alarm, normal | |
| 35 | CO value | integer | 0-1000 | |
| 36 | CO2 Detection State | enum | alarm, normal | |
| 37 | CO2 value | integer | 0-1000 | |
| 38 | Formaldehyde Detection State | enum | alarm, normal | |
| 39 | CH2O value | integer | 0-1000 | |
| 40 | Master mode | enum | disarmed, arm, home, sos | |
| 41 | Air quality index | enum | level_1, level_2, level_3, level_4, level_5, level_6 | |
NOTE (*) - The range can vary depending on the device. As an example, for dimmers, it may be 10-1000 or 25-255.
Version 3.3 - WiFi Air Quality Detector PM2.5/Formaldehyde/VOC/CO2/Temperature/Humidity
| 2 | PM2.5 value | integer | 0 - 999 | ug/m3 |
| 18 | Current Temperature | integer | 0 - 850 | ˚C (multiplied by 10) |
| 19 | Current Humidity | integer | 0 - 1000 | % (multiplied by 10) |
| 20 | CH2O (Formaldehyde) value | integer | 0 - 1000 | ppm |
| 21 | VOC (Volatile organic compound) value | integer | 0 - 2000 | ppm |
| 22 | CO2 value | integer | 350 - 2000 | ppm |
Example device: https://www.aliexpress.com/item/1005005034880204.html
Version 3.3 - Robot Mower Type
| 6 | Battery | integer | 0-100 | % |
| 101 | Machine Status | enum | - STANDBY MOWING
- CHARGING
- EMERGENCY
- LOCKED
- PAUSED
- PARK
- CHARGING_WITH_TASK_SUSPEND
- FIXED_MOWING
| |
| 102 | Machine error | integer | 0, ? | |
| 103 | Machine warning | enum | - MOWER_LEAN
- MOWER_EMERGENCY
- MOWER_UI_LOCKED
| |
| 104 | Rain mode | boolean | True/False | |
| 105 | Work time | interger | 1-99 | hours |
| 106 | Machine password | byte str | ? | |
| 107 | Clear machine appointment | boolean | True/False | |
| 108 | Query machine reservation | boolean | True/False | |
| 109 | Query partition parameters | boolean | True/False | |
| 110 | Report machine reservation | byte str | | |
| 111 | Error log | byte str | | |
| 112 | Work log | byte str | | |
| 113 | Partition parameters | byte str | | |
| 114 | Work mode | enum | AutoMode/?? | |
Reference pymoebot for further definition.
Version 3.3 - 24v Thermostat (i.e. PCT513-TY)
| 2 | System Mode | enum | [ 'auto' 'cool' 'heat' 'off' others? ] | |
| 16 | Center of Setpoint, High-Resolution °C | integer | 500-3200 | °C x 100 in steps of 50 |
| 17 | Center of Setpoint, °F | integer | 20-102 | °F |
| 18* | Cooling Setpoint, Low-Resolution °F | integer | 20-102 | °F |
| 19* | Cooling Setpoint, Low-Resolution °C | integer | 500-3200 | °C |
| 20* | Heating Setpoint, Low-Resolution °F | integer | 20-102 | °F |
| 23 | Display Units | enum | [ 'f' 'c' ] | |
| 24 | Current Temperature, High-Resolution °C | integer | 500-3200 | °C x 100 in steps of 50 |
| 26* | Heating Setpoint, Low-Resolution °C | integer | 5-32 | °C |
| 27* | Temperature Correction | integer | -10 - +10 | |
| 29 | Current Temperature, °F | integer | 20-102 | °F |
| 34 | Current Humidity | integer | 0-100 | % |
| 45 | Fault Flags | bitmask | [ e1 e2 e3 ] | |
| 107 | System Type | integer-as-string | ? | ? |
| 108* | Cooling Setpoint, High-Resolution °C | integer | 500-3200 | °C x 100 in steps of 50 |
| 109* | Heating Setpoint, High-Resolution °C | integer | 500-3200 | °C x 100 in steps of 50 |
| 110* | Cooling Setpoint, °F | integer | 20-102 | °F |
| 111* | Heating Setpoint, °F | integer | 20-102 | °F |
| 115 | Fan Mode | enum | [ 'auto' 'cycle' 'on' ] | |
| 116 | "at home/away from home" | integer-as-string | ? | ? |
| 118 | Schedule Data | base64 | binary blob | |
| 119 | Schedule Enabled | bool | True/False | |
| 120 | Hold/Schedule | enum | [ 'permhold' 'temphold' 'followschedule' ] | |
| 121 | Vacation Data | base64 | binary blob | |
| 122 | Sensor Data, list 1 | base64 | binary blob | |
| 123 | Minimum Fan Run Time | integer | 0-55 | minutes per hour |
| 125 | Sensor Data, list 2 | base64 | binary blob | |
| 126 | Sensor Data, list 3 | base64 | binary blob | |
| 127 | Sensor Data, list 4 | base64 | binary blob | |
| 128 | Sensor Data, list 5 | base64 | binary blob | |
| 129 | System State | enum | [ 'fanon' 'coolfanon' 'alloff' others? ] | |
| 130 | Weather Forcast | ? | ? | ? |
NOTE (*) - Depending on the firmware, either 18/19/20/26/27 or 108/109/110/111/x are used, not both
A user contributed module is available for this device in the Contrib library:
from tinytuya.Contrib import ThermostatDevice
thermo = ThermostatDevice( 'abcdefghijklmnop123456', '172.28.321.475', '1234567890123abc' )
For info on the Sensor Data lists, see https://github.com/jasonacox/tinytuya/discussions/139
Version 3.4 - WIFI Dual Meter (i.e. PJ1103A)
| 1 | Forward energy total | integer | | kWh x 100 |
| 2 | Reverse energy total | integer | | kWh x 100 |
| 101 | Power (A) | integer | | W x 10 |
| 102 | Direction of current flow (A) | enum | | |
| 104 | Direction of current flow (B) | enum | | |
| 105 | Power (B) | integer | | W x 10 |
| 106 | Energy forward (A) | integer | | kWh x 100 |
| 107 | Energy reverse (A) | integer | | kWh x 100 |
| 108 | Energy forward (B) | integer | | kWh x 100 |
| 109 | Energy reverse (B) | integer | | kWh x 100 |
| 110 | Power Factor (A) | integer | | value x 100 |
| 111 | AC frequency | integer | | Hz x 100 |
| 112 | AC voltage | integer | | V x 10 |
| 113 | Current (A) | integer | | mA |
| 114 | Current (B) | integer | | mA |
| 115 | Total power | integer | | W x 10 |
| 116 | Voltage Calibration | integer | 800-1200 | value * 1000 |
| 117 | Current Calibration (A) | integer | 800-1200 | value * 1000 |
| 118 | Power Calibration (A) | integer | 800-1200 | value * 1000 |
| 119 | Energy Calibration forward (A) | integer | 800-1200 | value * 1000 |
| 121 | Power Factor (B) | integer | | value x 100 |
| 122 | Frequency Calibration | integer | 800-1200 | value * 1000 |
| 123 | Current Calibration (B) | integer | 800-1200 | value * 1000 |
| 124 | Power Calibration (B) | integer | 800-1200 | value * 1000 |
| 125 | Energy Calibration forward (B) | integer | 800-1200 | value * 1000 |
| 127 | Energy Calibration reverse (A) | integer | 800-1200 | value * 1000 |
| 128 | Energy Calibration reverse (B) | integer | 800-1200 | value * 1000 |
| 129 | Report Rate Control | integer | 3-60 | s |
Note: (A) or (B) means channel A or channel B
A user contributed module is available for this device in the Contrib library:
wdm = WiFiDualMeterDevice.WiFiDualMeterDevice(
dev_id='abcdefghijklmnop123456',
address='192.168.0.29',
local_key='1234567890123abc',
version=3.4)
Tuya References
Credits
- TuyAPI https://github.com/codetheweb/tuyapi by codetheweb and blackrozes.
Protocol reverse engineering from jepsonrob and clach04.
- PyTuya https://github.com/clach04/python-tuya by clach04.
The origin of this python module (now abandoned). Thanks to nijave for pycryptodome support and testing, Exilit for unittests and docstrings, mike-gracia for improved Python version support, samuscherer for RGB Bulb support, magneticflux for improved Python version support, sean6541 for initial PyPi package and Home Assistant support https://github.com/sean6541/tuya-homeassistant, ziirish - for resolving a dependency problem related to version numbers at install time
- https://github.com/rospogrigio/localtuya-homeassistant by rospogrigio.
Updated pytuya to support devices with Device IDs of 22 characters
- Thanks to @uzlonewolf, our top contributor and resident wizard, for expanding the Outlet/Cover/Bulb/Cloud modules into separate files, introducing Contrib structure for user generated device modules, making enhancements to TuyaMessage logic for multi-payload messages, rewriting the scanner and adding Tuya Protocol 3.2, 3.4 & 3.5 support to TinyTuya!
- Finally, thanks to the entire TinyTuya community for the great engagement, contributions and encouragement! See RELEASE notes for the ever growing journal of improvements and the incredible list of talent making this project possible.
Related Projects
TinyTuya Powered Projects
Please feel free to submit a PR or open an issue to add your project.
Contributors


