Security News
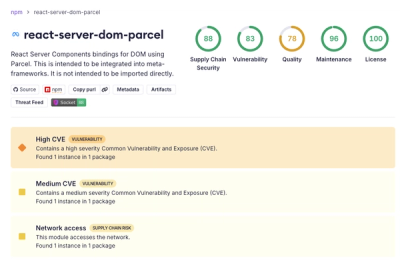
New React Server Components Vulnerabilities: DoS and Source Code Exposure
New DoS and source code exposure bugs in React Server Components and Next.js: what’s affected and how to update safely.
By Sarah Gooding - Dec 12, 2025
tundra-cli
Advanced tools
Snowflake permissions management tool with Apache Iceberg table support
Tundra is a modern fork of tundra that adds comprehensive support for Apache Iceberg tables in Snowflake, while maintaining all the original functionality for managing permissions on databases, schemas, tables, and views.
We welcome contributions! Please submit issues or pull requests on GitHub.
Install the latest version using:
pip install tundra-cli==0.0.9
For development or latest features, install directly from GitHub:
pip install git+https://github.com/henryupton/tundra.git
Tundra extends the original tundra functionality with comprehensive support for Apache Iceberg tables and External Volumes in Snowflake:
SHOW ICEBERG TABLESSELECT) and write (INSERT, UPDATE, DELETE, etc.) privilegesdatabase.schema.*)USAGE privileges on external volumes (S3, Azure, GCS)Example configuration:
# Define external volumes for Iceberg tables
external_volumes:
  - s3_iceberg_volume:
      storage_provider: s3
      owner: sysadmin

roles:
  data_engineer:
    # Grant access to external volumes (required for Iceberg tables)
    external_volumes:
      - s3_iceberg_volume
    privileges:
      tables:
        read:
          - analytics.public.*           # Includes Iceberg tables
        write:
          - analytics.public.output_*    # Write access to Iceberg tables
Use this command to check and manage the permissions of a Snowflake account.
tundra [-v] run <spec_file> [--role] [--dry] [--diff] [--user] [--ignore-memberships]
#> tundra run --help
Usage: tundra run [OPTIONS] SPEC

  Grant the permissions provided in the provided specification file for
  specific users and roles

Options:
  --dry        Do not actually run, just check.
  --diff       Show full diff, both new and existing permissions, use with -v.
  --role TEXT  Run grants for specific roles. Usage: --role testrole --role
               testrole2.

  --user TEXT  Run grants for specific users. Usage: --user testuser --user
               testuser2.

  --ignore-memberships  Do not handle role membership grants/revokes
  --help       Show this message and exit.
Use this utility command to run the SnowFlake specification loader to confirm that your roles.yml file is valid.
tundra [-v] spec-test <spec_file> [--role] [--user] [--ignore-memberships]
#>  tundra spec-test --help
Usage: tundra spec-test [OPTIONS] SPEC

  Load SnowFlake spec based on the roles.yml provided. CLI use only for confirming specifications are valid.

Options:
  --role TEXT           Run grants for specific roles. Usage: --role testrole
                        --role testrole2.

  --user TEXT           Run grants for specific users. Usage: --user testuser
                        --user testuser2.

  --ignore-memberships  Do not handle role membership grants/revokes
  --run-list TEXT       Run grants for specific users. Usage: --user testuser
                        --user testuser2.

  --help                Show this message and exit.
Given the parameters to connect to a Snowflake account and a YAML file (a "spec") representing the desired database configuration, this command makes sure that the configuration of that database matches the spec. If there are differences, it will return the sql grant and revoke commands required to make it match the spec. If there are additional permissions set in the database this command will create the necessary revoke commands with the exception of:
Furthermore, if you are using the recommended role of SECURITYADMIN, ALTER USER ... commands will fail on users that are owned by ACCOUNTADMIN. In these circumstances, it is highly recommended to log into the Snowflake instance and update ownership of all users to belong to USERADMIN as per Snowflake recommended best practices.
Lastly, note that the default roles cannot have their role hierarchies modified. As such, any GRANT ROLE <default role> TO ROLE <default role>; will be excluded from the permission set generated by Tundra.
For example:
...
roles:
  public:
    member_of:
      - useradmin
  securityadmin:
    member_of:
      - useradmin
...
Both of the above relationships will be skipped as this attempts to modify a default Snowflake permission structure which would generate an error on attempting to implement.
Tundra is heavily inspired by pgbedrock which can be used for managing the permissions in a Postgres database.
The YAML specification file is used to define in a declarative way the databases, roles, users and warehouses in a Snowflake account, together with the permissions for databases, schemas and tables for the same account.
All permissions are abbreviated as read or write permissions, with
Tundra generating the proper grants for each type of object. This includes
shared databases which have simpler and more limited permissions than non-shared
databases.
According to the read vs. write permissions approach, you should be able to
grant granular access like read permissions for usage of database and schema
and write permissions to insert data into a specific table within that
database and schema.
Please find below the links between Tundra permissions and Snowflake grants.
| Objects | Tundra permissions | Snowflake grants |
|---|---|---|
| Databases | read | usage |
| write | monitor, create schema | |
| Schemas | read | usage |
| write | monitor, create table, create view, create stage, create file format, create sequence, create function, create pipe | |
| Table | read | select |
| write | insert, update, delete, truncate, references |
Tables and views are listed under tables and handled properly behind the
scenes.
If * is provided as the parameter for tables the grant statement will use the
ALL <object_type>s in SCHEMA syntax. It will also grant to future tables and
views. See Snowflake documentation for ON FUTURE
If a schema name includes an asterisk (prefix or suffix), such as snowplow_* or *_snowplow, then all schemas
that match this pattern will be included in the grant statement unless it is
for ownership, in which case the asterisk is not supported. This can be coupled
with the asterisk for table grants to grant permissions on all tables in all
schemas that match the given pattern. This is useful for date-partitioned
schemas.
All entities must be explicitly referenced. For example, if a permission is
granted to a schema or table then the database must be explicitly referenced for
permissioning as well. Additionally, role membership must be explicit in the
config file. If a role does not have a member_of list, it will have all roles
it currently has revoked.
Roles can accept "_" as a role name either alone or nested under the include
key. There is optionally an exclude key that can be used if include is used.
"_"will grant membership to all roles defined in the spec. Any roles defined
inexcludewill be removed from the list defined ininclude.
Objects like warehouses and integrations that only have one tundra permission type just needs to be specified in the role (see below).
Objects can have a meta dictionary which may contain information that is not relevant for Tundra's
execution and are ignored by Tundra itself.
A specification file has the following structure:
# Databases
databases:
    - db_name:
        shared: boolean
    - db_name:
        shared: boolean
        owner: role_name
        meta:
            some_key: some_value
            ...
    ... ... ...

# Roles
roles:
    - role_name:
        warehouses:
            - warehouse_name
            - warehouse_name
            ...

        member_of:
            - role_name
            - role_name
            ...

            # or

        member_of:
            include:
                - "*"
            exclude:
                - role_name

        privileges:
            databases:
                read:
                    - database_name
                    - database_name
                    ...
                write:
                    - database_name
                    - database_name
                    ...
            schemas:
                read:
                    - database_name.*
                    - database_name.schema_name
                    - database_name.schema_partial_*
                    - database_name.*_schema_partial

                    ...
                write:
                    - database_name.*
                    - database_name.schema_name
                    - database_name.schema_partial_*
                    - database_name.*_schema_partial
                    ...
            tables:
                read:
                    - database_name.*.*
                    - database_name.schema_name.*
                    - database_name.schema_partial_*.*
                    - database_name.*_schema_partial.*
                    - database_name.schema_name.table_name
                    ...
                write:
                    - database_name.*.*
                    - database_name.schema_name.*
                    - database_name.schema_partial_*.*
                    - database_name.*_schema_partial.*
                    - database_name.schema_name.table_name
                    ...

        owns:
            databases:
                - database_name
                ...
            schemas:
                - database_name.*
                - database_name.schema_name
                ...
            tables:
                - database_name.*.*
                - database_name.schema_name.*
                - database_name.schema_name.table_name
                ...

        meta:
            some_key: some_value
            ...

    - role_name:
        owner: role_name
    ... ... ...

# Users
# can_login is required the rest of the parameters are optional
# None of the values are validated in Snowflake, hence default_warehouse, default_namespace and default_role
# can contain invalid values
users:
    - user_name:
        can_login: boolean
        member_of:
            - role_name
            ...
        has_password: boolean
        display_name: string
        first_name: string
        middle_name: string
        last_name: string
        email: string
        comment: string
        default_warehouse: string
        default_namespace: string
        default_role: string
        type: string
        meta:
            some_key: some_value
            ...
    - user_name:
        owner: role_name
    ... ... ...

# Warehouses
# Warehouse sizes are informative and not altered by Tundra to align with the spec file
warehouses:
    - warehouse_name:
        size: x-small
        meta:
            some_key: some_value
            ...
    - warehouse_name:
        size: x-small
        owner: role_name
    ... ... ...

# Integrations
# Integration categories are informative and not altered by Tundra to align with the spec file
integrations:
    - integration_name:
        category: storage
        meta:
            some_key: some_value
            ...
    - integration_name:
        category: security
        owner: role_name
    ... ... ...
External volumes provide access to external storage locations (S3, Azure Blob Storage, Google Cloud Storage) and are essential for Apache Iceberg table operations. They are defined at the top level and referenced in roles.
# External volume definitions
external_volumes:
    - s3_iceberg_volume:
        storage_provider: s3
        owner: sysadmin
    - azure_data_lake:
        storage_provider: azure
        owner: data_admin
    - gcs_analytics:
        storage_provider: gcs
        owner: analytics_admin

# Role configuration with external volume access
roles:
    - data_engineer:
        external_volumes:
            - s3_iceberg_volume
            - azure_data_lake
        privileges:
            tables:
                read:
                    - analytics.public.*    # Includes Iceberg tables
                write:
                    - analytics.staging.*   # Write to Iceberg tables
Important: External volumes are required for Iceberg table operations. Roles that need to read from or write to Iceberg tables must have USAGE privileges on the appropriate external volumes where the Iceberg table data is stored.
For a working example with external volumes, check the examples/external_volumes_example.yml file.
Note: The spec file must all be in lowercase.
To achieve better organization, you can include content from other YML files into your spec file using the !include format.
For example, the following imports the content of a warehouses.yml file (among others) into snowflake_spec.yml
# warehouses.yml

- wh_loading:
    size: x-small
    auto_suspend: 600
    auto_resume: true
    initially_suspended: true
# snowflake_spec.yml

# Databases
databases: !include databases.yml

# Warehouses
warehouses: !include warehouses.yml

# Roles
roles: !include roles.yml

# Users
users: !include users.yml
All settings are declared here with their default values and are described below. These can be added to your spec.yaml file.
require-owner: false
require-owner: Set to true to force having to set the owner property on all
objects defined.
When this flag is set, a full diff with both new and already granted commands is returned. Otherwise, only required commands for matching the definitions on the spec are returned.
When this flag is set, the permission queries generated are not actually sent to the server and run; They are just returned to the user for examining them and running them manually.
When this flag is not set, the commands will be executed on Snowflake and their status will be returned and shown on the command line.
The following environmental variables must be available to connect to Snowflake:
$PERMISSION_BOT_USER
$PERMISSION_BOT_ACCOUNT
$PERMISSION_BOT_WAREHOUSE
To connect using a username and password, also include the following:
$PERMISSION_BOT_PASSWORD
$PERMISSION_BOT_DATABASE
$PERMISSION_BOT_ROLE
Currently, Tundra assumes you are using the SECURITYADMIN role and will fail validation if you are not.
To connect using an OAuth token, also include the following:
$PERMISSION_BOT_OAUTH_TOKEN
To connect using an external browser with SSO Auth, also include the following:
$PERMISSION_BOT_AUTHENTICATOR='externalbrowser'
Rather than supplying a password or an oauth token, it's possible to connect via Snowflake's Key Pair authentication by setting the following:
$PERMISSION_BOT_KEY_PATH
$PERMISSION_BOT_KEY_PASSPHRASE
See Snowflake-sqlalchemy for more info.
Contributing to Tundra is easy, and most commands to do so are available within the Makefile.
The easiest way to start developing is to run make initial-setup to install
all the necessary packages to develop on the project. Next run make tundra in a second terminal, this will open a shell in a docker container
with the local version of Tundra installed.
You can now make changes to the files in your editor and it will be reflected in the commands that you run from the docker shell.
To check code quality prior to committing changes, you can use make local-lint.
See the Makefile for more details.
WARNINGS
DO NOT name git branches with forward slashes / as the current CI pipeline is
unable to manage names like this. (i.e. username/feature/feature-name will
break the CI pipeline so username.feature.feature-name should be used
instead)
This project has pre-commit hooks installed to maintain the existing code quality. As such, we strongly recommend you use a terminal to commit and push code changes. Specifically, avoid using git integrations on IDEs to make commits or pushes. Adding files through the IDE git integrations are okay, but do not commit through the IDE. Use the terminal to commit changes because it will show the output of each of the pre-commit checks to allow you to make changes as needed.
For committing work-in-progress changes use git commit --no-verify -m "WIP: <message>".
For committing finalized changes, the below workflow will identify errors and allow for easier development:
git add <file name(s)>git commit to identify/format errors in the changed files
git add <file name(s)>git commitgit push origin <branch name>. This will perform additional linting/formatting checks.
git push origin <branch name>git add <file name(s)>git commitgit push origin <branch name> until all checks passSee the issue template for guidance on how to release a new version of this project to PyPi
FAQs
Snowflake permissions management tool with Apache Iceberg table support
We found that tundra-cli demonstrated a healthy version release cadence and project activity because the last version was released less than a year ago. It has 1 open source maintainer collaborating on the project.
Did you know?

Socket for GitHub automatically highlights issues in each pull request and monitors the health of all your open source dependencies. Discover the contents of your packages and block harmful activity before you install or update your dependencies.
Security News
New DoS and source code exposure bugs in React Server Components and Next.js: what’s affected and how to update safely.

Security News
Socket CEO Feross Aboukhadijeh joins Software Engineering Daily to discuss modern software supply chain attacks and rising AI-driven security risks.
Security News
GitHub has revoked npm classic tokens for publishing; maintainers must migrate, but OpenJS warns OIDC trusted publishing still has risky gaps for critical projects.