Product
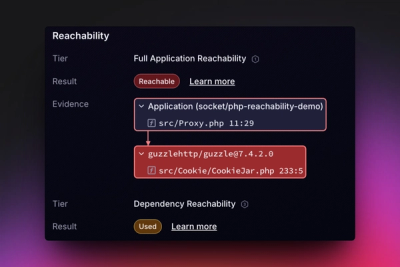
Introducing Reachability for PHP
Reachability analysis for PHP is now available in experimental, helping teams identify which vulnerabilities are actually exploitable.
By Benjamin Barslev - Apr 24, 2026
A library for audio visualization using the following rendering techniques:
We provide the following effects now:

Install from NPM.
npm install @antv/a8
Create a audio, set effect and start playing.
import { Audio, Sine } from '@antv/a8';

const audio = new Audio({
  canvas: $canvas,
});
audio.data($audio).effect(new Sine()).play();
new Audio({
  canvas: $canvas,
});
HTMLCanvasElementPass in an HTMLAudioElement, create a AudioContext and Analyser later.
audio.data($audio);
Mount an effect.
import { Sine } from '@antv/a8';

audio.effect(new Sine());
audio.effect(new Sine()); // switch to another
Update style options of effect.
audio.style({ blur: 1 });
Start visualizing the audio.
audio.play();
Destroy rAF and GPU resources(if any).
audio.destroy();
We provide the following effect now.
When creating GPU particle effects, we should use a WASM to compile shader chunks. For more informations, see https://observablehq.com/@antv/compute-toys#cell-712
const shaderCompilerPath = new URL(
  '/public/glsl_wgsl_compiler_bg.wasm',
  import.meta.url,
).href;
const effect = new Stardust(shaderCompilerPath, {});
Let me briefly describe the implementation. The whole process inside compute shaders can be divided into four stages:
The particle structure is really simple, it consists of 2 properties: position and velocity. We will load/store particles from/to storage textures later.
struct Particle {
  position: float4,
  velocity: float4,
}

fn LoadParticle(pix: int2) -> Particle {
  var p: Particle;
  p.position = textureLoad(pass_in, pix, 0, 0);
  p.velocity = textureLoad(pass_in, pix, 1, 0);
  return p;
}

fn SaveParticle(pix: int2, p: Particle) {
  textureStore(pass_out, pix, 0, p.position);
  textureStore(pass_out, pix, 1, p.velocity);
}
At the first frame, we assign the initial position & velocity for each particle.
@compute @workgroup_size(16, 16)
fn SimulateParticles(@builtin(global_invocation_id) id: uint3) {
  if (time.frame == 0u) {
    let rng = rand4();

    // Normalize from [0, 1] to [-1, 1].
    p.position = float4(2.0 * rng.xyz - 1.0, 0.0);
    p.velocity = float4(0.0, 0.0, 0.0, 0.0);
  }
}
And in each of the next frames, position will be updated with velocity.
let dt = custom.Speed * custom.TimeStep;
p.velocity += (ForceField(p.position.xyz, t) - custom.VelocityDecay * p.velocity) * dt;
p.position += p.velocity * dt;
numbernumbernumbernumbernumbernumbernumber
numbernumbernumbernumbernumbernumbernumbernumbernumbernumbernumberhttps://en.wikipedia.org/wiki/Kerr%E2%80%93Newman_metric
numbernumbernumbernumbernumbernumbernumbernumbernumbernumbernumbernumbernumbernumbernumbernumbernumberFAQs
A music visualizer
The npm package @antv/a8 receives a total of 1 weekly downloads. As such, @antv/a8 popularity was classified as not popular.
We found that @antv/a8 demonstrated a not healthy version release cadence and project activity because the last version was released a year ago. It has 64 open source maintainers collaborating on the project.
Did you know?

Socket for GitHub automatically highlights issues in each pull request and monitors the health of all your open source dependencies. Discover the contents of your packages and block harmful activity before you install or update your dependencies.
Product
Reachability analysis for PHP is now available in experimental, helping teams identify which vulnerabilities are actually exploitable.
Product
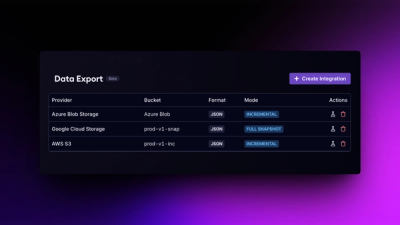
Export Socket alert data to your own cloud storage in JSON, CSV, or Parquet, with flexible snapshot or incremental delivery.
Research
/Security News
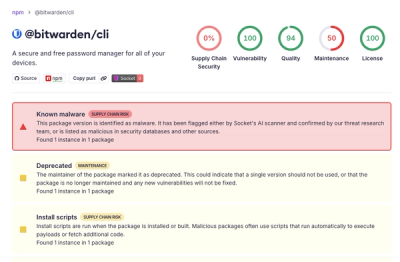
Bitwarden CLI 2026.4.0 was compromised in the Checkmarx supply chain campaign after attackers abused a GitHub Action in Bitwarden’s CI/CD pipeline.