Product
Introducing Reports: An Extensible Reporting Framework for Socket Data
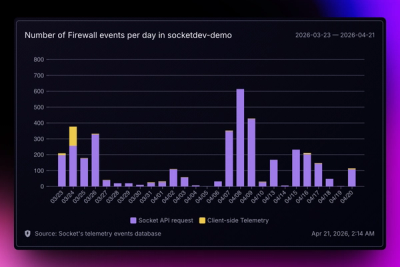
Explore exportable charts for vulnerabilities, dependencies, and usage with Reports, Socket’s new extensible reporting framework.
By André Staltz - Apr 21, 2026
@asyncapi/java-template
Advanced tools
![]()
This template generates Java application code based from an AsyncAPI document.
Implementations are provided for the following protocols:
ibmmq - generating Java JMS code (utilising features from the IBM MQ AsyncAPI bindings)kafka - generating Java code (utilising features from the Apache Kafka AsyncAPI bindings)This template must be used with the AsyncAPI Generator. You can find all available options here.
# Install the AsyncAPI Generator
npm install -g @asyncapi/generator

# Run generation
ag https://ibm.biz/mq-asyncapi-yml-sample @asyncapi/java-template -o output -p server=production
For complete instructions on generating the Java and subsequently using it to send messages, please see the relevant tutorial:
You can configure this template by passing different parameters in the Generator CLI: -p PARAM1_NAME=PARAM1_VALUE -p PARAM2_NAME=PARAM2_VALUE
| Name | Description | Required | Default |
|---|---|---|---|
server | Server must be defined in yaml and selected when using the generator | Yes | - |
user | User for the server to generate code for. This can also be provided as an environment variable (see below) | No | app |
password | Password for the server to generate code for. This can also be provided as an environment variable (see below) | No | passw0rd |
package | Java package name for generated code | No | com.asyncapi |
mqTopicPrefix | MQ topic prefix. Used for ibmmq protocols. Default will work with dev MQ instance | No | dev// |
asyncapiFileDir | Custom output location of the AsyncAPI file that you provided as an input | No | The root of the output directory |
Credentials can be provided as environment variables if preferred. If set, these credentials will override those set with the template parameters.
| Name | Description |
|---|---|
APP_USER | Overrides user template parameter |
APP_PASSWORD | Overrides password template parameter |
All credentials are stored in env.json in the output directory, so they can be updated at any time without needing to run the generator or recompile the Java.
The most straightforward command to use this template is:
ag https://ibm.biz/mq-asyncapi-yml-sample @asyncapi/java-template -o output -p server=production
For local development, you need different variations of this command. First of all, you need to know about three important CLI flags:
--debug enables the debug mode in Nunjucks engine what makes filters debugging simpler.--watch-template enables a watcher of changes that you make in the template. It regenerates your template whenever it detects a change.--install enforces reinstallation of the template.There are two ways you can work on template development:
# assumption is that you run this command from the root of your template
ag https://ibm.biz/mq-asyncapi-yml-sample @asyncapi/java-template -o output -p server=production
console.log in the Generator sources or even the Parser located in node_modules of the Generator:
# assumption is that you run this command from the root of your template
# assumption is that generator sources are cloned on the same level as the template
../generator/cli.js https://ibm.biz/mq-asyncapi-yml-sample @asyncapi/java-template -o output -p server=production
As a developer, you may want to make changes to how the generator operates. This non-exhaustive list aims to show the files you will likely need to change most.
| Path | Description |
|---|---|
| template/index.js | Entry point for the application |
| components/Common.js | Common/helper functions used across the generator |
| utils/* | Contains all filters |
| components/* | Contains reusable components |
Note: Files in the output directory are generated using the ag command, detailed in the above section.
| Path | Description |
|---|---|
| output/env.json | Used for setting environmental variables such as username and password |
| output/com/asyncapi/PubSubBase.java | The base used for generated publishers and subscribers |
To run the generated Java project in a Docker container, use the commands as below:
Build the image
docker build -t [PACKAGE_NAME]:[VERSION] .
Run the image in detached mode
docker run -d [PACKAGE_NAME]:[VERSION]
For further information including network setup, please see the tutorial.
ibmmq protocol enhancements
Thanks goes to these wonderful people (emoji key):
 Dan Raper 💻 📖 |  Tom Jefferson 💻 ✅ 📖 |  Lewis Relph 💻 📖 ⚠️ |  Kieran Murphy 💻 📖 ⚠️ |  Akshaya Gurlhosur 📖 ⚠️ |  Dale Lane 💻 📖 |
This project follows the all-contributors specification. Contributions of any kind welcome!
FAQs
Java JMS template for AsyncAPI generator
The npm package @asyncapi/java-template receives a total of 69 weekly downloads. As such, @asyncapi/java-template popularity was classified as not popular.
We found that @asyncapi/java-template demonstrated a not healthy version release cadence and project activity because the last version was released a year ago. It has 3 open source maintainers collaborating on the project.
Did you know?

Socket for GitHub automatically highlights issues in each pull request and monitors the health of all your open source dependencies. Discover the contents of your packages and block harmful activity before you install or update your dependencies.
Product
Explore exportable charts for vulnerabilities, dependencies, and usage with Reports, Socket’s new extensible reporting framework.
Product
Socket for Jira lets teams turn alerts into Jira tickets with manual creation, automated ticketing rules, and two-way sync.

Company News
Socket won two 2026 Reppy Awards from RepVue, ranking in the top 5% of all sales orgs. AE Alexandra Lister shares what it's like to grow a sales career here.