Product
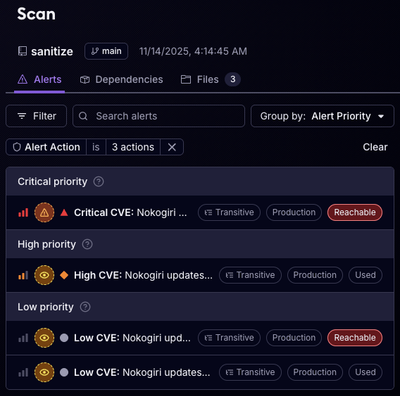
Reachability for Ruby Now in Beta
Reachability analysis for Ruby is now in beta, helping teams identify which vulnerabilities are truly exploitable in their applications.
@cometchat/chat-embed
Advanced tools


Follow these steps to integrate it into your existing React project:
For Next.js integration, please refer to our step-by-step guide.
Run the following command to install the required dependencies:
npm install @cometchat/chat-uikit-react@6.0.7 @cometchat/calls-sdk-javascript
Copy the cometchat-app-react/src/CometChat folder into your project’s src directory.
The initialization process varies depending on your setup. Select your framework:
Open the file src/index.tsx and update it to include the required imports and initialization logic.
import React from "react";
import ReactDOM from "react-dom/client";
import App from "./App";
import {
  UIKitSettingsBuilder,
  CometChatUIKit,
} from "@cometchat/chat-uikit-react";
import { setupLocalization } from "./CometChat/utils/utils";
import { CometChatProvider } from "./CometChat/context/CometChatContext";

export const COMETCHAT_CONSTANTS = {
  APP_ID: "", // Replace with your App ID
  REGION: "", // Replace with your App Region
  AUTH_KEY: "", // Replace with your Auth Key or leave blank if you are authenticating using Auth Token
};

const uiKitSettings = new UIKitSettingsBuilder()
  .setAppId(COMETCHAT_CONSTANTS.APP_ID)
  .setRegion(COMETCHAT_CONSTANTS.REGION)
  .setAuthKey(COMETCHAT_CONSTANTS.AUTH_KEY)
  .subscribePresenceForAllUsers()
  .build();

CometChatUIKit.init(uiKitSettings)?.then(() => {
  setupLocalization();
  ReactDOM.createRoot(document.getElementById("root") as HTMLElement).render(
    <CometChatProvider>
      <App />
    </CometChatProvider>
  );
});
Open the file src/main.tsx and update it to include the required imports and initialization logic.
import { createRoot } from "react-dom/client";
import "./index.css";
import App from "./App.tsx";
import {
  UIKitSettingsBuilder,
  CometChatUIKit,
} from "@cometchat/chat-uikit-react";
import { setupLocalization } from "./CometChat/utils/utils.ts";
import { CometChatProvider } from "./CometChat/context/CometChatContext.tsx";

export const COMETCHAT_CONSTANTS = {
  APP_ID: "", // Replace with your App ID
  REGION: "", // Replace with your App Region
  AUTH_KEY: "", // Replace with your Auth Key or leave blank if you are authenticating using Auth Token
};

const uiKitSettings = new UIKitSettingsBuilder()
  .setAppId(COMETCHAT_CONSTANTS.APP_ID)
  .setRegion(COMETCHAT_CONSTANTS.REGION)
  .setAuthKey(COMETCHAT_CONSTANTS.AUTH_KEY)
  .subscribePresenceForAllUsers()
  .build();

CometChatUIKit.init(uiKitSettings)?.then(() => {
  setupLocalization();
  createRoot(document.getElementById("root")!).render(
    <CometChatProvider>
      <App />
    </CometChatProvider>
  );
});
Refer to the User Login Guide to implement user authentication in your app.
Add the CometChatApp component to your app:
import CometChatApp from "./CometChat/CometChatApp";

const App = () => {
  return (
    /* The CometChatApp component requires a parent element with an explicit height and width
   to render properly. Ensure the container has defined dimensions, and adjust them as needed
   based on your layout requirements. */
    <div style={{ width: "100vw", height: "100dvh" }}>
      <CometChatApp />
    </div>
  );
};

export default App;
Use the CometChatApp component to launch a chat interface with a selected user or group.
import { useEffect, useState } from "react";
import { CometChat } from "@cometchat/chat-sdk-javascript";
import CometChatApp from "./CometChat/CometChatApp";

const App = () => {
  const [selectedUser, setSelectedUser] = useState<CometChat.User | undefined>(
    undefined
  );
  const [selectedGroup, setSelectedGroup] = useState<
    CometChat.Group | undefined
  >(undefined);

  useEffect(() => {
    const UID = "UID"; // Replace with your User ID
    CometChat.getUser(UID).then(setSelectedUser).catch(console.error);

    const GUID = "GUID"; // Replace with your Group ID
    CometChat.getGroup(GUID).then(setSelectedGroup).catch(console.error);
  }, []);

  return (
    /* CometChatApp requires a parent with explicit height & width to render correctly.
      Adjust the height and width as needed.
     */
    <div style={{ width: "100vw", height: "100vh" }}>
      <CometChatApp user={selectedUser} group={selectedGroup} />
    </div>
  );
};

export default App;
This implementation applies when you choose the Without Sidebar option for Sidebar.
chatType is user (default), only User chats will be displayed (either the selected user or the default user).chatType is group, only Group chats will be displayed (either the selected group or the default group).Finally, start your app using the appropriate command based on your setup:
npm run dev
npm start
Enable the following features in the Dashboard in your App under Chat > Features to ensure full functionality.
Mentions, Reactions, Message translation, Polls, Collaborative whiteboard, Collaborative document, Emojis, Stickers, Conversation starter, Conversation summary, Smart reply.
If you face any issues while integrating the builder in your app project, please check if you have the following configurations added to your tsConfig.json:
{
  "compilerOptions": {
    "jsx": "react-jsx",
    "resolveJsonModule": true
  }
}
If your development server is running, restart it to ensure the new TypeScript configuration is picked up.
- Open the
cometchat-app-reactfolder.- Add credentials for your app in
src/index.tsx(src/main.tsxincase for Vite):export const COMETCHAT_CONSTANTS = { APP_ID: "", // Replace with your App ID REGION: "", // Replace with your App Region AUTH_KEY: "", // Replace with your Auth Key or leave blank if you are authenticating using Auth Token };
- Install dependencies:
npm i
- Run the app:
npm start
For detailed steps, refer to our Chat Builder documentation
FAQs
CometChat Widget Builder No-Code Integration
We found that @cometchat/chat-embed demonstrated a healthy version release cadence and project activity because the last version was released less than a year ago. It has 13 open source maintainers collaborating on the project.
Did you know?

Socket for GitHub automatically highlights issues in each pull request and monitors the health of all your open source dependencies. Discover the contents of your packages and block harmful activity before you install or update your dependencies.

Product
Reachability analysis for Ruby is now in beta, helping teams identify which vulnerabilities are truly exploitable in their applications.

Research
/Security News
Malicious npm packages use Adspect cloaking and fake CAPTCHAs to fingerprint visitors and redirect victims to crypto-themed scam sites.

Security News
Recent coverage mislabels the latest TEA protocol spam as a worm. Here’s what’s actually happening.