React Native Apple Authentication


A well typed React Native library providing support for Apple Authentication on iOS and Android, including support for all AppleButton variants.
Prerequisites to using this library
The @invertase/react-native-apple-authentication library will not work if you do not ensure the following:
-
You are using React Native version 0.60 or higher.
-
(iOS only) You have setup react-native iOS development environment on your machine (Will only work on Mac). If not, please follow the official React Native documentation for getting started: React Native getting started documentation.
-
(iOS only) You are using Xcode version 11 or higher. This will allow you to develop using iOS version 13 and higher, when the APIs for Sign In with Apple became available.
-
Once you're sure you've met the above, please follow our Initial development environment setup guide.
Version 2.0.0 breaking changes
Version 2 added Android support and introduced a few breaking changes with how methods are accessed. Please see the Migration Guide.
Installation
yarn add @invertase/react-native-apple-authentication

(cd ios && pod install)
You will not have to manually link this module as it supports React Native auto-linking.
Expo usage
To enable the Sign In with Apple capability in your app, Apple requires
you to add an entitlement. You may configure this in your app.json
{
  "ios": {
    "entitlements": {
      "com.apple.developer.applesignin": ["Default"]
    }
  }
}
You may also need to run npx expo prebuild.
Usage
Below are simple steps to help you get up and running. The implementation differs between iOS an Android, so if you're having trouble, be sure to look through the docs. Please skip and head to the full code examples noted below if you prefer to see a more complete implementation:
iOS
1. Initial set-up
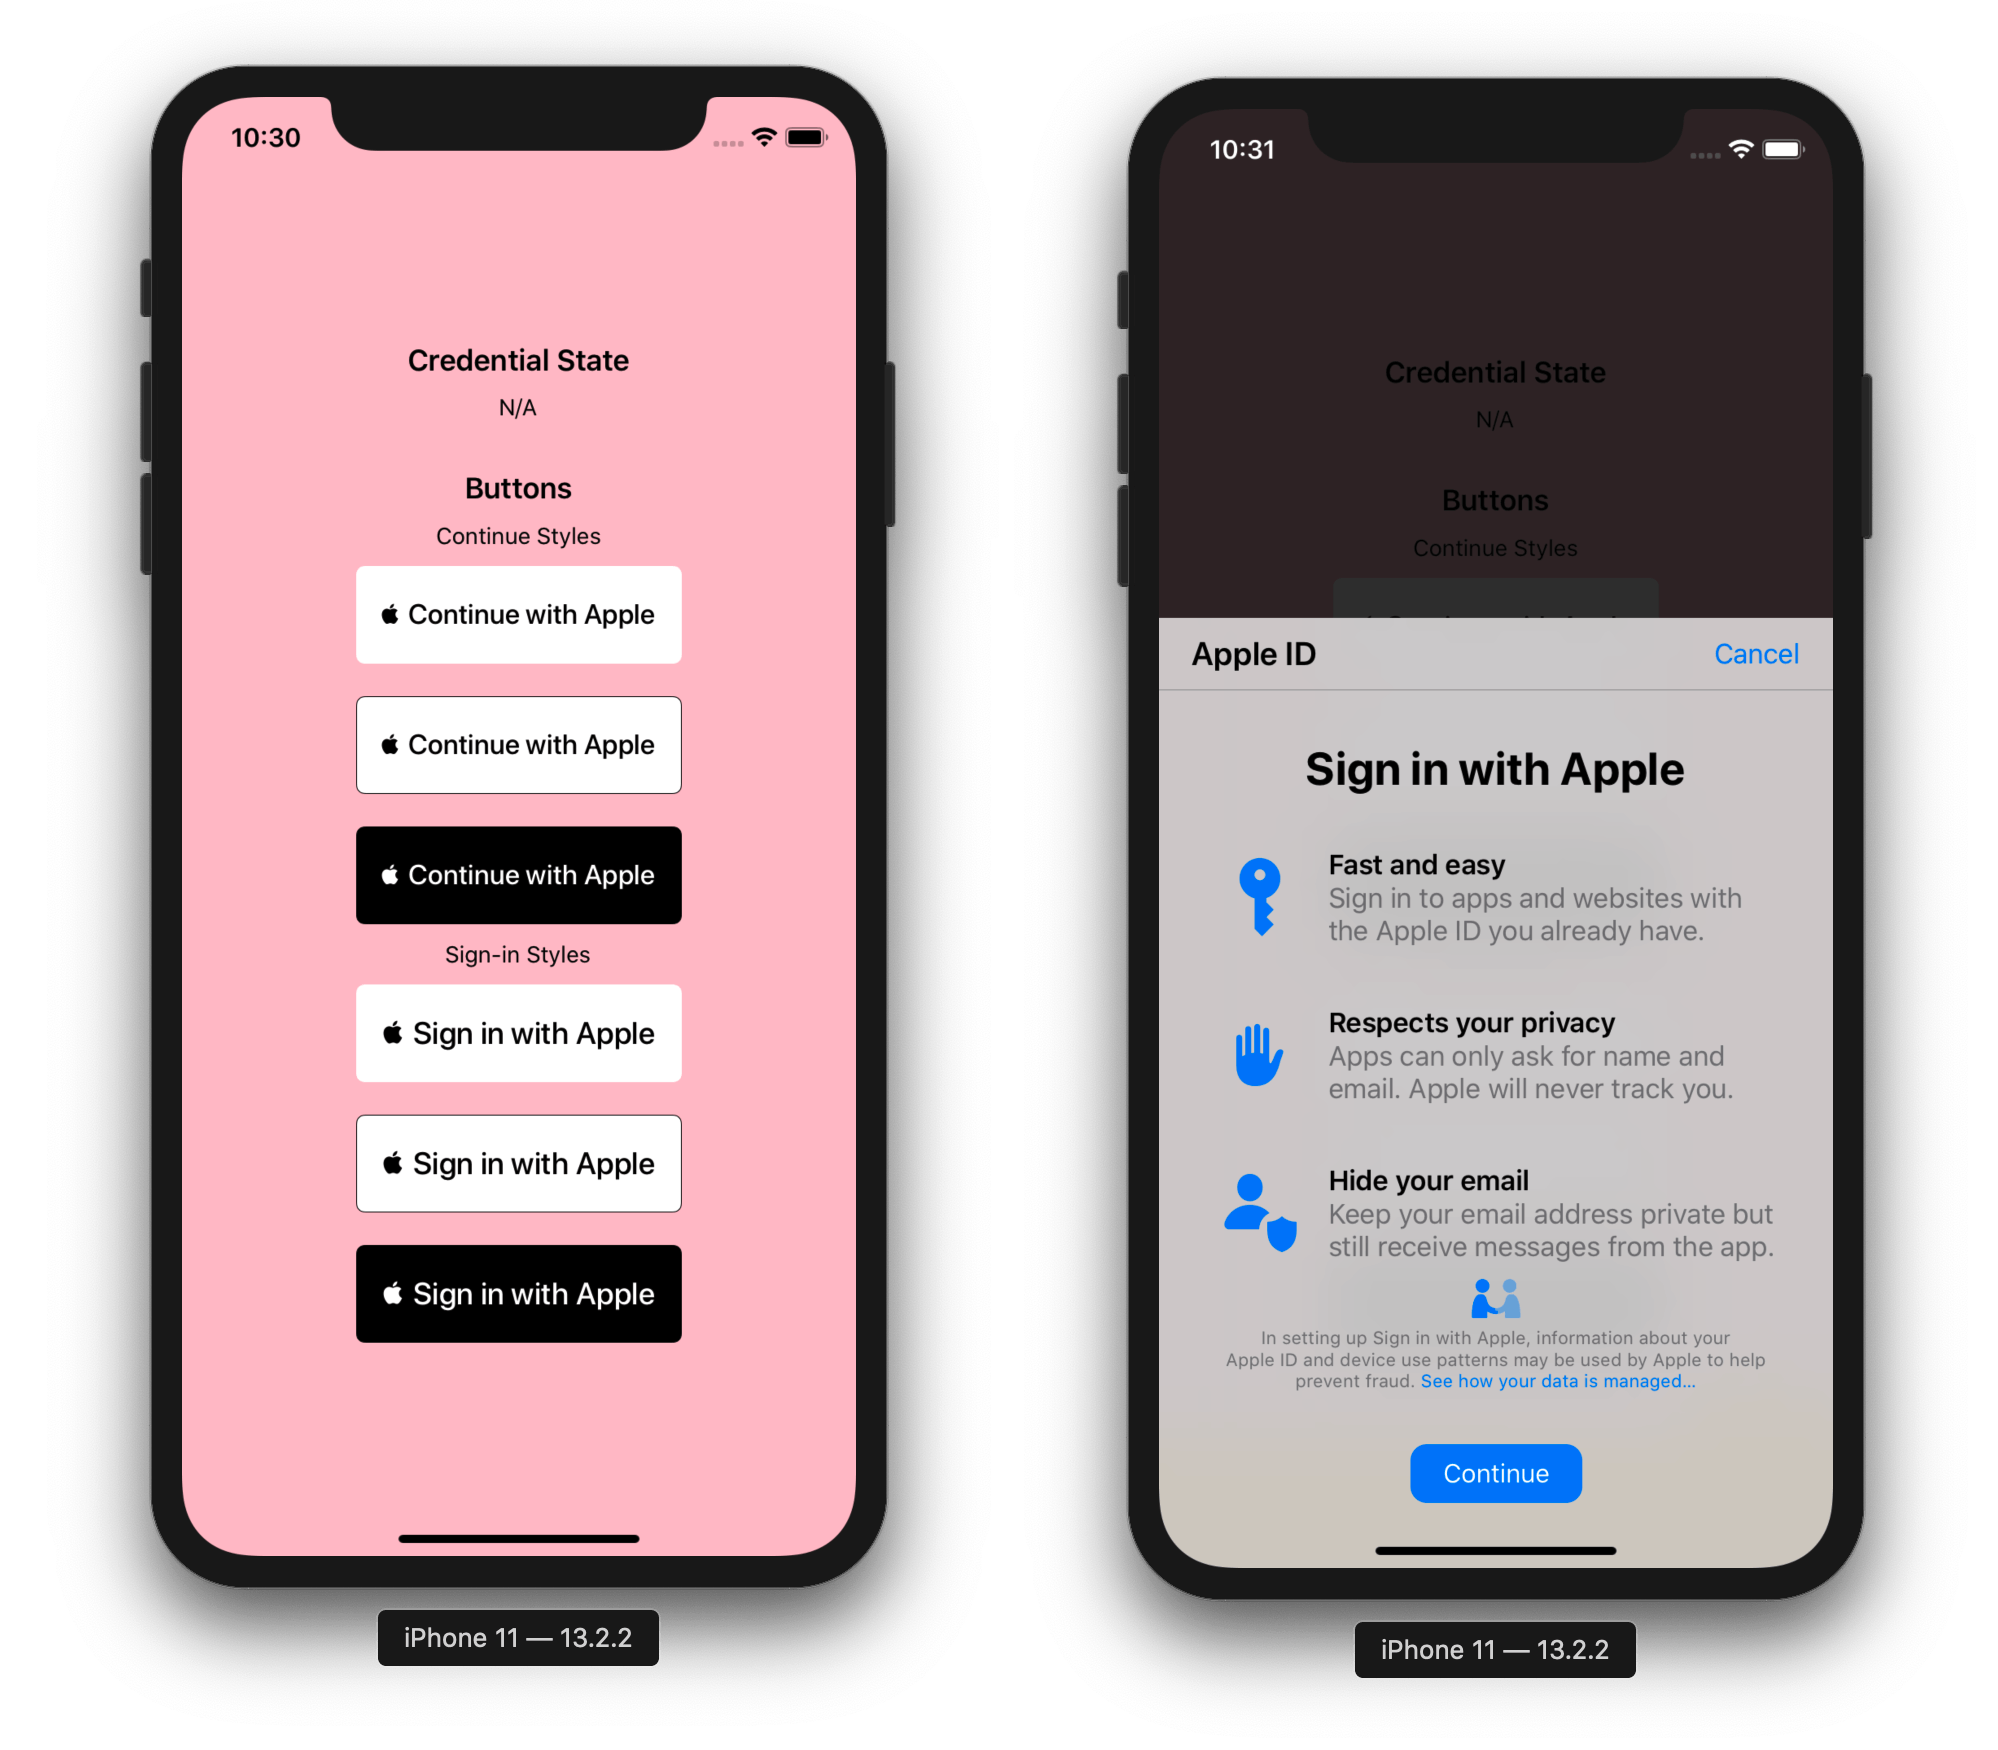
Import the appleAuth (API documentation) module and the AppleButton (API documentation) exported member element from the @invertase/react-native-apple-authentication library. Setup an event handler (onPress) to kick start the authentication request.
import React from 'react';
import { View } from 'react-native';
import { AppleButton } from '@invertase/react-native-apple-authentication';
async function onAppleButtonPress() {
}
function App() {
return (
<View>
<AppleButton
buttonStyle={AppleButton.Style.WHITE}
buttonType={AppleButton.Type.SIGN_IN}
style={{
width: 160, // You must specify a width
height: 45, // You must specify a height
}}
onPress={() => onAppleButtonPress()}
/>
</View>
);
}
2. Implement the login process
import { appleAuth } from '@invertase/react-native-apple-authentication';
async function onAppleButtonPress() {
 const appleAuthRequestResponse = await appleAuth.performRequest({
   requestedOperation: appleAuth.Operation.LOGIN,
   requestedScopes: [appleAuth.Scope.FULL_NAME, appleAuth.Scope.EMAIL],
 });
const credentialState = await appleAuth.getCredentialStateForUser(appleAuthRequestResponse.user);
if (credentialState === appleAuth.State.AUTHORIZED) {
}
}
3. Event Listener
Set up event listener for when user's credentials have been revoked.
import React, { useEffect } from 'react';
import { View } from 'react-native';
import { appleAuth, AppleButton } from '@invertase/react-native-apple-authentication';
function App() {
useEffect(() => {
return appleAuth.onCredentialRevoked(async () => {
console.warn('If this function executes, User Credentials have been Revoked');
});
}, []);
return (
<View>
<AppleButton onPress={() => onAppleButtonPress()} />
</View>
);
}
4. Implement the logout process
There is an operation appleAuth.Operation.LOGOUT, however it does not work as expected and is not even being used by Apple in their example code. See this issue for more information
So it is recommended when logging out to just clear all data you have from a user, collected during appleAuth.Operation.LOGIN.
Android
1. Initial set-up
Make sure to correctly configure your Apple developer account to allow for proper authentication on Android. You can checkout our guide for more info.
import React from 'react';
import { View } from 'react-native';
import { appleAuthAndroid, AppleButton } from '@invertase/react-native-apple-authentication';
async function onAppleButtonPress() {
}
function App() {
return (
<View>
{appleAuthAndroid.isSupported && (
<AppleButton
buttonStyle={AppleButton.Style.WHITE}
buttonType={AppleButton.Type.SIGN_IN}
onPress={() => onAppleButtonPress()}
/>
)}
</View>
);
}
2. Implement the login process
import { appleAuthAndroid } from '@invertase/react-native-apple-authentication';
import 'react-native-get-random-values';
import { v4 as uuid } from 'uuid'
async function onAppleButtonPress() {
const rawNonce = uuid();
const state = uuid();
appleAuthAndroid.configure({
clientId: 'com.example.client-android',
redirectUri: 'https://example.com/auth/callback',
responseType: appleAuthAndroid.ResponseType.ALL,
scope: appleAuthAndroid.Scope.ALL,
nonce: rawNonce,
state,
});
const response = await appleAuthAndroid.signIn();
}
MacOS
This library works on MacOS 10.15+ if using in conjunction with react-native-macos.
Web (not react-native-web, but that may come as a follow-on, this is pure web at the moment)
1. Initial set-up
- Ensure you follow the android steps above.
- Install the web counterpart
yarn add react-apple-signin-auth in your web project.
2. Implement the login process on web
import AppleSignin from 'react-apple-signin-auth';
const MyAppleSigninButton = ({ ...rest }) => (
<AppleSignin
/** Auth options passed to AppleID.auth.init() */
authOptions={{
clientId: 'SAME AS ANDROID',
redirectURI: 'SAME AS ANDROID',
scope: 'email name',
state: 'state',
/** sha256 nonce before sending to apple to unify with native firebase behavior - https://github.com/invertase/react-native-apple-authentication/issues/28 */
nonce: sha256('nonce'),
/** We have to usePopup since we need clientSide authentication */
usePopup: true,
}}
onSuccess={(response) => {
console.log(response);
// {
// "authorization": {
// "state": "[STATE]",
// "code": "[CODE]",
// "id_token": "[ID_TOKEN]"
// },
// "user": {
// "email": "[EMAIL]",
// "name": {
// "firstName": "[FIRST_NAME]",
// "lastName": "[LAST_NAME]"
// }
// }
// }
}}
/>
);
export default MyAppleSigninButton;
3. Verify serverside
- Send the apple response to your server.
- See Serverside Verification
- Ensure that you pass the clientID as the web service ID, not the native app bundle. Since the project utilizes the service ID for authenticating web and android.
Serverside verification
Nonce
-
Based on the Firebase implementation guidelines the nonce provided to appleAuth.performRequest (iOS) and appleAuthAndroid.configure (Android) is automatically SHA256-hashed.
-
To verify the nonce serverside you first need to hash the nonce value, ie:
crypto.createHash('sha256').update(nonce).digest('hex');
-
The nonce can then be easily compared serverside for extra security verification, ie:
import crypto from 'crypto';
import appleSigninAuth from 'apple-signin-auth';
appleIdTokenClaims = await appleSigninAuth.verifyIdToken(id_token, {
nonce: nonce ? crypto.createHash('sha256').update(nonce).digest('hex') : undefined,
});
API Reference Documentation
All API documentation is generated by typedoc, and is available in the typedocs folder
FAQs
-
Why does full name and email return null?
const appleAuthRequestResponse = await appleAuth.performRequest({
requestedOperation: appleAuth.Operation.LOGIN,
requestedScopes: [appleAuth.Scope.FULL_NAME, appleAuth.Scope.EMAIL],
});
- For testing purposes, to be receive these again, go to your device settings;
Settings > Apple ID, iCloud, iTunes & App Store > Password & Security > Apps Using Your Apple ID, tap on your app and tap Stop Using Apple ID. You can now sign-in again and you'll receive the full name and `email.
- Keep in mind you can always access the
email property server-side by inspecting the id_token returned from Apple when verifying the user.
-
How to change button language? (iOS)
- Native Apple Button component reads language value from CFBundleDevelopmentRegion at Info.plist file. By changing CFBundleDevelopmentRegion value you can change default language for component.
<key>CFBundleDevelopmentRegion</key>
<string>en</string>
- For supporting multi language, you can add CFBundleAllowMixedLocalizations key to Info.plist.
<key>CFBundleAllowMixedLocalizations</key>
<string>true</string>
-
How do I get the email after the first login?
- You can get the email address by parsing the JWT token that's returned from any authentication, like so:
import { appleAuth } from '@invertase/react-native-apple-authentication';
import { jwtDecode } from 'jwt-decode';
const appleAuthRequestResponse = await appleAuth.performRequest({
requestedOperation: appleAuth.Operation.LOGIN,
requestedScopes: [appleAuth.Scope.EMAIL, appleAuth.Scope.FULL_NAME]
});
const { email, email_verified, is_private_email, sub } = jwtDecode(appleAuthRequestResponse.identityToken)
Troubleshooting
The operation couldn’t be completed. (com.apple.AuthenticationServices.AuthorizationError error 1000.)
Case 1
Check that the connection settings have been made correctly.
The setup can be found here: Initial Setup
Case 2
If you are using the function getCredentialStateForUser on a simulator, this error will always be triggered, for the reason that this function verifies the authenticity of the device.
You must test your code on a real device.
Case 3
If you are using a simulator, go to Manage Apple Account.
Search for "Devices", select "Simulator" and press "Remove from Account".

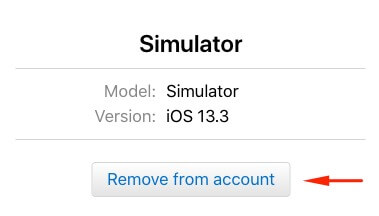
It should work fine.
"invalid_client" in Android webview
Make sure to read the Android services setup docs.
Case 1
The clientId you passed to appleAuthAndroid.configure doesn't match the Service ID you setup in your Apple developer console.
Case 2
Your Service ID is attached to the wrong Primary App ID, and therefore uses the incorrect Sign In with Apple key.
Case 3
The redirectUri you passed to appleAuthAndroid.configure doesn't match one of the return URLs or domains/subdomains you added in your Apple developer console. The URL must match exactly, and cannot contain a query string.
License
Example app construction
This section is intended for people maintaining the module.
react-native-test-app is used for the example, to refresh it this is the general path:
-
use yarn to update the react-native-test-app package in the package.json
-
move the existing example app(s) to a side space (e.g., example-OLD)
-
create the main test app (for android and ios, which are current)
-
yarn init-test-app
- name the app
RNAppleAuthExample
- choose ios and android only as the platforms (the others lag in versions)
- create the new project in
example directory
touch example/yarn.lock so that yarn will consider it to be separate- copy old example files to new example:
- the old app.json (it sets up single-app mode and the apple entitlements)
- the old index.and app. images and ios/example.entitlements files
- remove the App.tsx file
- add our package as a dependency '"@invertase/react-native-apple-auth": "portal:../"'
- other packages
yarn add react-native-get-random-values base-64 jwt-decode
- add the
path require and our package dir to watch folders in metro.config.js as
it was in the old example
-
Now make a second one, but for the platforms which lag behind mainline react-native:
yarn init-test-app --version 0.79, name RNAppleAuthExample, example-other- now do the same steps as above
- the index.ios.js and app.ios.js files need to be copied to .macos.

Built and maintained by Invertase.