Security News
Crates.io Users Targeted by Phishing Emails
The Rust Security Response WG is warning of phishing emails from rustfoundation.dev targeting crates.io users.
@luigi-project/client-support-ui5
Advanced tools
Javascript library supporting consumers of the Luigi framework
The Luigi Client UI5 Support Library offers a set features which make it easier to use the Luigi micro frontend framework with UI5 applications.
index.html file in order to add ComponentSupport and allow data-sap-ui-frameOptions:<script id="sap-ui-bootstrap" src="resources/sap-ui-core.js" data-sap-ui-resourceroots='{
"luigi.ui5-demoapp": "./"
}' data-sap-ui-oninit="module:sap/ui/core/ComponentSupport" data-sap-ui-compatVersion="edge"
data-sap-ui-async="true" data-sap-ui-frameOptions="allow" data-sap-ui-theme="sap_horizon"
data-sap-ui-xx-waitForTheme="true" data-sap-ui-xx-supportedLanguages="en,de">
</script>
package.json file:npm install @luigi-project/client-support-ui5
Component.js file.Using UI5 tooling:
sap.ui.define([
"sap/ui/core/UIComponent",
....
"@luigi-project/client-support-ui5/ui5-support-lib",
], function (UIComponent,...., Ui5SupportLib) {
return UIComponent.extend("com.sap.luigiclient.Component", {
....
init: function () {
.....
// connect client-support-ui5 lib to the application
Ui5SupportLib.connectTo(this);
this.LuigiClient = Ui5SupportLib.LuigiClient;
this.getRouter().initialize();
},
Create a lib folder under the webapp directory and put the luigi-client.js and ui5-support-lib.js into it.
Use the shim mechanism to make Luigi Client available in your UI5 application using sap.ui.loader.config (the Luigi Client UI5 Support Library consumes Luigi Client via the name @luigi-project/client/luigi-client):
sap.ui.loader.config({
// provide dependency and export metadata for non-UI5 modules
paths: {
"@luigi-project/client/luigi-client": "lib/luigi-client"
},
shim:{
"@luigi-project/client/luigi-client": {
amd: false,
exports: 'LuigiClient'
}
}
});
sap.ui.define([
"sap/ui/core/UIComponent",
...
"./lib/LuigiUI5SupportLib"
], function (UIComponent, ..., LuigiUI5SupportLib) {
"use strict";
return UIComponent.extend("com.sap.luigiclient.Component", {
....
init: function () {
.....
// connect client-support-ui5 lib to the application
Ui5SupportLib.connectTo(this);
this.LuigiClient = Ui5SupportLib.LuigiClient;
this.getRouter().initialize();
},
In addition, the Luigi Client API is available through the Luigi Client UI5 Support Library. Luigi Client can be used in a controller in this way:
const alertSettings = {
    ....
}
this.getOwnerComponent().LuigiClient.uxManager().showAlert(alertSettings).then(() => {
          // Logic to execute when the alert is dismissed
        });
The main features offered by the Luigi Client UI5 support library are:
The current (latest) context object that the UI5 application receives from Luigi Core is available on the UI5 model. The context object is accessible in the controller by calling:
this.getView().getModel('$luigiCtx').getData()
In a view file, it can be used like this:
<Button
    text="{$luigiCtx>/<CONTEXT_PROPERTY_KEY>}"/>
With the auto routing feature, we provide an easy way of synchronizing UI5 application routes with Luigi navigation. In the routes definition of the manifest file, you can add these attributes in the data object:
{
    "pattern": "",
    "name": "products",
    "target": "products",
    "data": {
        "luigiRoute": "/app1/products"
    }
},
{
    "pattern": "settings/userSettings/developer",
    "name": "developer",
    "target": "developer",
    "data": {
        "fromContext": "usersettings",
        "luigiRoute": "developer"
    }
},
{
    "pattern": "settings",
    "name": "settings",
    "target": "settings",
    "data": {
        "fromVirtualTreeRoot": true
    }
},
{
    "pattern": "products/{productId}/sites/{siteId}",
    "name": "site",
    "target": "site",
    "data": {
        "fromVirtualTreeRoot": {
            "truncate": "*/sites"
        }
    }
}
If data "data": {"luigiRoute": "/app1/products"} is defined on a route, Luigi Client will be called with:
luigiClient.linkManager().withoutSync().navigate(data.luigiRoute);
with data: { fromVirtualTreeRoot: true }, Luigi Client API will be called in this way:
luigiClient.linkManager().fromVirtualTreeRoot().withoutSync().navigate({route url});
with data: { preventBrowserHistory: true }, Luigi Client API will be called in this way:
luigiClient.linkManager().withoutSync().withOptions({ preventHistoryEntry: true }).navigate({route url});
IF you are navigating inside the same route.
Additionally, it is possible to truncate the URL. Everything before and including the specified value is truncated from the URL.
For example, all but /{sitesId} are removed from the URL with the above configuration.
More information about Luigi's linkManager can be found here.
Similarly to other views, modals which have a modalPathParam which can trigger a change in the URL when navigation occurs. In the UI5 router of your Luigi app, you can enable auto-routing for modals using these parameters:
updateModalDataPath - if set to true, the URL will be updated automatically every time the user navigates within a modal.addHistoryEntry - if set to true, changes in the modal will also add a history element in the history of the tab.
For example:{
"pattern": "products/{productId}",
"name": "product",
"target": "product",
"data": {
"updateModalDataPath": true,
"addHistoryEntry": true,
"luigiRoute":'/products/:productId'
}
}
If you are using view groups in your Luigi configuration, this library provides a view which you can use as a Luigi preloadUrl attribute in your configuration.
The route to this view is https://your.domain.name/__luigi_preload_view__
FAQs
Javascript library supporting consumers of the Luigi framework
We found that @luigi-project/client-support-ui5 demonstrated a not healthy version release cadence and project activity because the last version was released a year ago. It has 2 open source maintainers collaborating on the project.
Did you know?

Socket for GitHub automatically highlights issues in each pull request and monitors the health of all your open source dependencies. Discover the contents of your packages and block harmful activity before you install or update your dependencies.

Security News
The Rust Security Response WG is warning of phishing emails from rustfoundation.dev targeting crates.io users.

Product
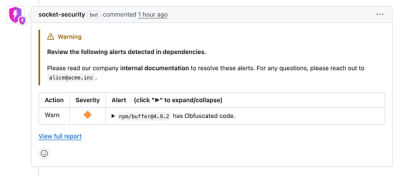
Socket now lets you customize pull request alert headers, helping security teams share clear guidance right in PRs to speed reviews and reduce back-and-forth.

Product
Socket's Rust support is moving to Beta: all users can scan Cargo projects and generate SBOMs, including Cargo.toml-only crates, with Rust-aware supply chain checks.