React (npm)
The Delight AI agent Messenger React allows seamless integration of chatbot features into your React application.
This guide explains:
Prerequisites
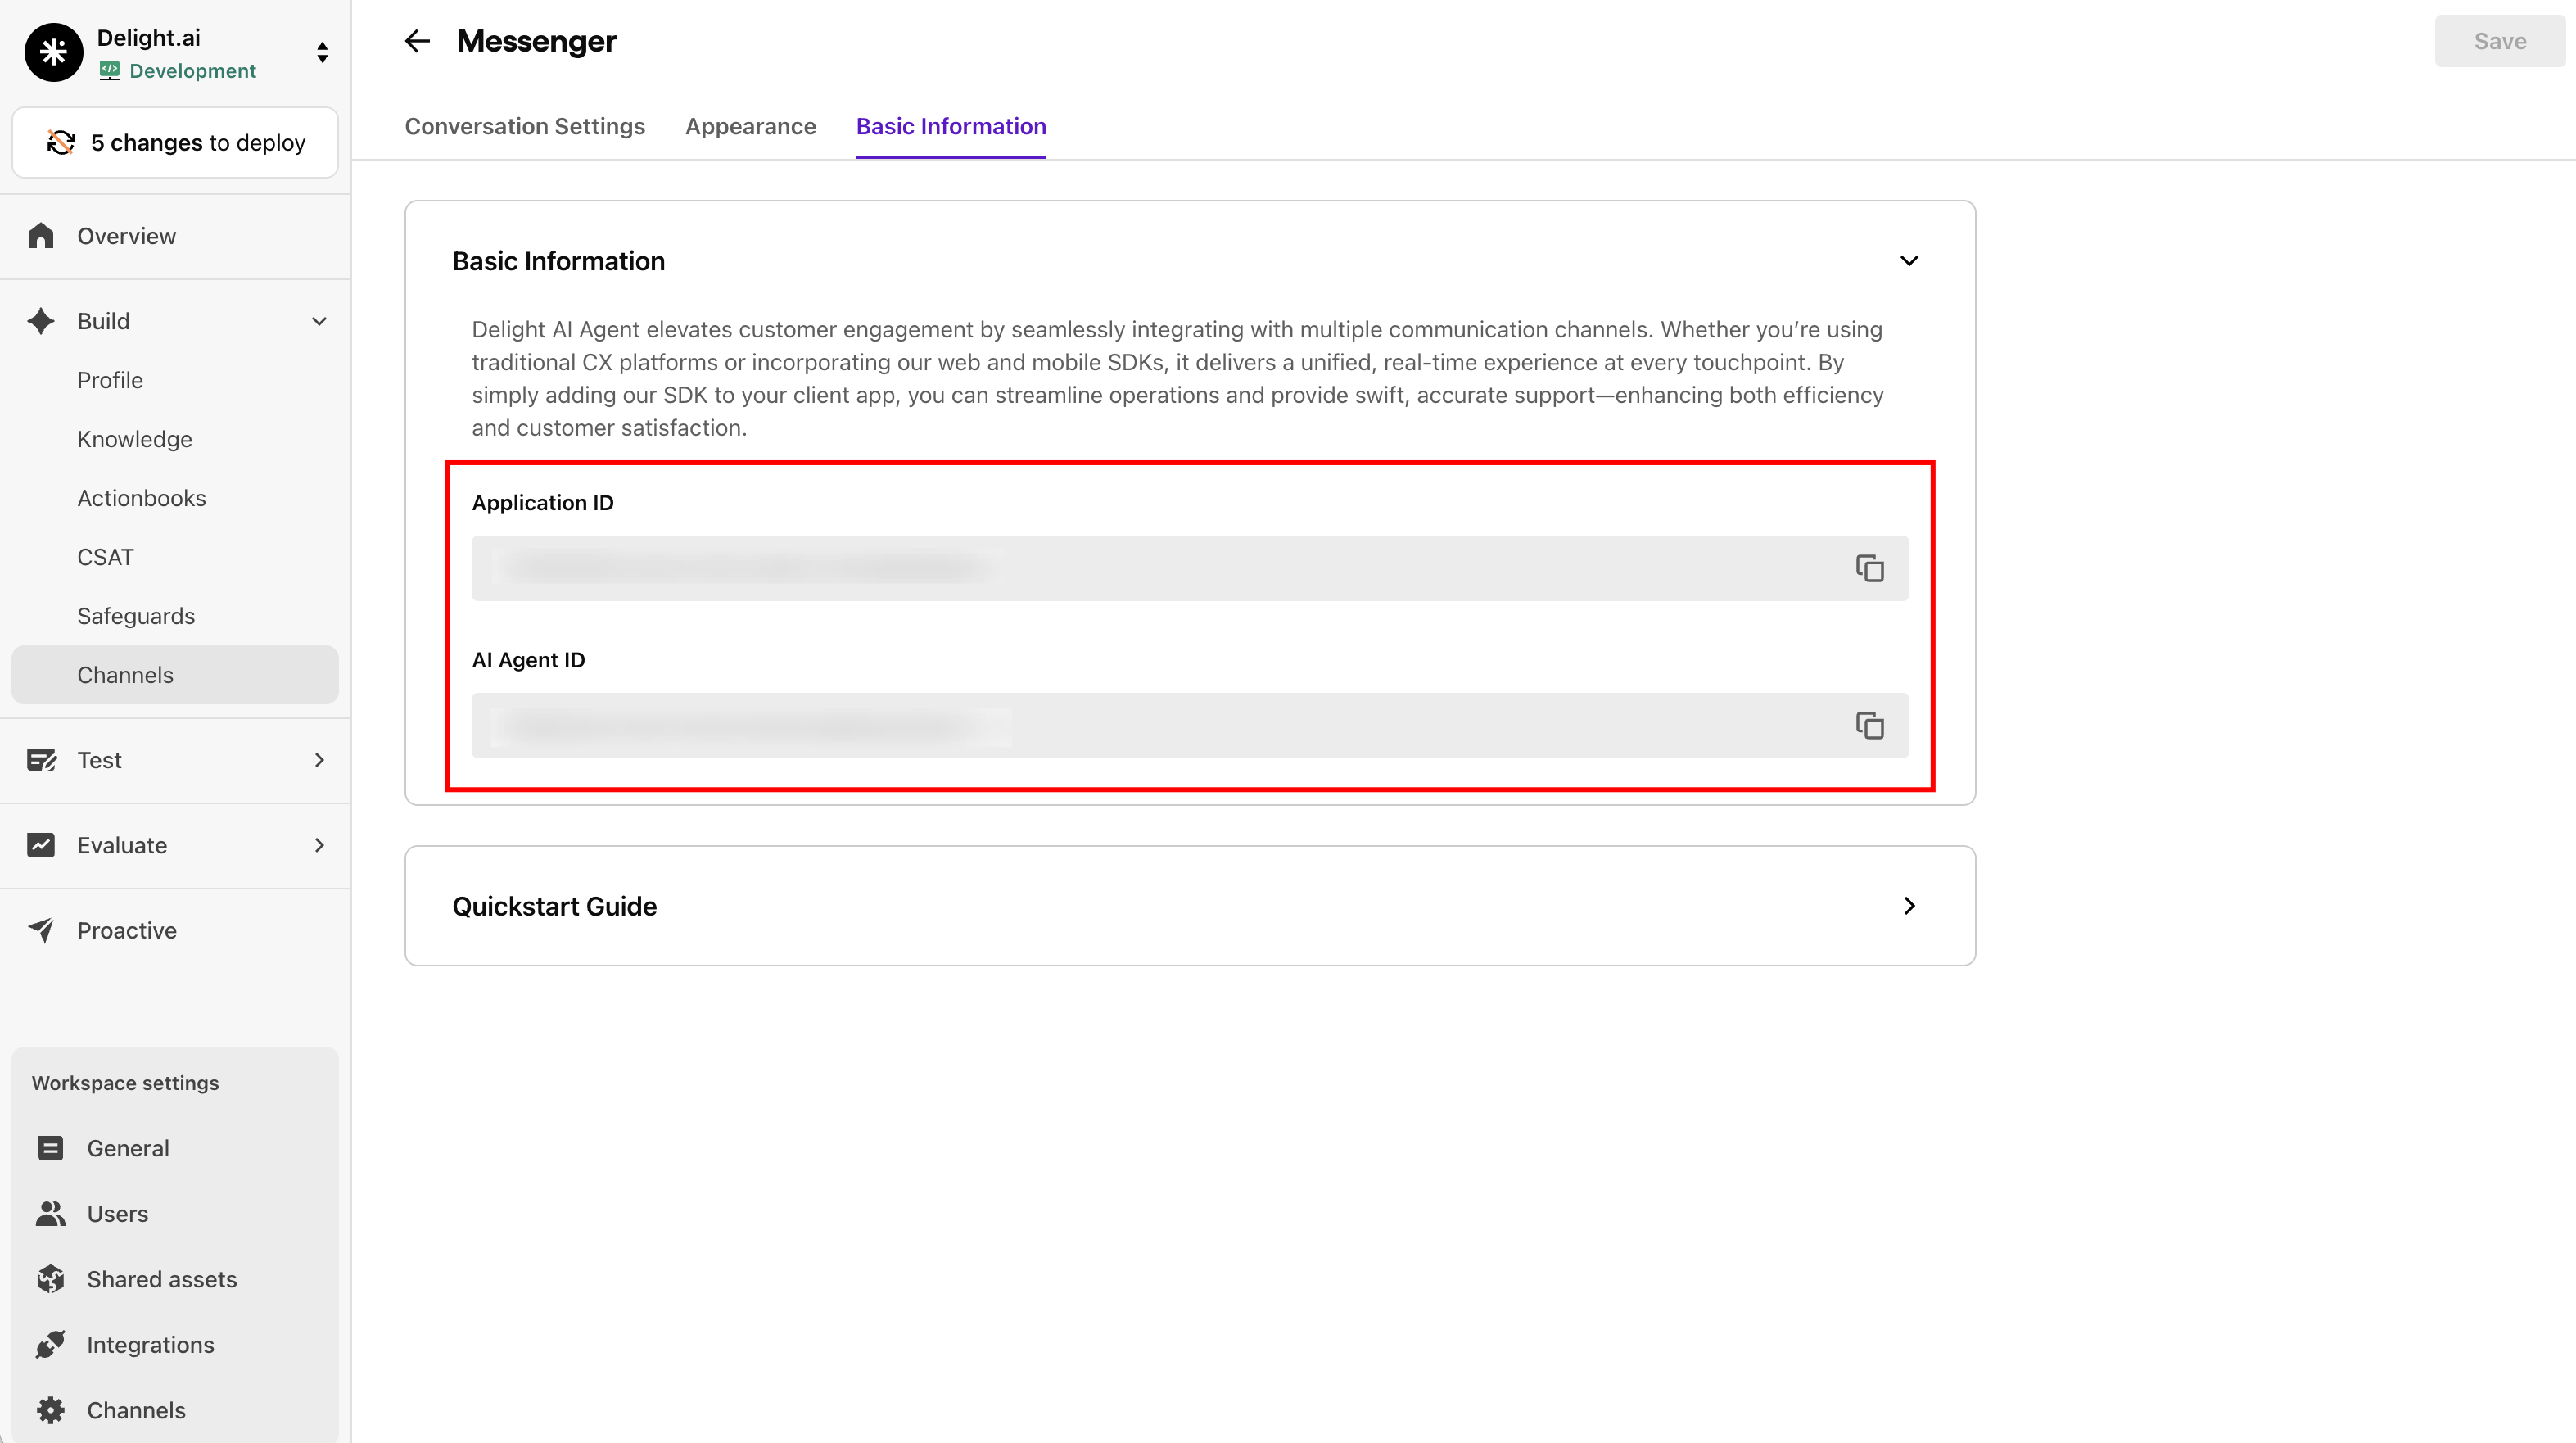
Before you start, you'll need your Application ID and AI agent ID.
You can find it under the Channels > Messenger menu on the Delight AI dashboard.
System requirements:
- React >=18.0.0
- React DOM >=18.0.0
- @sendbird/chat ^4.19.0
- styled-components >=5.0.0
Getting started
Quickly install and initialize the AI agent SDK by following the steps below.
Step 1. Install AI agent SDK
Install the package with its peer dependencies using npm or yarn:
npm install @sendbird/ai-agent-messenger-react @sendbird/chat styled-components
yarn add @sendbird/ai-agent-messenger-react @sendbird/chat styled-components
Note: Modern npm versions automatically install peer dependencies, but explicitly installing them ensures compatibility and avoids potential version conflicts.
Step 2. Initialize AI agent SDK
The React SDK provides two main approaches for integration:
Option 1: FixedMessenger (recommended for quick setup)
FixedMessenger provides a predefined UI toolkit with launcher and messenger at fixed position (bottom-right):
import { FixedMessenger } from '@sendbird/ai-agent-messenger-react';
import '@sendbird/ai-agent-messenger-react/index.css';

function App() {
  return <FixedMessenger appId="YOUR_APP_ID" aiAgentId="YOUR_AI_AGENT_ID" />;
}
Option 2: AgentProviderContainer (for custom UI implementations)
AgentProviderContainer allows for custom UI implementations and component-level integration:
import { AgentProviderContainer, Conversation } from '@sendbird/ai-agent-messenger-react';
import '@sendbird/ai-agent-messenger-react/index.css';

function App() {
  return (
    <AgentProviderContainer appId="YOUR_APP_ID" aiAgentId="YOUR_AI_AGENT_ID">
      <Conversation />
    </AgentProviderContainer>
  );
}
Custom host configuration
If needed, you can specify custom API and WebSocket hosts:
<FixedMessenger
  appId="YOUR_APP_ID"
  aiAgentId="YOUR_AI_AGENT_ID"
  customApiHost="https://your-proxy-api.example.com"
  customWebSocketHost="wss://your-proxy-websocket.example.com"
/>
Similarly, when using AgentProviderContainer:
<AgentProviderContainer
  appId="YOUR_APP_ID"
  aiAgentId="YOUR_AI_AGENT_ID"
  customApiHost="https://your-proxy-api.example.com"
  customWebSocketHost="wss://your-proxy-websocket.example.com"
>
  <Conversation />
</AgentProviderContainer>
Both properties are optional and only need to be configured if required.
Component overview
FixedMessenger vs AgentProviderContainer
FixedMessenger:
- Complete UI toolkit with launcher and messenger
- Fixed position (bottom-right corner)
- Includes all necessary providers internally
- Recommended for most use cases
- Use standalone without additional providers
AgentProviderContainer:
- Provider component for custom UI implementations
- Allows building custom messenger interfaces
- Use when you need specific UI layouts or custom components
- Must be combined with conversation components like
<Conversation />
Running your application
Now that you have installed and initialized the AI agent SDK, follow the steps below to run your application.
To launch and display the messenger, implement the code below:
Note: Replace YOUR_APP_ID and YOUR_AI_AGENT_ID with your Application ID and AI agent ID which you can obtain from the Delight AI dashboard. To learn how to do so, refer to the prerequisites section.
function App() {
  return <FixedMessenger appId="YOUR_APP_ID" aiAgentId="YOUR_AI_AGENT_ID" />;
}
FixedMessenger styles
When using the fixed messenger, FixedMssenger.Style allows you to customize its appearance and positioning:
margin: Defines the margin around the fixed messenger and its launcher.launcherSize: Defines the size of the launcher button in pixels (width and height are equal).position: Determines which corner of the screen the launcher will appear in. Available options are: start-top, start-bottom, end-top and end-bottom.
function App() {
  return (
    <FixedMessenger>
      <FixedMessenger.Style
        position={'start-bottom'}
        launcherSize={32}
        margin={{ start: 0, end: 0, bottom: 0, top: 0 }}
      />
    </FixedMessenger>
  );
}
Manage user sessions
The SDK supports two types of user sessions: Manual session for authenticated users and Anonymous session for temporary users.
Session types
1. Manual session (ManualSessionInfo): Use this when you have an authenticated user with a specific user ID and session token.
import { ManualSessionInfo } from '@sendbird/ai-agent-messenger-react';

<FixedMessenger
  appId="YOUR_APP_ID"
  aiAgentId="YOUR_AI_AGENT_ID"
  userSessionInfo={new ManualSessionInfo({
    userId: 'user_id',
    authToken: 'auth_token',
    sessionHandler: {
      onSessionTokenRequired: async (resolve, reject) => {
        try {
          const response = await fetch('new-token-endpoint');
          resolve(response.token);
        } catch (error) {
          reject(error);
        }
      },
      onSessionClosed: () => { },
      onSessionError: (error) => { },
      onSessionRefreshed: () => { }
    }
  })}
/>
2. Anonymous session (AnonymousSessionInfo): Use this when you don't have user authentication or want to allow guest access. The server will automatically create a temporary user.
import { AnonymousSessionInfo } from '@sendbird/ai-agent-messenger-react';

<FixedMessenger
  appId="YOUR_APP_ID"
  aiAgentId="YOUR_AI_AGENT_ID"
  userSessionInfo={new AnonymousSessionInfo()}
/>
The messenger view can be programmatically controlled using the state prop:
function App() {
  const [opened, setOpened] = useState(true);

  return <FixedMessenger appId="YOUR_APP_ID" aiAgentId="YOUR_AI_AGENT_ID" state={{ opened, setOpened }} />;
}
Advanced features
The following are available advanced features.
Display messenger without launcher button
Build custom messenger UI using AgentProviderContainer:
import { AgentProviderContainer, Conversation } from '@sendbird/ai-agent-messenger-react';

function App() {
  return (
    <div style={{ height: '400px', border: '1px solid #ccc' }}>
      <AgentProviderContainer appId="YOUR_APP_ID" aiAgentId="YOUR_AI_AGENT_ID">
        <Conversation />
      </AgentProviderContainer>
    </div>
  );
}
Passing context object to agent
You can predefine customer-specific information such as country, language, or other custom context data to guide the AI agent in providing faster and more accurate responses.
This allows for a more personalized and context-aware interaction experience.
Important: These settings can only be configured during initialization.
<FixedMessenger
appId="YOUR_APP_ID"
aiAgentId="YOUR_AI_AGENT_ID"
language="en-US"
countryCode="US"
context={{
userPreference: 'technical',
customerTier: 'premium',
}}
/>
Localization and language support
The SDK supports multiple languages and allows you to customize UI strings. You can:
- Set the language during initialization
- Customize specific strings in supported languages
- Add support for additional languages
- Dynamically load language files
For detailed information about localization options and full list of available string sets, refer to our Localization Guide.