[!WARNING]
Storyblok Vue 2 SDK is reaching its End of Life on August 31st 2024. Please follow the Migration Guide to update your project to the latest version of Vue and Storyblok Vue SDK.
Vue 2 EOL was December 31st, 2023. If you are starting a new project using Vue and Storyblok, please start with the latest version of Vue (3.x) and Storyblok Vue SDK.
🚀 Usage
Check out the Live Demo on Stackblitz!
If you are first-time user of the Storyblok, read the Getting Started guide to get a project ready in less than 5 minutes.
Installation
Install @storyblok/vue-2
npm install --save-dev @storyblok/vue-2
Register the plugin on your application (usually in main.js), add the apiPlugin and add the access token of your Storyblok space:
import Vue from "vue";
import { StoryblokVue, apiPlugin } from "@storyblok/vue-2";
import App from "./App.vue";

Vue.use(StoryblokVue, {
  accessToken: "<your-token>",
  use: [apiPlugin],
});
That's it! All the features are enabled for you: the Api Client for interacting with Storyblok CDN API, and Storyblok Bridge for real-time visual editing experience.
You can enable/disable some of these features if you don't need them, so you save some KB. Please read the "Features and API" section
Composition API
-
Using Vue 2.7
As Vue 2.7 comes with Composition API under the hood you just need to import everything from "vue".
Note: @storyblok/vue-2 v2.0.0 doesn't support Vue 2.6 anymore.
-
Using Vue 2.6 or less
Use a v1.x.x from this SDK and then, install @vue/composition-api and register it in the application:
import VueCompositionAPI from "@vue/composition-api";
Vue.use(VueCompositionAPI);
To use script setup, install unplugin-vue2-script-setup. Depending on your setup, the configuration is different. For example, in Vite:
import { createVuePlugin } from "vite-plugin-vue2";
import ScriptSetup from "unplugin-vue2-script-setup/vite";
export default {
plugins: [createVuePlugin(), ScriptSetup()],
};
From a CDN
Install the file from the CDN and access the methods via window.storyblokVue:
<script src="https://unpkg.com/@storyblok/vue-2"></script>
Getting started
@storyblok/vue-2 does three actions when you initialize it:
- Provides a
storyblokApi object in your app, which is an instance of storyblok-js-client
- Loads Storyblok Bridge for real-time visual updates
- Provides a
v-editable directive to link editable components to the Storyblok Visual Editor
Short Form
Load globally the Vue components you want to link to Storyblok in your main.js file:
import Page from "./components/Page.vue";
import Teaser from "./components/Teaser.vue";

Vue.use(StoryblokVue, {
  accessToken: "<your-token>",
  use: [apiPlugin],
});

Vue.component("Page", Page);
Vue.component("Teaser", Teaser);
The simplest way is by using the useStoryblok one-liner composable. Where you need to pass as first parameter the slug, while the second and third parameters, apiOptions and bridgeOptions respectively, are optional:
<script setup>
import { useStoryblok } from "@storyblok/vue-2";
const story = useStoryblok(
"path-to-story",
{ version: "draft", resolve_relations: "Article.author" },
{ resolveRelations: ["Article.author"], resolveLinks: "url" }
);
</script>
<template>
<StoryblokComponent v-if="story" :blok="story.content" />
</template>
Check the available apiOptions in our API docs and bridgeOptions passed to the Storyblok Bridge.
Rendering Rich Text
You can easily render rich text by using the renderRichText function that comes with @storyblok/vue-2 and a Vue computed property:
<template>
  <div v-html="articleContent"></div>
</template>

<script setup>
  import { computed } from "vue";
  import { renderRichText } from "@storyblok/vue-2";

  const articleContent = computed(() => renderRichText(blok.articleContent));
</script>
You can set a custom Schema and component resolver globally at init time by using the richText init option:
import { RichTextSchema, StoryblokVue } from "@storyblok/vue-2";
import cloneDeep from "clone-deep";
const mySchema = cloneDeep(RichTextSchema);
app.use(StoryblokVue, {
accessToken: "YOUR_ACCESS_TOKEN",
use: [apiPlugin],
richText: {
schema: mySchema,
resolver: (component, blok) => {
switch (component) {
case "my-custom-component":
return `<div class="my-component-class">${blok.text}</div>`;
default:
return "Resolver not defined";
}
},
},
});
You can also set a custom Schema and component resolver only once by passing the options as the second parameter to renderRichText function:
import { renderRichText } from "@storyblok/vue-2";

renderRichText(blok.richTextField, {
  schema: mySchema,
  resolver: (component, blok) => {
    switch (component) {
      case "my-custom-component":
        return `<div class="my-component-class">${blok.text}</div>`;
        break;
      default:
        return `Component ${component} not found`;
    }
  },
});
Long Form
1. Fetching Content
Inject storyblokApi when using Composition API:
<template>
<div>
<p v-for="story in stories" :key="story.id">{{ story.name }}</p>
</div>
</template>
<script setup>
import { onMounted } from "vue";
import { useStoryblokApi } from "@storyblok/vue-2";
onMounted(() => {
const storyblokApi = useStoryblokApi();
const { data } = await storyblokApi.get(
"cdn/stories/home",
{ version: "draft", resolve_relations: "Article.author" }
);
});
</script>
Note: you can skip using apiPlugin if you prefer your own method or function to fetch your data.
2. Listen to Storyblok Visual Editor events
Use useStoryBridge to get the new story every time is triggered a change event from the Visual Editor. You need to pass the story id as first param, and a callback function as second param to update the new story:
<script setup>
import { onMounted, reactive } from "vue";
import { useStoryblokBridge, useStoryblokApi } from "@storyblok/vue-2";
onMounted(() => {
const storyblokApi = useStoryblokApi();
const { data } = await storyblokApi.get(
"cdn/stories",
{ version: "draft", resolve_relations: "Article.author" }
);
const state = reactive({ story: data.story });
useStoryblokBridge(state.story.id, story => (state.story = story));
});
</script>
You can pass Bridge options as a third parameter as well:
useStoryblokBridge(
state.story.id,
(story) => (state.story = story),
{
resolveRelations: ["Article.author"],
resolveLinks: "url",
}
);
3. Link your components to Storyblok Visual Editor
For every component you've defined in your Storyblok space, add the v-editable directive with the blok content:
<template>
<div v-editable="blok"></div>
</template>
Where blok is the actual blok data coming from Storblok's Content Delivery API.
Check out the playground for a full example.
Options API
You can use Options API as well, accessing the api client via this.$storyblokApi:
import { useStoryblokBridge } from "@storyblok/vue-2";
export default {
data: () => ({
story: [],
}),
async created() {
const { data } = this.$storyblokApi.get();
this.story = data.story;
},
mounted() {
useStoryblokBridge(
this.story.id,
(evStory) => (this.story = evStory),
{
resolveRelations: ["Article.author"],
resolveLinks: "url",
}
);
},
};
Features and API
You can choose the features to use when you initialize the plugin. In that way, you can improve Web Performance by optimizing your page load and save some bytes.
useStoryblok(pathToStory, apiOptions = {}, bridgeOptions = {})
This example of useStoryblok:
<script setup>
import { useStoryblok } from "@storyblok/vue-2";
const story = await useStoryblok(
"blog",
{ version: "draft", resolve_relations: "Article.author" },
{ resolveRelations: ["Article.author"], resolveLinks: "url" }
);
</script>
Is equivalent to the following, using useStoryblokBridge and useStoryblokApi:
<script setup>
import { onMounted, reactive } from "vue";
import { useStoryblokBridge, useStoryblokApi } from "@storyblok/vue-2";
onMounted(() => {
const storyblokApi = useStoryblokApi();
const { data } = await storyblokApi.get(
"cdn/stories/blog",
{ version: "draft", resolve_relations: "Article.author" },
);
const state = reactive({ story: data.story });
useStoryblokBridge(
state.story.id,
story => (state.story = story),
{ resolveRelations: ["Article.author"], resolveLinks: "url" }
);
});
</script>
Check the available apiOptions (passed to storyblok-js-client) and bridgeOptions (passed to the Storyblok Bridge).
Storyblok API
You can use an apiOptions object. This is passed down to the storyblok-js-client config object.
app.use(StoryblokVue, {
accessToken: "<your-token>",
apiOptions: {
cache: { type: "memory" },
},
use: [apiPlugin],
});
If you prefer to use your own fetch method, just remove the apiPlugin and storyblok-js-client won't be added to your application.
app.use(StoryblokVue);
Region parameter
Possible values:
eu (default): For spaces created in the EUus: For spaces created in the USap: For spaces created in Australiaca: For spaces created in Canadacn: For spaces created in China
Full example for a space created in the US:
app.use(StoryblokVue, {
  accessToken: "<your-token>",
  use: [apiPlugin],
  apiOptions: {
    region: "us",
  },
});
Note: For spaces created in the US, Australia, Canada or China, the region parameter must be specified.
Storyblok Bridge
You can conditionally load it by using the bridge option. Very useful if you want to disable it in production:
app.use(StoryblokVue, {
  bridge: process.env.NODE_ENV !== "production",
});
Keep in mind you have still access to the raw window.StoryblokBridge:
const sbBridge = new window.StoryblokBridge(options);
sbBridge.on(["input", "published", "change"], (event) => {
});
How to migrate to 2.x.x (Vue 2.7 compatible)
In this section we will see how to migrate the SDK in our project from v1.x.x to v2.x.x.
1. Update to plugin-vue2
Vue 2.7 support for Vite is provided via a new plugin: @vitejs/plugin-vue2, that supersedes the existing vite-plugin-vue2 for older versions.
Update your vite.config.js file:
import { defineConfig } from "vite";
- import { createVuePlugin } from "vite-plugin-vue2";
+ import createVuePlugin from "@vitejs/plugin-vue2";

export default defineConfig({
  plugins: [createVuePlugin()],
});
2. Update to latest version of vue
Upgrade your project to the latest version of Vue 2.7.x.
For more information about the changes needed see the official upgrade guide.
3. Remove Composition API
Remove Vue Composition API from your project:
- import VueCompositionAPI from "@vue/composition-api";

- Vue.use(VueCompositionAPI);
Change the imports from "@vue/composition-api" to "vue":
- import { ref, onMounted } from "@vue/composition-api";
+ import { ref, onMounted } from "vue";
Compatibility
Vue versions
The v2.x.x of this package is compatible with Vue 2.7.x.
If you want to work with Vue 2.6 or less, use v1.x.x instead.
Browsers
This plugin is for Vue 2.7. Thus, it supports the same browsers as Vue 2. In short: all modern browsers, but also IE 11 support.
Server Side Rendering
Vue 2.7 does not allow top-level await. If you need SSR, you should use Nuxt instead, in combination with our nuxt-2 SDK.
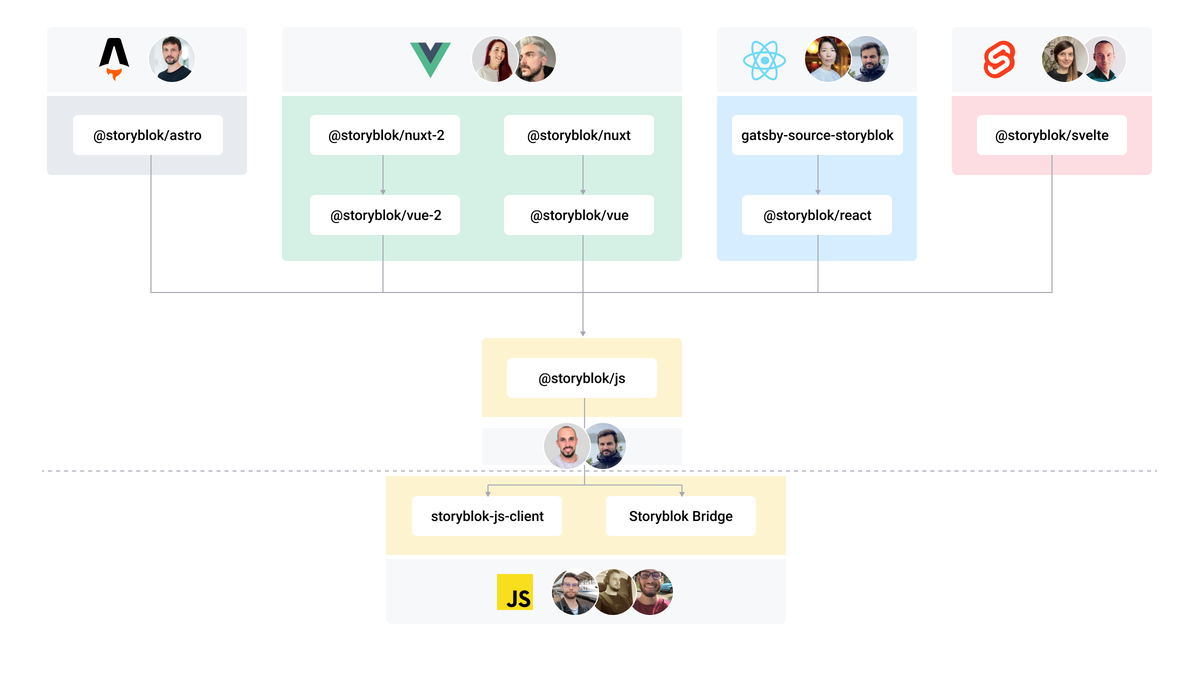
The Storyblok JavaScript SDK Ecosystem
🔗 Related Links
ℹ️ More Resources
Support
Contributing
Please see our contributing guidelines and our code of conduct.
This project use semantic-release for generate new versions by using commit messages and we use the Angular Convention to naming the commits. Check this question about it in semantic-release FAQ.