
Research
Security News
Lazarus Strikes npm Again with New Wave of Malicious Packages
The Socket Research Team has discovered six new malicious npm packages linked to North Korea’s Lazarus Group, designed to steal credentials and deploy backdoors.
@vivocha/bot-sdk
Advanced tools
JavaScript / TypeScript SDK to create Bot Agents and Filters for the Vivocha platform
This SDK allows to write Vivocha Bot Agents integrating existing bots, built and trained using your preferred bot / NLP platform. E.g., Dialogflow, IBM Watson Assistant (formerly Conversation), Wit.ai, etc... By creating a BotManager it is possible to register multi-platform bot implementations and let Vivocha communicate with them through a well-defined and uniform message-based API.
To start with the Bot SDK it is recommended to:
npm i @vivocha/bot-sdkor
The Vivocha platform provides out-of-the-box support for chat bots built using IBM Watson Assistant (formerly Conversation) and Dialogflow platforms. This means that it is possible to integrate these particular bot implementations with Vivocha simply using the Vivocha configuration app and specificing few settings, like authentication tokens, and following some, very simple, mandatory guidelines when building the bot, at design time. The first sections of this documentation focus on building custom Bot Agents using the Bot SDK, which allows to integrate them with the Vivocha system with ease and also provides a library to write bots using the Wit.ai NLP platform.
The last sections of this guide are dedicated to the integration guidelines for chatbots built with the three supported platforms: IBM Watson Assistant (formerly Conversation), Dialogflow and Wit.ai and about how to transfer contacts from a bot to another agent.
The following picture shows an high-level overview of the Vivocha Bot SDK and its software components.
 |
|---|
| FIGURE 1 - Overview of the main modules of the Bot SDK |
The examples folder contains some samples of Bot Managers, a Wit.ai Bot implementation and a Filter, along with some related HTTP requests to show how to call their APIs.
See:
sample: dead simple bot Agent and Manager plus a Bot Filter, read and use the examples/http-requests/sample.http file to learn more and to run them;dummy-bot: a simple bot (Agent and Manager) able to understand some simple "commands" to return several types of messages, including quick replies and templates. Read and use the examples/http-requests/dummy-bot.http file to learn more and to run and interact with them.sample-wit: a simple bot using the Wit.ai platform.TIP: For a quick start learning about the format of requests, responses and messages body, including quick replies and templates, just read the Dummy Bot code.
A BotAgent represents and communicates with a particular Bot implementation platform.
A BotManager exposes a Web API acting as a gateway to registered BotAgents.
Usually, the steps to use agents and managers are:
BotAgent for every Bot/NLP platform you need to support, handling / wrapping / transforming messages of type BotRequest and BotResponse;BotAgentManager instance;BotAgents defined in step 1) to the BotAgentManager, through the registerAgent(key, botAgent) method, where key (string) is the choosen bot engine (e.g, Dialogflow, Watson, ...) and agent is a BotAgent instance;BotAgentManager service through its listen() method, it exposes a Web API;BotAgent thanks to the engine.type message property, used as key in step 3). The API is fully described by its Swagger specification, available at http://<BotAgentManager-Host>:<port>/swagger.json.A BotFilter is a Web service to filter/manipulate/enrich/transform BotRequests and/or BotResponses.
For example, a BotFilter can enrich a request calling an external API to get additional data before sending it to a BotAgent, or it can filter a response coming from a BotAgent to transform data before forwarding it to the user chat.
Basically, to write a filter you have to:
BotFilter specifying a BotRequestFilter or a BotResponseFilter. These are the functions containing your logic to manipulate/filter/enrich requests to bots and responses from them. Inside them you can call, for example, external web services, access to DBs, transform data and do whatever you need to do to achieve your application-specific goal. A BotFilter can provide a filter only for requests, only for responses or both.BotFilter service through its listen() method, it exposes a Web API; the API is fully described by its Swagger specification, available at http://<BotFilter-Host>:<port>/swagger.json.A BotAgent represents an abstract Bot implementation and it directly communicates with a particular Bot / NLP platform (like Dialogflow, IBM Watson Assistant, formerly Conversation, and so on...).
In the Vivocha model, a Bot is represented by a function with the following signature:
In Typescript:
(request: BotRequest): Promise<BotResponse>
In JavaScript:
let botAgent = async (request) => {
    // the logic to interact with the particular bot implementation
    // goes here, then produce a BotResponse message...
    ...
    return response;
}
Requests are sent to BotAgents, BotManagers and BotFilters. A BotRequest is a JSON with the following properties (in bold the required properties):
| PROPERTY | VALUE | DESCRIPTION |
|---|---|---|
event | string: start or continue or end or a custom string | start event is sent to wake-up the Bot; continue tells the Bot to continue the conversation; end to set the conversation as finished; a custom string can be set for specific custom internal Bot functionalities. |
message | (optional) object, see BotMessage below | the message to send to the BotAgent |
language | (optional) string. E.g., en, it, ... | language string, mandatory for some Bot platforms. |
data | (optional) object | an object containing data to send to the Bot. Its properties must be of basic type. E.g., {"firstname":"Antonio", "lastname": "Smith", "code": 12345} |
context | (optional) object | Opaque, Bot specific context data |
tempContext | (optional) object | Temporary context, useful to store volatile data; i.e., in bot filters chains. |
environment | (optional) object | Vivocha specific environment data sent by the platform. Currently, the environment object can have the following (optional) properties: host, acct, hmac, campaignId, channelId, entrypointId, engagementId, contactId. |
settings | (optional) BotSettings object (see below) | Bot platform settings. |
Some contents and definitions of the Vivocha Bot Messages are inspired by the Facebook Messenger messages specification, but adapted and extended as needed by the Vivocha Platform.
Currently, messages' quick_replies and template properties are supported in BotResponses.
Notes: Generally speaking, while messages containing quick replies or templates have no particular constraints about the number of elements (and buttons, etc...), please take into consideration that Facebook Messenger have some contraints about them, e.g., in the number of quick replies or buttons per message; therefore, if you're supporting chats also through the Facebook Messenger channel, then you need to be compliant to its specification (more details about Messenger messages constraints can be found here). Anyway, in case of an exceeding number of elements, the Vivocha platform will trim them before sending to Messenger clients.
A BotMessage has the following properties:
| PROPERTY | VALUE | DESCRIPTION |
|---|---|---|
code | string, value is always message | Vivocha code type for Bot messages. |
type | string: text or postback | Vivocha Bot message type. |
body | string | the message text body. |
payload | (optional) string | a custom payload, usually used to send back the payload of a quick reply or of a postback button in a BotRequest, after the user clicks / taps the corresponding UI button. |
quick_replies_orientation | (optional) string: vertical or horizontal | in case of a message with quick_replies it indicates the quick replies buttons group orientation to show in the client; default is horizontal. |
quick_replies | (optional) only in case of type === text messages, an array of MessageQuickReply objects (see below) | an array of quick replies |
template | (optional) only in case of type === text messages, a MessageTemplate objects (see below) | a generic template object. |
Bot platform settings object. Along with the engine property (see the table below), it is possible to set an arbitrarily number of properties. In case, it is responsability of the specific Bot implementation / platform to handle them.
| PROPERTY | VALUE | DESCRIPTION |
|---|---|---|
engine | (optional) BotEngineSettings object (see below) | Specific Bot/NLP Platform settings. |
| PROPERTY | VALUE | DESCRIPTION |
|---|---|---|
type | string | Unique bot engine identifier, i.e., the platform name, like: Watson, Dialogflow, WitAi, ... |
settings | (optional) object | Specific settings to send to the BOT/NLP platform. E.g. for Watson Assistant (formerly Conversation) is an object like {"workspaceId": "<id>" "username": "<usrname>", "password": "<passwd>"}; for a Dialogflow bot is something like: {"token": "<token>", "startEvent": "MyCustomStartEvent"}, and so on... You need to refer to the documentation of the specific Bot Platform used. |
| PROPERTY | VALUE | DESCRIPTION |
|---|---|---|
content_type | string, accepted value: location | Type of the content of the Quick Reply |
title | (optional) string | title of the message |
payload | (optional) a string or a number | string or number related to the content-type property value |
image_url | (optional) string | a URL of an image |
Example 1: A BotResponse message containing three simple quick replies
{
    ...
    "messages": [
        {
            "code": "message",
            "type": "text",
            "body": "Just an example of quick replies... which color?",
            "quick_replies": [
                {
                    "content_type": "text",
                    "title": "Red",
                    "payload": "red 1"
                },
                {
                    "content_type": "text",
                    "title": "Blue",
                    "payload": "blue 2"
                },
                {
                    "content_type": "text",
                    "title": "White",
                    "payload": "white 3"
                }
            ]
        }
    ],
    "event": "continue",
    "data": {}
}
Which is rendered by the Vivocha interaction app like in the following screenshot:
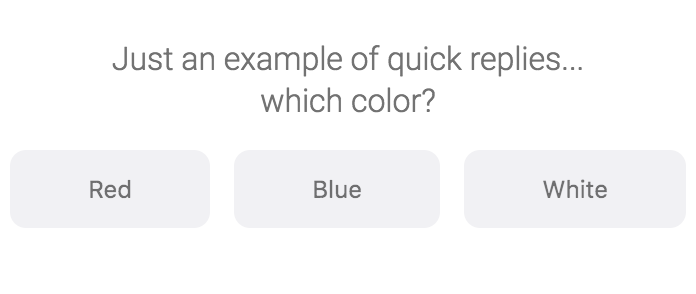 |
|---|
| A BotResponse containing a message with quick replies |
Example 2: A BotResponse message containing three quick replies with vertical orientation
{
    ...
    "messages": [
        {
            "code": "message",
            "type": "text",
            "body": "Just an example of quick replies... which color?",
            "quick_replies": [
                {
                    "content_type": "text",
                    "title": "Red",
                    "payload": "red 1"
                },
                {
                    "content_type": "text",
                    "title": "Blue",
                    "payload": "blue 2"
                },
                {
                    "content_type": "text",
                    "title": "White",
                    "payload": "white 3"
                }
            ],
            "quick_replies_orientation": "vertical"
        }
    ],
    "event": "continue",
    "data": {}
}
Which is rendered by the Vivocha interaction app like in the following screenshot:
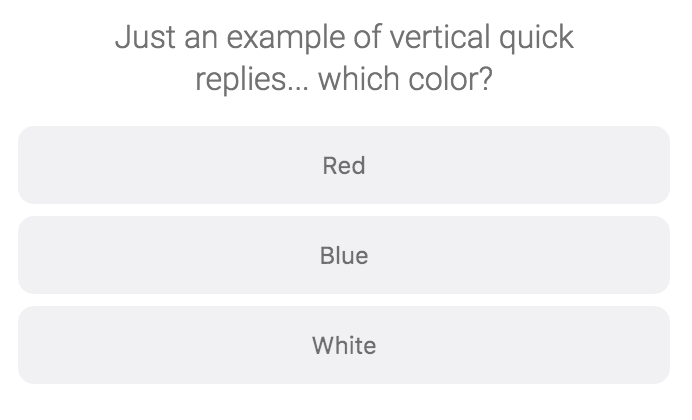 |
|---|
| A BotResponse containing a message with quick replies with vertical orientation |
Example 3: A BotResponse message containing some quick replies with images
{
    ...
    "messages": [
        {
            "code": "message",
            "type": "text",
            "body": "Choose a team member",
            "quick_replies": [
                {
                    "content_type": "text",
                    "title": "Federico",
                    "payload": "federico 1",
                    "image_url": "https://www.vivocha.com/wp-content/uploads/2017/03/team_federico.png"
                },
                {
                    "content_type": "text",
                    "title": "Andrea",
                    "payload": "andrea 2",
                    "image_url": "https://www.vivocha.com/wp-content/uploads/2017/03/team_andrea.png"
                },
                {
                    "content_type": "text",
                    "title": "Antonio",
                    "payload": "antonio 3",
                    "image_url": "https://www.vivocha.com/wp-content/uploads/2017/05/team-antonio.png"
                },
                {
                    "content_type": "text",
                    "title": "Marco",
                    "payload": "marco 4",
                    "image_url": "https://www.vivocha.com/wp-content/uploads/2017/03/Marco_Amadori.png"
                }
            ]
        }
    ],
    "event": "continue",
    "data": {}
}
Which is rendered by the Vivocha interaction app like in the following screenshot:
| A BotResponse containing a message with some quick replies containing an image |
| PROPERTY | VALUE | DESCRIPTION |
|---|---|---|
type | string, accepted values are: generic or list | Template type, currently only generic and list types are supported |
elements | (optional) an array of generic template Elements | elements defined by TemplateElement object spec. |
buttons | (optional) only in case of a template where type == list, an array of Button objects | the buttons to display in the bottom part of the template. |
In a Template Element only the property title is mandatory, but at least one optional property among the following must be set in addition to it.
| PROPERTY | VALUE | DESCRIPTION |
|---|---|---|
title | string | the text to display as title in the template rendering |
subtitle | (optional) string | an optional subtitle to display in the template |
image_url | (optional) string | a valid URL for an image to display in the template |
default_action | (optional) DefaultAction object | an object representing the default action to execute when the template is clicked / tapped |
buttons | (optional) an array of Button objects | the buttons to display in the template element. |
Example: A BotResponse message containing a generic template
{
    ...
    "messages": [
        {
            "code": "message",
            "type": "text",
            "body": "Just an example of generic template:",
            "template": {
                "type": "generic",
                "elements": [
                    {
                        "title": "Meow!",
                        "image_url": "https://upload.wikimedia.org/wikipedia/commons/thumb/5/5d/Adult_Scottish_Fold.jpg/1920px-Adult_Scottish_Fold.jpg",
                        "subtitle": "We have the right cat for everyone.",
                        "default_action": {
                            "type": "web_url",
                            "url": "https://en.wikipedia.org/wiki/Cat"
                        },
                        "buttons": [
                            {
                                "type": "web_url",
                                "url": "https://en.wikipedia.org/wiki/Cat",
                                "title": "View Website"
                            },
                            {
                                "type": "postback",
                                "title": "OK",
                                "payload": "ok abcd 123"
                            }
                        ]
                    }
                ]
            }
        }
    ],
    "event": "continue",
    "data": {}
}
which is rendered by the Vivocha interaction app like in the following screenshot:
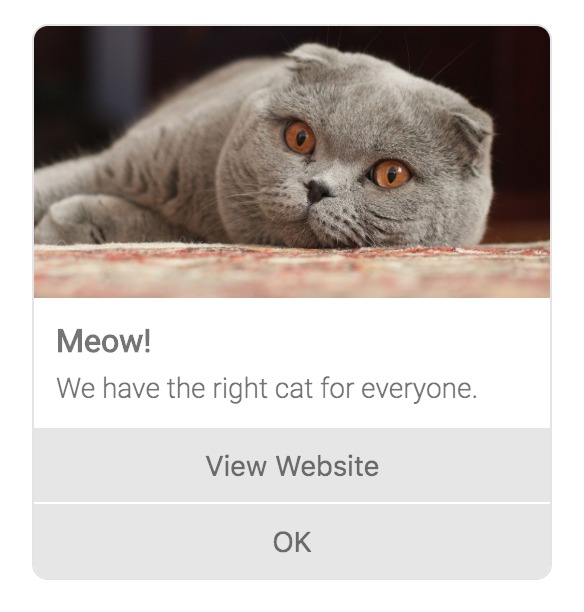 |
|---|
| A BotResponse message containing only one generic template |
Example 4: A BotResponse message containing a carousel of generic templates
{
    ...
    "messages": [
        {
            "code": "message",
            "type": "text",
            "body": "Just an example of generic template:",
            "template": {
                "type": "generic",
                "elements": [
                    {
                        "title": "Meow!",
                        "image_url": "https://upload.wikimedia.org/wikipedia/commons/thumb/5/5d/Adult_Scottish_Fold.jpg/1920px-Adult_Scottish_Fold.jpg",
                        "subtitle": "We have the right cat for everyone.",
                        "default_action": {
                            "type": "web_url",
                            "url": "https://en.wikipedia.org/wiki/Cat"
                        },
                        "buttons": [
                            {
                                "type": "web_url",
                                "url": "https://en.wikipedia.org/wiki/Cat",
                                "title": "View Website"
                            },
                            {
                                "type": "postback",
                                "title": "OK",
                                "payload": "ok abcd 123"
                            }
                        ]
                    }
                ]
            }
        }
    ],
    "event": "continue",
    "data": {}
}
Which is shown in the Vivocha web interaction app as in the following screenshot:
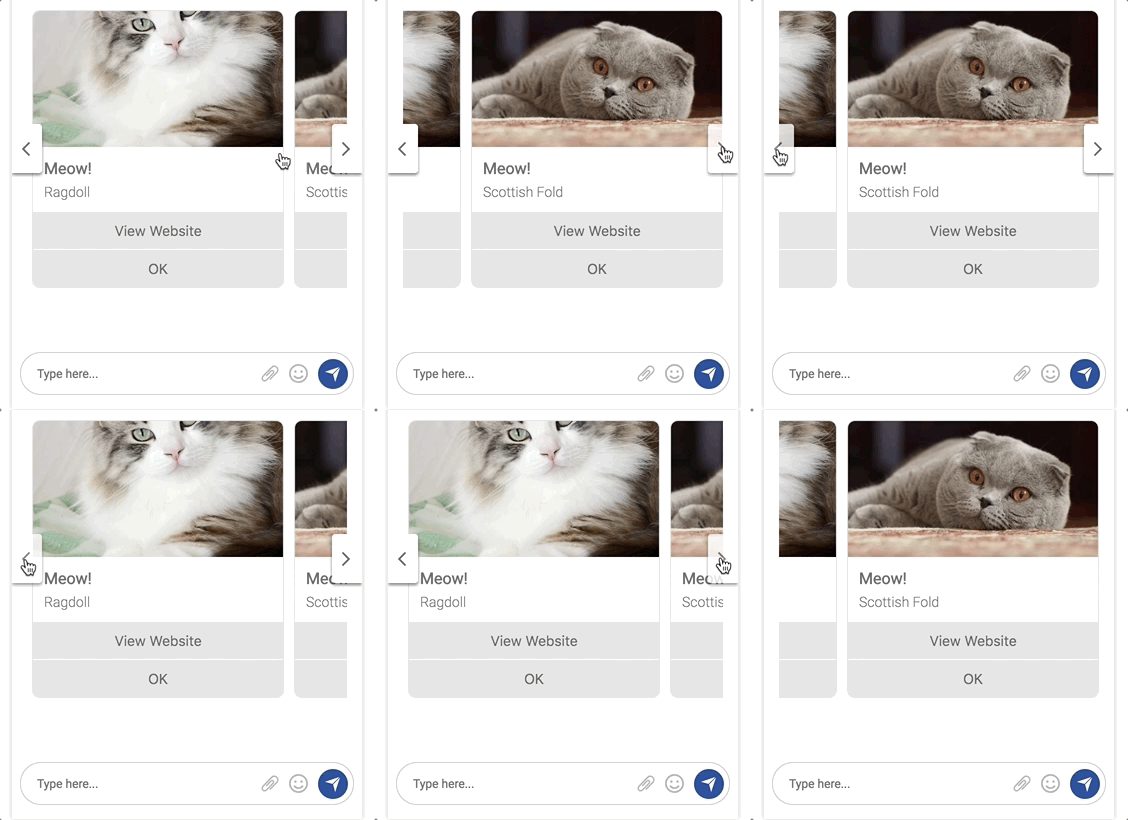 |
|---|
| A BotResponse message containing a carousel of generic templates |
Example 5: A BotResponse message containing a list template
{
    ...
    "messages": [
        {
            "code": "message",
            "type": "text",
            "body": "List template",
            "template": {
                "type": "list",
                "elements": [
                    {
                        "title": "Documentation part 1 - 2018",
                        "subtitle": "All documents about our products available in 2018. Advertisement, User's guides, technical info...",
                        "default_action": {
                            "type": "web_url",
                            "url": "https://www.vivocha.com"
                        }
                    },
                    {
                        "title": "Documentation part 2 - 2017",
                        "subtitle": "All documents about our products available in 2017. Advertisement, User's guides, technical info...",
                        "default_action": {
                            "type": "web_url",
                            "url": "https://www.vivocha.com"
                        }
                    },
                    {
                        "title": "Documentation part 3 - 2011-2016",
                        "subtitle": "All deprecated documents about old products no more available...",
                        "default_action": {
                            "type": "web_url",
                            "url": "https://www.vivocha.com"
                        }
                    }
                ],
                "buttons": [
                    {
                        "type": "postback",
                        "title": "More",
                        "payload": "view_more"
                    }
                ]
            }
        }
    ],
    "event": "continue",
    "data": {}
}
Which is rendered by the Vivocha interaction app like in the following screenshot:
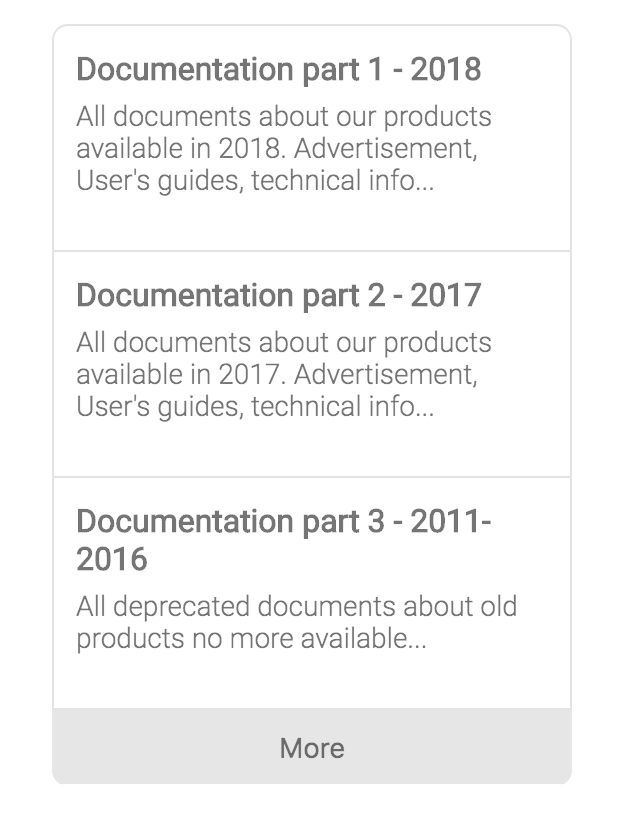 |
|---|
| A BotResponse message containing a list template |
Example 6: A BotResponse message containing a list template with links (buttons)
{
    ...
   "messages": [
        {
            "code": "message",
            "type": "text",
            "body": "list template",
            "template": {
                "type": "list",
                "elements": [
                    {
                        "title": "Visit our website",
                        "subtitle": "All our products in one place. News, plans, tips, prices.",
                        "default_action": {
                            "type": "web_url",
                            "url": "https://www.pintux.it"
                        },
                        "buttons": [
                            {
                                "title": "View",
                                "type": "web_url",
                                "url": "https://www.pintux.it"
                            }
                        ]
                    },
                    {
                        "title": "Technical documentation",
                        "subtitle": "Technical info, API documentation, tutorials and more...",
                        "default_action": {
                            "type": "web_url",
                            "url": "https://www.lensculture.com"
                        },
                        "buttons": [
                            {
                                "title": "OK",
                                "type": "postback",
                                "payload": "OK-123"
                            }
                        ]
                    }
                ],
                "buttons": [
                    {
                        "type": "postback",
                        "title": "More",
                        "payload": "view_more"
                    }
                ]
            }
        }
    ],
    "event": "continue",
    "data": {}
}
Which is rendered by the Vivocha interaction app like in the following screenshot:
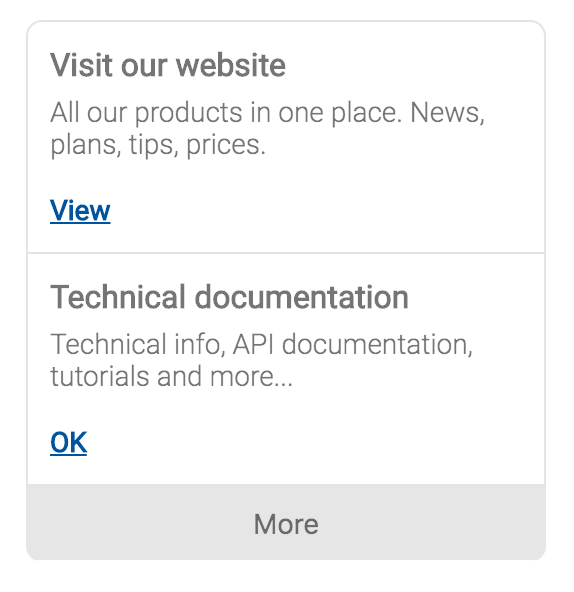 |
|---|
| A BotResponse message containing a list template with links (buttons) |
| PROPERTY | VALUE | DESCRIPTION |
|---|---|---|
type | string, admitted value is only web_url | default action type, it always refers to a web URL |
url | string | a valid URL to open when executing the default action |
A Button object can be one of the following types: PostbackButton, WebURLButton or a CustomEventButton
A postback button is used to send back to the bot a response made of a title and a payload.
| PROPERTY | VALUE | DESCRIPTION |
|---|---|---|
type | string, always set to postback | the postback button type |
title | string | the button text to display and to send back in the message body |
payload | string | a custom payload to send back to the bot |
A WebURL button is used to open a web page at the specified URL.
| PROPERTY | VALUE | DESCRIPTION |
|---|---|---|
type | string, always set to web_url | the WebURL button type |
title | string | the button text to display |
url | string | the URL of the page to open when the button is pressed |
This button allows to fire a custom event in the website page where the Vivocha interaction app / chat is running. In order to work, a contact-custom-event must be configured in the particular Vivocha Campaign.
| PROPERTY | VALUE | DESCRIPTION |
|---|---|---|
type | string, a custom type string excluding web_url and page_event | the custom type |
title | string | the button text to display |
Example of a request sent to provide the name in a conversation with a Wit.ai based Bot.
{
    "language": "en",
    "event": "continue",
    "message": {
        "code": "message",
        "type": "text",
        "body": "my name is Antonio Watson"
    },
    "settings": {
       "engine": {
          "type": "WitAi",
          "settings": {
            "token": "abcd-123"
          }
        }
    },
    "context": {
        "contexts": [
            "ask_for_name"
        ]
    }
}
Responses are sent back by BotAgents, BotManagers and BotFilters to convay a Bot platform reply back to the Vivocha platform.
A BotResponse is a JSON with the following properties and it is similar to a BotRequest, except for some fields (in bold the required properties):
| PROPERTY | VALUE | DESCRIPTION |
|---|---|---|
event | string: continue or end | continue event is sent back to Vivocha to continue the conversation, in other words it means that the bot is awaiting for the next user message; end is sent back with the meaning that Bot finished is task. |
messages | (optional) an array of BotMessage objects (same as BotRequest) | the messages sent back by the BotAgent including quick replies and templates with images, buttons, etc... |
language | (optional) string. E.g., en, it, ... | language string code |
data | (optional) object | an object containing data collected or computed by the Bot. Its properties must be of simple type. E.g., {"firstname":"Antonio", "lastname": "Smith", "code": 12345, "availableAgents": 5} |
context | (optional) object | Opaque, Bot specific context data. The Vivocha platform will send it immutated to the Bot in the next iteration. |
tempContext | (optional) object | Temporary context, useful to store volatile data, i.e., in bot filters chains. |
environment | (optional) object | Vivocha specific environment data originally sent by the platform. Currently, the environment object can have the following (optional) properties: host, acct, hmac, campaignId, channelId, entrypointId, engagementId, contactId. |
settings | (optional) BotSettings object | Bot platform settings |
raw | (optional) object | raw, platform specific, unparsed bot response. |
An example of text response sent back by a Wit.ai based Bot. It is related to the request in the BotRequest sample above in this document.
{
  "event": "continue",
  "messages": [
    {
      "code": "message",
      "type": "text",
      "body": "Thank you Antonio Watson, do you prefer to be contacted by email or by phone?"
    }
  ],
  "data": {
    "name": "Antonio Watson"
  },
  "settings": {
    "engine": {
      "type": "WitAi",
      "settings": {
        "token": "abcd-123"
      }
    }
  },
  "context": {
    "contexts": [
      "recontact_by_email_or_phone"
    ]
  },
  "raw": {
    "_text": "my name is Antonio Watson",
    "entities": {
      "contact": [
        {
          "suggested": true,
          "confidence": 0.9381,
          "value": "Antonio Watson",
          "type": "value"
        }
      ],
      "intent": [
        {
          "confidence": 0.9950627479,
          "value": "provide_name"
        }
      ]
    },
    "msg_id": "0ZUymTwNbUPLh6xp6"
  }
}
Another BotResponse example, including three quick replies:
{
    "event": "continue",
    "messages": [
        {
            "code": "message",
            "type": "text",
            "body": "Hello Alice, please choose a color...",
            "quick_replies": [
                {
                    "content_type": "text",
                    "title": "Red",
                    "payload": "red"
                },
                {
                    "content_type": "text",
                    "title": "Blue",
                    "payload": "blue"
                },
                {
                    "content_type": "text",
                    "title": "White",
                    "payload": "white"
                }
            ]
        }
    ],
    "data": {
      "name": "Alice"
    },
    "settings": {
        "engine": {
            "type": "custom",
            "settings": {
                "token": "super-secret-123-token"
            }
        }
    }
}
A BotResponse including a List Template:
{
    "event": "continue",
    "messages": [{
                    "code": "message",
                    "type": "text",
                    "body": "A list template",
                    "template": {
                        "type": "list",
                        "elements": [
                            {
                                "title": "Item 1",
                                "subtitle": "This is the subtitle for the item number one linked to the Vivocha website",
                                "default_action": {
                                    "type": "web_url",
                                    "url": "https://www.vivocha.com"
                                }
                            },
                            {
                                "title": "Item 2",
                                "subtitle": "This is the subtitle for the item number two linked to the Vivocha Tech blog",
                                "default_action": {
                                    "type": "web_url",
                                    "url": "http://tech.vivocha.com",
                                }
                            },
                            {
                                "title": "Item 3",
                                "subtitle": "This is the subtitle for the item number three linked to the Vivocha Team webpage",
                                "default_action": {
                                    "type": "web_url",
                                    "url": "https://www.vivocha.com/team"
                                }
                            }
                        ],
                        "buttons": [
                            {
                                "type": "postback",
                                "title": "More",
                                "payload": "view_more"
                            }
                        ]
                    }
                }
    ],
    "data": {
      "name": "Alice"
    },
    "settings": {
        "engine": {
            "type": "custom",
            "settings": {
                "token": "super-secret-123-token"
            }
        }
    }
}
A BotManager is a bot registry microservice, which basically provides two main functionalities:
BotAgents;BotAgents, acting as a gateway using a normalized interface.In the code contained in the examples directory it is possible to read in detail how to create and register Bot Agents.
Briefly, to register a BotAgent, BotManager provides a registerAgent() method:
const manager = new BotAgentManager();
manager.registerAgent('custom', async (msg: BotRequest): Promise<BotResponse> => {

    // Bot Agent application logic goes here
    // I.e., call the specific Bot implementation APIs (e.g., Watson, Dialogflow, etc...)
    // adapting requests and responses.
    ...
}
The BotManager allows to register several BotAgents by specifying different type parameters (first param in registerAgent() method. E.g., Watson, Dialogflow, WitAi, custom, ecc... ).
In this way it is possible to have a multi-bot application instance, the BotManager will forward the requests to the correct registered bot, matching the registered BotAgent type with the settings.engine.type property in incoming BotRequests.
The BotManager listen() method starts a Web server microservice, exposing the following API endpoint:
POST /bot/message - Sends a BotRequest and replies with a BotResponse.
After launching a BotManager service, the detailed info, and a Swagger based API description, are always available at URL:
http(s)://<Your-BotAgentManager-Host>:<port>/swagger.json
BotFilters are Web (micro)services to augment or adapt or transform BotRequests before reaching a Bot, and/or to augment or adapt or transform BotResponses coming from a Bot before returning back them to the Vivocha platform. It is also possible to chain several BotFilters in order to have specialized filters related to the application domain.
Next picture shows an example of a BotFilters chain:
 |
|---|
| FIGURE 2 - An example of a BotFilters chain configured using Vivocha |
The same BotFilter instance can act as a filter for requests, as a filter for responses or both.
See BotFilter class constructor to configure it as you prefer.
Figure 2 shows an example of a BotFilter chain: BotFilters A, B and C are configured to act as request filters; in other words they receive a BotRequest and return the same BotRequest maybe augmented with more data or transformed as a particular application requires. For example, BotFilter A may add data after reading from a DB, BotFilter B may call an API or external service to see if a given user has a premium account (consequentially setting in the request a isPremium boolean property), and so on...
When it's time to send a request to a BotAgent (through a BotManager), the Vivocha platform will sequentially call all the filters in the request chain before forwarding the resulting request to the Bot.
BotFilter D is a response filter and notice that BotFilter A is also configured to be a response filter; thus, when a response comes from the Bot, Vivocha sequentially calls all the response BotFilters in the response chain before sending back to a chat the resulting response. For example: a response BotFilter can hide or encrypt data coming from a Bot or it can on-the-fly convert currencies, or format dates or call external services and APIs to get useful additional data to send back to users.
As an example, refer to examples/sample.ts(.js) files where it is defined a runnable simple BotFilter.
The BotFilter listen() method runs a Web server microservice, exposing the following API endpoints:
POST /filter/request - For a request BotFilter, it receives a BotRequest and returns a BotRequest.
POST /filter/response - For a response BotFilter, it receives a BotResponse and returns a BotResponse.
After launching a BotFilter service, the detailed info, and a Swagger based API description, are always available at URL:
http(s)://<Your-BotFilter-Host>:<port>/swagger.json
Next sections briefly provide some guidelines to integrate Bots built with the three supported platforms and using the default drivers / settings.
N.B.: Vivocha can be integrated with any Bot Platform, if you're using a platform different than the supported you need to write a driver and a BotManager to use BotRequest / BotResponse messages and communicate with the particular, chosen, Bot Platform.
Dialogflow Bot Platform allows the creation of conversation flows using its nice Intents feature. Feel free to build your conversation flow as you prefer, related to the specific Bot application domain, BUT, in order to properly work with Vivocha taking advantage of the out-of-the-box support it provides, it is mandatory to follow some guidelines:
Must exists in Dialogflow an intent configured to be triggered by a start event. The start event name configured in a Dialogflow intent must exactly match the start event configured in Vivocha; Default is: start.
At the end of each conversation branch designed in Dialogflow, the bot MUST set a special context named (exactly) end, to tell to Vivocha that Bot's task is complete and to terminate the chat conversation.
Data passed to the Bot through Vivocha drivers are always contained inside a special context named SESSION_MESSAGE_DATA_PAYLOAD_CONTEXT. Thus, the Dialogflow bot can access to data "stored" in that particular context in each intent that needs to get information; i.e., to extract real-time data coming from BotFilters. If the bot implementation needs to extract passed data/parameters, it can access to that context through (for example) the expression: #SESSION_MESSAGE_DATA_PAYLOAD_CONTEXT.my_parameter_name - see Dialogflow documentation).
When a message request forwarded to the bot contains the payload property (like in the case when it is sent as a reaction to a postback button, for example) and it is sent through the default Vivocha drivers, then the message payload value will be passed to Dialogflow through the SESSION_MESSAGE_DATA_PAYLOAD_CONTEXT context, as the value of a property named VVC_MessagePayload. Therefore, it can be retrieved in the Dialogflow bot logic, inside an intent, through the expression: #SESSION_MESSAGE_DATA_PAYLOAD_CONTEXT.VVC_MessagePayload.
Thanks to the Vivocha built-in support for Dialogflow, it is possible to send from this bot platform responses containing rich Vivocha-compliant bot messages (bot messages format is described in this section).
To send rich Vivocha messages as response from a Dialogflow Intent, just add a response with a Custom payload by its console and enter a valid JSON for the messages property.
For example, the following valid snippet is related to a response from Dialogflow with a custom payload for a Vivocha Bot message containing a template:
{
  "messages": [
    {
      "code": "message",
      "type": "text",
      "body": "Just an example of generic template",
      "template": {
        "type": "generic",
        "elements": [
          {
            "title": "Meow!",
            "image_url": "https://upload.wikimedia.org/wikipedia/commons/thumb/c/c0/Tajeschidolls_Beren_of_LoveLorien_Ragdoll_Seal_Mink_Lynx_Bicolor.jpg/1024px-Tajeschidolls_Beren_of_LoveLorien_Ragdoll_Seal_Mink_Lynx_Bicolor.jpg",
            "subtitle": "We have the right cat for everyone.",
            "default_action": {
              "type": "web_url",
              "url": "https://en.wikipedia.org/wiki/Cat"
            },
            "buttons": [
              {
                "type": "web_url",
                "url": "https://en.wikipedia.org/wiki/Cat",
                "title": "View Website"
              },
              {
                "type": "postback",
                "title": "OK",
                "payload": "OK"
              }
            ]
          },
          {
            "title": "Meow!",
            "image_url": "https://upload.wikimedia.org/wikipedia/commons/thumb/5/5d/Adult_Scottish_Fold.jpg/1920px-Adult_Scottish_Fold.jpg",
            "subtitle": "We have the right cat for everyone.",
            "default_action": {
              "type": "web_url",
              "url": "https://en.wikipedia.org/wiki/Cat"
            },
            "buttons": [
              {
                "type": "web_url",
                "url": "https://en.wikipedia.org/wiki/Cat",
                "title": "View Website"
              },
              {
                "type": "postback",
                "title": "OK",
                "payload": "OK"
              }
            ]
          }
        ]
      }
    }
  ]
}
Sending a well-formed message enables the Vivocha interaction apps and widgets to correctly show these rich messages to the customer.
In the Dialogflow console:
followUp events to jump to a particular intent node in your bot;Watson Assistant (formerly Conversation) provides a tool to create conversation flows: Dialogs.
Watson Assistant doesn't handle events, only messages, thus you must create an intent trained to understand the word start (simulating an event, in this case).
To communicate that a conversation flow/branch is complete, in each leaf node of the Dialog node, set a specific context parameter to true named as specified by endEventKey property in the module constructor; Important: in order to use the default Vivocha driver, just set the dataCollectionComplete context parameter to true in each Watson Assistant Dialog leaf node; it can be set using the Watson Assistant JSON Editor for a particular dialog node; like in:
...
"context": {
    "dataCollectionComplete": true
}
...
If you need to perfom data collection tasks, remember that you have to configure the bot slot-filling feature in the dedicated nodes of the Dialog section.
When a message sent to the bot contains the payload property (like in the case when it is sent as a reaction to a postback button, for example) and it is sent through the default Vivocha drivers, then the message payload value will be passed to Watson Assistant as a context parameter named VVC_MessagePayload. Therefore, it can be retrieved and used as a variable or slot in the Watson Assistant bot logic.
Thanks to the Vivocha built-in support for IBM Watson Assistant, it is possible to send from this bot platform responses containing rich Vivocha-compliant bot messages (bot messages format is described in this section).
To send rich Vivocha messages as responses from the Watson platform, in its workspace console, Dialog tab, select the particular dialog node, and in the Then respond with section, open the embedded JSON Editor and just add a response with a valid JSON object for the messages property, just inside the predefined output object (as defined by the Watson Assistant responses format).
For example, the following valid snippet is related to a response from a Watson Assistant bot, with a custom payload for a Vivocha Bot message containing a body along with three quick replies:
{
  "output": {
    "messages": [
      {
        "body": "Hello from Watson, please choose an action",
        "code": "message",
        "type": "text",
        "quick_replies": [
          {
            "title": "help",
            "payload": "help",
            "content_type": "text"
          },
          {
            "title": "documents",
            "payload": "documents",
            "content_type": "text"
          },
          {
            "title": "exit",
            "payload": "exit",
            "content_type": "text"
          }
        ]
      }
    ]
  }
}
Sending a well-formed custom message enables the Vivocha interaction apps and widgets to correctly show these rich messages to the customer.
Using the IBM Watson Assistant workspace:
Slot-filling and parameters can be defined for every node in the Dialog tab;
a slot-filling can be specified for every Dialog node and the JSON output can be configured using the related JSON Editor;
An Entity can be of type pattern: this allows to define regex-based entities. To save in the context the entered value for a pattern entity it should be used the following syntax: @NAME_OF_THE_ENTITY.literal.
E.g., for slot filling containing a pattern entity like:
Check for: @ContactInfo - Save it as: $email
configure the particular slot through Edit Slot > ... > Open JSON Editor as:
...
"context": {
    "email": "@ContactInfo.literal"
}
...
"milan,cagliari,london,rome,berlin".split(",").contains(input.text.toLowerCase());
Wit.ai is a pure Natural Language Processing (NLP) platform. Using the Web console it is not possible to design Bot's dialog flows or conversations, anymore. Therefore, all the bot application logic, conversation flows, contexts and so on... (in other words: the Bot itself) must be coded outside, calling Wit.ai APIs (mainly) to process natural language messages coming from the users. Through creating an App in Wit.ai and training the system for the specific application domain, it is possible to let it processing messages and extract information from them, like (but not only): user intents end entities, along with their confidence value.
Skipping platform-specific details, in order to create Wit.ai Chat Bots and integrate them with the Vivocha Platform you have to:
Create and train a Wit.ai App, naming intents that will be used by the coded Bot;
Write the code of your Bot subclassing the WitAiBot class provided by this SDK, mapping intents defined in 1) to handler functions;
Run the coded Bot (Agent) using a BotManager and configure it using the Vivocha web console.
The next picture shows how this integration works:
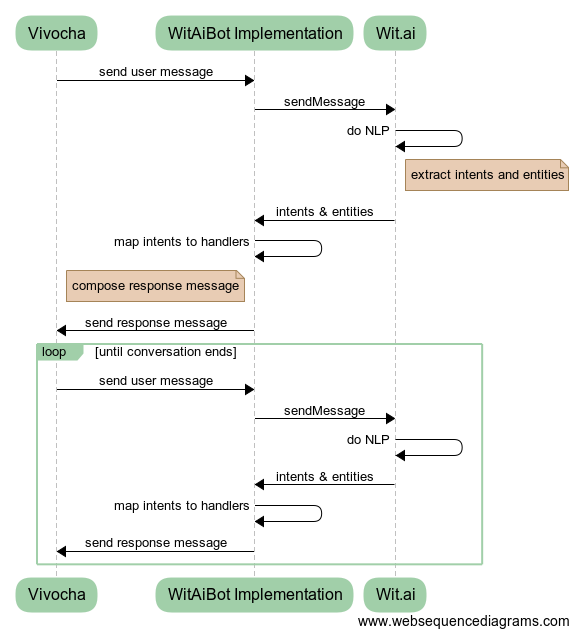 |
|---|
| FIGURE 3 - The Vivocha - Wit.ai integration model: subclassing to provided WitAiBot class it is possible to quickly code bots using Wit.ai NLP tool without writing specific API calls. |
Subclassing the WitAiBot allows writing Bots using Wit.ai NLP.
Subclassing that class implies:
IntentsMap: it maps intents names as coming from Wit.ai to custom intent handler functions. E.g, in the following (TypeScript) snippet are defined the required intents mapping to handle a simple customer info collection;export class SimpleWitBot extends WitAiBot {
protected intents: IntentsMap = {
provide_name: (data, request) => this.askEmailorPhone(data.entities, request),
by_email: (data, request) => this.contactMeByEmail(data, request),
by_phone: (data, request) => this.contactMeByPhone(data, request),
provide_phone: (data, request) => this.providePhoneNumber(data.entities, request),
provide_email: (data, request) => this.provideEmailAddress(data.entities, request),
unknown: (data, request) => this.unknown(data, request)
};
...
// write intent handlers here...
}
Note that the unknown mapping is needed to handle all the cases when Wit.ai isn't able to extract an intent. For example, the associated handler function could reply with a message like the popular "Sorry I didn’t get that!" text ;)
getStartMessage(request: BotRequest) which is called by Vivocha to start a bot instance only at the very beggining of a conversation with a user;More details can be found in the dedicated examples/sample-wit.ts(.js) sample files.
use BotRequest/BotResponse context.contexts array property to set contexts, in order to drive your bot in taking decisions about which conversation flow branch follow and about what reply to the user. To check contexts, the WitAiBotclass provides the inContext() method. See the example to discover more;
in each intent mapping handler which decides to terminate the conversation, remember to send back a response with the event property set to end.
In the Vivocha model, a Bot is just like a "normal" agent, able to handle contacts, chat with users and also able to transfer a particular current contact to another agent (a human agent or, maybe, to another Bot). Configuring a Bot to fire a transfer to other agents in Vivocha is a quite straightforward process.
BotResponse and its corresponding value to check, plus the agents tag or nick name to transfer to. For example, the next picture shows a transfer to tag Bot configuration which will be fired anytime the BotResponse data object contains a sub-property named transferToAgent set to sales in order to transfer the contact to an agent tagged with sales. |
|---|
FIGURE 4 - Vivocha Bots can transfer contacts to other agents (human agents or, why not?, to another Bot) when necessary. This picture shows a transfer to tag Bot configuration fired anytime the BotResponse data object contains a sub-property named transferToAgent set to sales, in order to transfer the contact to another agent tagged with sales |
event property set to end AND the data property containing the configured transfer sub-property (as transferToAgent in the previous example) set to the specified value. The following JSON snippet shows a BotResponse for the transfer configuration described in step 1){
"event": "end",
"messages": [ {
"code": "message",
"type": "text",
"body": "OK I'm transferring you to a sales agent. Bye! 😊"
} ],
"settings": {
"engine": {
"type": "custom",
"settings": {...}
}
},
"data": {
"firstname": "Daenerys",
"lastname": "Targaryen",
...
"transferToAgent": "sales"
}
}
NOTES:
if your bot is built through the IBM Watson Assistant platform, and you're using the built-in Vivocha Watson integration, then set the transfer property directly as a context variable in the dialog node which ends the conversation and a transfer is required;
if the bot is developed through the Dialogflow platform, and your're using the built-in Vivocha Dialogflow integration, then set the transfer property in the parameters property of a returned context (i.e., using a Firebase Cloud Functions-based fulfillment);
if the bot is written using Wit.ai and the module provided by this SDK, just return the transfer property in the BotResponse data field (see examples/dummy-bot(.ts | .js) code for the transfer case).
Starting from version 2.6.0, the Vivocha Bot SDK supports running Bot Managers & Agents and Bot Filters as Lambda Functions in AWS Lambda, resulting in a great flexibility and scalability added by this serverless-applications platform.
In order to simplify the overall deployment process we use the Serverless Framework & Tools.
npm i -g serverlessAs a reference, the examples directory contains two Lambda functions:
lambda-bot-manager is a Lambda-deployable Bot Manager for a dummy bot accepting some commandslambda-bot-filter is a BotFilter (same as in sample.(ts|js) file) deployable as AWS Lambda.As a recap for the previous sections, to run a Vivocha BotManager or a BotFilter, once having written the code you can call their listen() method, which runs a web server, and you're done.
To run them as a Lambda Function, basically you have to:
@vivocha/bot-sdk and in your code, import serverless and toLambda from the Vivocha Bot SDK, like in the following snippet:import {BotFilter, BotRequest, ..., toLambda, serverless } from '@vivocha/bot-sdk';
listen() method, just add the following line at the end of the file:module.exports.handler = serverless(toLambda(manager));
where, in this case, manager is your BotManager instance.
serverless.yaml file (or copy one those contained in the examples directory, mentioned before in this document). This file should have a configuration like the following (related to a BotFilter):# serverless.yml
# the name of your service (manager or filter) as in package.json
service: lambda-bot-filter
provider:
name: aws
# we need Node.js AWS environment set to v8.10
runtime: nodejs8.10
# stage name, change as you prefer, i.e.: prod
stage: dev
# AWS region, change it as needed
region: us-west-2
functions:
# name of your Lambda function
lambda-bot-filter:
description: Lambda-based Vivocha Bot Filter sample
# name of the file/handler where you put the module.exports.handler=... statement
handler: dist/lambda-bot-filter.handler
events:
# Configuration related to the API HTTP Gateway, leave it as follows, if possible.
- http: "ANY /"
- http: "ANY {proxy+}"
(optional) if you've written the code in TypeScript, then compile your code
run the command:
sls deploy
If the deploy process is successful, you should have an output like the following:
service: lambda-bot-filter
stage: dev
region: us-west-2
stack: lambda-bot-filter-dev
api keys:
  None
endpoints:
  ANY - https://abcdef123kwc82.execute-api.us-west-2.amazonaws.com/dev
  ANY - https://abcdef123kwc82.execute-api.us-west-2.amazonaws.com/dev/{proxy+}
functions:
  lambda-bot-filter: lambda-bot-filter-dev-lambda-bot-filter
In the response above, AWS returned the endpoint base URL of our Lambda, thus this is not the complete URL.
Therefore, for our BotFilter example, the resulting complete filter endpoint URL to use in the Vivocha Bot configuration console will be:
https://abcdef123kwc82.execute-api.us-west-2.amazonaws.com/dev/filter/request
The process in case of a BotManager is the same.
Likewise, if you have deployed as Lambda a BotManager the complete endpoint URL to use will be something like the following:
https://abcdef567kwc82.execute-api.us-west-2.amazonaws.com/dev/bot/message
Done.
In order to run the tests you need a Wit.ai account.
Then, in your Wit.ai console:
/test/data/witai-test-app.zip file, name it as you prefer;Finally, run all tests with:
WIT_TOKEN=<YOUR_CLIENT_ACCESS_TOKEN> npm run test
FAQs
Vivocha Bot SDK: TypeScript / JavaScript SDK to create/integrate chatbots with the Vivocha platform
The npm package @vivocha/bot-sdk receives a total of 20 weekly downloads. As such, @vivocha/bot-sdk popularity was classified as not popular.
We found that @vivocha/bot-sdk demonstrated a healthy version release cadence and project activity because the last version was released less than a year ago. It has 0 open source maintainers collaborating on the project.
Did you know?

Socket for GitHub automatically highlights issues in each pull request and monitors the health of all your open source dependencies. Discover the contents of your packages and block harmful activity before you install or update your dependencies.

Research
Security News
The Socket Research Team has discovered six new malicious npm packages linked to North Korea’s Lazarus Group, designed to steal credentials and deploy backdoors.

Security News
Socket CEO Feross Aboukhadijeh discusses the open web, open source security, and how Socket tackles software supply chain attacks on The Pair Program podcast.

Security News
Opengrep continues building momentum with the alpha release of its Playground tool, demonstrating the project's rapid evolution just two months after its initial launch.