Research
Security News
Lazarus Strikes npm Again with New Wave of Malicious Packages
The Socket Research Team has discovered six new malicious npm packages linked to North Korea’s Lazarus Group, designed to steal credentials and deploy backdoors.
authing-js-sdk
Advanced tools
Authing 的 JavaScript SDK 支持 Angular.js, React.js, Vue.js 以及 Node.js.我们提供了完全一致的接口.

当构建大规模应用时,我们推荐使用 npm 进行安装, 它可以与一些模块打包工具很好地配合使用,如 Webpack, Browserify。
# latest stable
$ npm install authing-js-sdk --save
先从 Authing 控制台 中获取 Client ID。
为保证 secret 安全,在服务端的初始化和客户端的初始化有所不同。
服务端可直接传入 clientId 和 secret。
const auth = new Authing({
	clientId: 'your_client_id',
	secret: 'your_client_secret'
});

auth.then((authing) => {
	// authing.login
	// authing.register
	// ...
});
const auth = new Authing({
	clientId: 'your_client_id',
	timestamp: Math.round(new Date() / 1000),
	nonce: Math.ceil(Math.random() * Math.pow(10, 6)),
});
auth.then((authing) => {
	// authing.login
	// authing.register
	// ...
});
Authing SDK 的所有 API 都支持 Promise。
const Authing = require('authing-js-sdk');

// 对 Client ID 和 Client Secret 进行验证,获取 Access Token
const auth = new Authing({
	// 若在浏览器端请使用 timestamp + nonce + clientId 的形式
	clientId: 'your_client_id',
	secret: 'your_app_secret'
});

auth.then(function(authing) {

	//验证成功后返回新的 authing-js-sdk 实例(authing),可以将此实例挂在全局

	authing.login({
		email: 'test@testmail.com',
		password: 'testpassword'
	}).then(function(user) {
		console.log(user);
	}).catch(function(error) {
		console.log(error);
	});

}).catch(function(error) {
	//验证失败
	console.log(error);
});
如果你使用 ES6+ 推荐用 await 处理异步,示例如下:
import Authing from 'authing-js-sdk';

const main = async () => {

	//使用async时需要使用 try...catch... 捕捉错误

	let auth;

	try{
		auth = await new Authing({
			// 若在浏览器端请使用 timestamp + nonce + clientId 的形式
			clientId: 'your_client_id',
			secret: 'your_app_secret'
		});
	}catch(error) {
		console.log('Authing 验证失败:', error);
	}

	if(auth) {

		let user;

		try {
			user = await auth.login({
				email: 'test@testmail.com',
				password: 'testpassword'
			});
		}catch(error) {
			console.log('登录失败:', error);
		}

		if(user) {
			console.log('login success');
		}else {
			console.log('login failed');
		}

	}

}

main();
全部 API 请参考:用户接口。
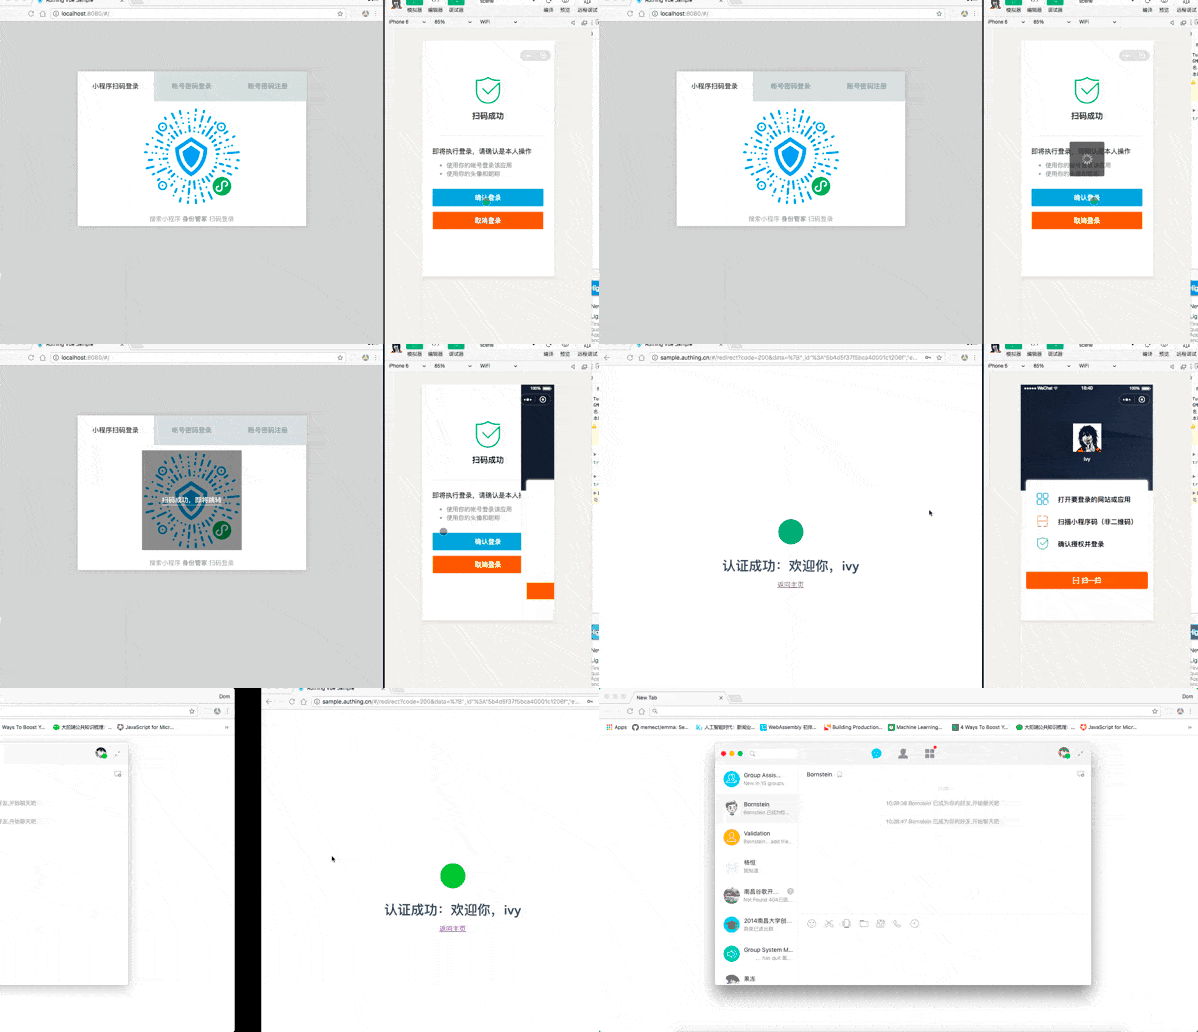
小程序扫码登录指使用 Authing 小程序 身份管家 执行微信登录。
示例:小程序扫码登录

使用 startWXAppScaning 方法:
const Authing = require('authing-js-sdk');

const auth = new Authing({
	clientId: 'your_client_id',
	timestamp: Math.round(new Date() / 1000),
	nonce: Math.ceil(Math.random() * Math.pow(10, 6)),
});

auth.then(function(authing) {

	authing.startWXAppScaning({
  	mount: 'qrcode-node', //二维码挂载点的 HTML 元素 ID,如不写则默认漂浮在文档中间
	});

})
扫码完成后会自动跳到用户配置的URL上。
authing.startWXAppScaning({
  	mount: 'qrcode-node', // 二维码挂载点,如不写则默认漂浮在文档中间
  	redirect: true, // 是否执行跳转(在用户后台配置的 URL),默认为 true,相关用户信息回传至 url 上
  	onSuccess: function(res) {}, // 登录成功后回调函数,redirect 为 true 时不回调此函数
  	onError: function(error) {}, // 登录失败后回调函数,一般为网络问题
	onIntervalStarting: function(intervalNum) {}, // 轮询时的回调函数,intervalNum 为 setInterval 返回的数值,可使用 clearInterval 停止轮询
	onQRCodeLoad: function(qRcode) {}, // 小程序码获取成功后的回调函数,qRcode 为小程序码的相关信息,是一个对象
	onQRCodeShow: function(qRcode) {}, // 小程序码图片加载完成后的回调函数,qRcode 为小程序码的相关信息,是一个对象
  	interval: 1500, // 每隔多少秒检查一次,默认 1500
  	tips: '搜索小程序 <strong>身份管家</strong> 扫码登录', // 提示信息,可写 HTML
});
了解更多,请查看:使用小程序扫码登录
Authing 构造函数包含一个名为 host 对象,可接收自定义的请求链接(适合私有部署 Authing 的用户使用),使用方法如下:
const auth = new Authing({
	clientId: 'xxxx',
	secret: 'xxxxxx',
	host: {
		user: 'https://users.authing.cn/graphql',
		oauth: 'https://oauth.authing.cn/graphql'
	}
});
host 对象中 user 和 oauth 的默认值是 Authing 官方的请求链接:
当在浏览器使用时,我们会将用户 token 以 '_authing_token' 字段存在 localStorage 中,后面都会从 localStorage 中读取并进行验证。
了解更多报错的详情,请查看错误代码。
获取 Client ID 和 Client Secret,请点击这里。
FAQs
Official SDK of Authing
The npm package authing-js-sdk receives a total of 640 weekly downloads. As such, authing-js-sdk popularity was classified as not popular.
We found that authing-js-sdk demonstrated a healthy version release cadence and project activity because the last version was released less than a year ago. It has 0 open source maintainers collaborating on the project.
Did you know?

Socket for GitHub automatically highlights issues in each pull request and monitors the health of all your open source dependencies. Discover the contents of your packages and block harmful activity before you install or update your dependencies.

Research
Security News
The Socket Research Team has discovered six new malicious npm packages linked to North Korea’s Lazarus Group, designed to steal credentials and deploy backdoors.

Security News
Socket CEO Feross Aboukhadijeh discusses the open web, open source security, and how Socket tackles software supply chain attacks on The Pair Program podcast.

Security News
Opengrep continues building momentum with the alpha release of its Playground tool, demonstrating the project's rapid evolution just two months after its initial launch.