Product
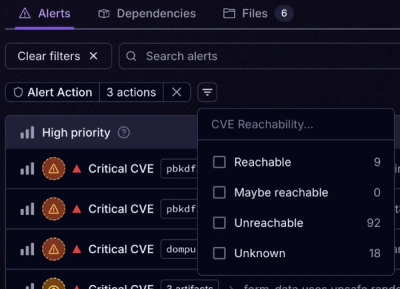
Introducing Tier 1 Reachability: Precision CVE Triage for Enterprise Teams
Socket’s new Tier 1 Reachability filters out up to 80% of irrelevant CVEs, so security teams can focus on the vulnerabilities that matter.
create-xianfires
Advanced tools
Engineered by Christian I. Cabrera — Instructor I, College of Computer Studies
Lightweight JS Framework for Events-Driven & Integrative Programming 2
XianFire is a minimal, Lightweight JS Framework for rapidly scaffolding full-stack web applications with built-in authentication, database integration (MySQL or MongoDB), Electron desktop app support, and dynamic code generation.
Designed for fast prototyping, student projects, desktop applications, and small-to-medium applications — especially for Events-Driven Programming and Integrative Programming 2 at Mindoro State University.
✅ Express.js server with session-based auth
✅ MySQL (Sequelize) or MongoDB (Mongoose) support
✅ Electron desktop app integration
✅ Auto-generated CRUD templates
✅ CLI generator for models & controllers (create:model, create:controller)
✅ Built-in migration system
✅ .xian custom template engine
✅ Tailwind CSS ready
✅ Zero-config setup
✅ Cross-platform desktop builds
npm create xianfires@latest myApp
You'll be prompted to choose:
Default Template or With CRUD FunctionsMongoDB or MySQL💡 If you don't specify a name, it defaults to
xianfire-app.
cd myApp
npm install
npm run migrate
✅ Creates database (MySQL) or collections (MongoDB) + syncs models.
npm run xian
🌐 Web app runs at → http://localhost:3000
# Development mode (server + Electron)
npm run xian-dev

# Production build
npm run xianca
myApp/
├─ controllers/
│  ├─ authController.js      # Login/Register/Dashboard logic (if CRUD)
│  ├─ homeController.js      # Home page handler
│  └─ *.js                   # Your generated controllers
├─ models/
│  ├─ db.js                  # Sequelize connection (MySQL only)
│  ├─ userModel.js           # Default User model
│  └─ *.js                   # Your generated models
├─ routes/
│  └─ index.js               # Main route definitions
├─ views/
│  ├─ home.xian
│  ├─ login.xian             # If CRUD template chosen
│  ├─ register.xian
│  ├─ dashboard.xian
│  └─ *.xian                 # Your custom views
├─ public/
│  └─ tailwind.css           # Pre-configured Tailwind
├─ electron/                 🆕 Electron desktop app files
│  └─ main.js                # Electron main process
├─ create.js                 # CLI generator for models & controllers
├─ migrate.js                # Database initializer
├─ index.js                  # Server entry point
├─ package.json
└─ node_modules/
.xian Template EngineRender views with res.render("filename") — no complex templating needed.
Example: views/home.xian
<!DOCTYPE html>
<html>
<head>
  <title>Home</title>
  <link href="/tailwind.css" rel="stylesheet">
</head>
<body class="bg-gray-50">
  <h1 class="text-3xl font-bold text-center mt-10">Welcome to XianFire 🔥</h1>
  <p class="text-center mt-4">Home Page</p>
</body>
</html>
| Route | Method | Description |
|---|---|---|
/ | GET | Home page |
/login | GET | Render login form |
/login | POST | Authenticate user |
/register | GET | Render registration form |
/register | POST | Create new user |
/dashboard | GET | Protected dashboard (session) |
/logout | GET | Destroy session & redirect |
/forgot-password | GET | Forgot password page (stub) |
models/db.jssequelize.define()migrate.jsmongoose.SchemaXianFire includes seamless Electron integration:
Electron Features:
After project setup, generate models and controllers dynamically:
npm run create:model Product
→ Creates models/Product.js:
import { DataTypes } from "sequelize";
import { sequelize } from "./db.js";

export const Product = sequelize.define("Product", {
  name: { type: DataTypes.STRING, allowNull: false },
  email: { type: DataTypes.STRING, allowNull: false },
  password: { type: DataTypes.STRING, allowNull: false }
});

export { sequelize };
✅ Fields are customizable — edit after generation.
npm run create:controller productController
→ Creates controllers/productController.js with full CRUD:
import { Product } from "../models/Product.js";

export const getAllProducts = async (req, res) => { ... };
export const createProduct = async (req, res) => { ... };
export const getProductById = async (req, res) => { ... };
export const updateProduct = async (req, res) => { ... };
export const deleteProduct = async (req, res) => { ... };
✅ Auto-imports matching model. Uses PascalCase ↔ camelCase conversion.
import { User } from './models/userModel.js';
import bcrypt from 'bcrypt';

const hashed = await bcrypt.hash('mypassword', 10);
await User.create({
  name: "Jane Doe",
  email: "jane@example.com",
  password: hashed
});
import bcrypt from "bcrypt";
import { User } from "./models/userModel.js";

const user = await User.findOne({ where: { email: "jane@example.com" } });
if (user && await bcrypt.compare("mypassword", user.password)) {
  console.log("✅ Login successful!");
} else {
  console.log("❌ Invalid credentials");
}
In routes/index.js:
import { getAllProducts } from "../controllers/productController.js";

// Add after existing routes
router.get("/api/products", getAllProducts);
Then visit → http://localhost:3000/api/products
If you chose Electron during setup:
# Development mode (auto-reload)
npm run xian-dev

# Production mode
npm run xianca

# Build distributable packages
npm run dist
→ Creates executable files in dist/ folder for all platforms
Run anytime to ensure DB structure is synced:
npm run migrate
sync({ force: true }))⚠️ Warning: MySQL migration wipes existing data. Use
sync()withoutforcein production.
models/db.js)import { Sequelize } from "sequelize";
export const sequelize = new Sequelize("myApp", "root", "your_password_here", {
host: "localhost",
dialect: "mysql",
});
🔐 Update username/password as needed.
migrate.js)const DB_URI = `mongodb://127.0.0.1:27017/myApp`;
🌐 Change host/port if MongoDB runs elsewhere.
package.json)The Electron build is pre-configured with:
com.xianfire.appdist/| Command | Description |
|---|---|
npm run xian | Start server with auto-reload (nodemon) |
npm start | Start server (production) |
npm run migrate | Initialize/sync database |
npm run create:model <Name> | Generate Sequelize model |
npm run create:controller <nameController> | Generate Express controller |
npm run xian-dev | 🆕 Run Electron app in development |
npm run xianca | 🆕 Run Electron app (production) |
npm run dist | 🆕 Build distributable packages |
You can easily extend the framework:
models/YourModel.jscontrollers/yourController.jsroutes/index.jsviews/yourpage.xianpublic/ folderelectron/main.js for native featuresnpm run migrate.secret in index.js for production.npm run dist to create installers for Windows, macOS, and Linuxnpm create xianfires@latest myProjectnpm run migrate → npm run xianhttp://localhost:3000 → Register a usernpm run create:model Book → npm run create:controller bookControllernpm run xian-devnpm run dist✅ You're now ready to build blazing-fast web AND desktop apps with XianFire!
To enable HTML syntax highlighting for .xian template files in Visual Studio Code, add this configuration to your VS Code settings.json:
Ctrl + , (Windows/Linux) or Cmd + , (Mac) to open Settings{})settings.json:{
"files.associations": {
"*.xian": "html"
}
}
✅ Now all .xian files will be highlighted as HTML — including autocomplete, formatting, and error detection!
| Before (No association) | After (HTML highlighting) |
|---|---|
| Plain text, no colors | ✅ Syntax-highlighted HTML |
| No tag autocomplete | ✅ <div>, class=, etc. work |
| Hard to read | ✅ Easy to develop templates |
"Simplicity is the ultimate sophistication." — Designed for Mindoro State University students to learn, build, and ship without boilerplate headaches.
Now with desktop app superpowers! 🚀
Happy coding!
FAQs
Simple JS Framework for Events Driven Programming
The npm package create-xianfires receives a total of 1,449 weekly downloads. As such, create-xianfires popularity was classified as popular.
We found that create-xianfires demonstrated a healthy version release cadence and project activity because the last version was released less than a year ago. It has 1 open source maintainer collaborating on the project.
Did you know?

Socket for GitHub automatically highlights issues in each pull request and monitors the health of all your open source dependencies. Discover the contents of your packages and block harmful activity before you install or update your dependencies.

Product
Socket’s new Tier 1 Reachability filters out up to 80% of irrelevant CVEs, so security teams can focus on the vulnerabilities that matter.

Research
/Security News
Ongoing npm supply chain attack spreads to DuckDB: multiple packages compromised with the same wallet-drainer malware.

Security News
The MCP Steering Committee has launched the official MCP Registry in preview, a central hub for discovering and publishing MCP servers.