Product
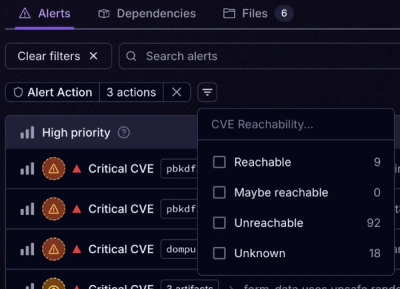
Introducing Tier 1 Reachability: Precision CVE Triage for Enterprise Teams
Socket’s new Tier 1 Reachability filters out up to 80% of irrelevant CVEs, so security teams can focus on the vulnerabilities that matter.
fluidstate-preact
Advanced tools
Library for using fine-grained reactivity state management library fluidstate in Preact
View interactive documentation on the official website.:
fluidstate-preact provides Preact bindings for the fluidstate fine-grained reactivity library. It allows you to build highly performant Preact applications where components update automatically and efficiently in response to state changes, without manual subscriptions or monolithic state updates.
fluidstate-preact is designed to serve two distinct but complementary purposes:
Standalone Reactive Layer: It offers a reactive layer for fluidstate built on top of @preact/signals-core. This part of the library can be used independently of Preact, enabling you to leverage the performance of Preact Signals in any fluidstate-powered JavaScript application.
Preact Bindings: It provides a rich set of tools—hooks, Higher-Order Components (HOCs), and signal-based utilities—to seamlessly integrate fluidstate's reactive state into your Preact components, offering multiple patterns for different use cases.
useReactive hook, withReactive HOC, or the hyper-performant useSignals hook.fluidstate reactive layer powered by @preact/signals-core that can be used in any environment, even without Preact.createReactiveSetup: A powerful pattern for creating encapsulated, reusable, and testable state management modules with Providers and consumer hooks/HOCs.fluidstate ecosystem, regardless of the underlying reactive layer.You will need fluidstate and fluidstate-preact. Depending on which features you use, you may also need to install preact, @preact/signals-core, and @preact/signals as peer dependencies.
# Core library
npm install fluidstate fluidstate-preact

# or
yarn add fluidstate fluidstate-preact
Optional Peer Dependencies:
useReactive, withReactive, createReactiveSetup): install preact.useSignals hook: install preact and @preact/signals.@preact/signals-core.Example: To use everything, you would install:
npm install preact @preact/signals @preact/signals-core
# or
yarn add preact @preact/signals @preact/signals-core
@preact/signals)fluidstate-preact includes a reactive layer that bridges fluidstate with @preact/signals-core. This allows you to use fluidstate's ergonomic API while leveraging the highly efficient Preact Signals engine under the hood.
This layer can be used in any project, even one that doesn't use Preact for its UI, making it a powerful choice for any fluidstate-based application.
To enable fluidstate, you must provide it with a reactive layer. This is a one-time setup at your application's entry point.
// file: main.ts
import {
	provideReactiveLayer,
	createReactive,
	createReaction,
	runAction,
} from "fluidstate";
// Note the import path for the reactive layer
import { getReactiveLayer } from "fluidstate-preact/reactive-layer";

// 1. Get the reactive layer from fluidstate-preact
const reactiveLayer = getReactiveLayer();

// 2. Provide it to fluidstate
provideReactiveLayer(reactiveLayer);

// 3. You can now use the fluidstate API throughout your application
const counter = createReactive({ value: 0 });

createReaction(() => {
	console.log(`Counter value: ${counter.value}`);
});
// LOGS: Counter value: 0

runAction(() => {
	counter.value++;
});
// LOGS: Counter value: 1
After this setup, you can use the fluidstate package for all your state management tasks. For more details on createReactive, createReaction, and other features, please refer to the main fluidstate documentation.
This part of the library is focused on integrating your fluidstate reactive state into Preact components.
Before using any Preact bindings, you must configure fluidstate with a reactive layer, as shown in Part 1. You can use any fluidstate reactive layer (e.g., fluidstate-alien, fluidstate-mobx or fluidstate-preact/reactive-layer). The Preact bindings are agnostic to the underlying engine.
fluidstate-preact offers three primary ways to make your components reactive, each with different trade-offs.
useReactive HookThe useReactive hook is a flexible way to consume reactive state. You provide a function that reads from your state, and the hook ensures your component re-renders whenever any of the accessed state properties change.
Example Store:
// file: counter-store.ts
import { createReactive } from "fluidstate";

export type CounterStore = {
	count: number;
	increment: () => void;
	decrement: () => void;
};

export const counterStore = createReactive<CounterStore>({
	count: 0,
	increment() {
		counterStore.count++;
	},
	decrement() {
		counterStore.count--;
	},
});
Component using useReactive:
// file: counter.tsx
import { useReactive } from "fluidstate-preact";
import { counterStore } from "./counter-store";

export const Counter = () => {
	// The component will re-render only when `counterStore.count` changes.
	const count = useReactive(() => counterStore.count);

	return (
		<div>
			<h1>Counter: {count}</h1>
			<button onClick={counterStore.increment}>Increment</button>
			<button onClick={counterStore.decrement}>Decrement</button>
		</div>
	);
};
withReactive HOCThe withReactive HOC provides an alternative, wrapping your component to make it automatically re-render when any reactive state it accesses changes.
// file: counter-hoc.tsx
import { withReactive } from "fluidstate-preact";
import { counterStore } from "./counter-store";

export const CounterComponent = withReactive(() => {
	return (
		<div>
			<h1>Counter: {counterStore.count}</h1>
			<button onClick={counterStore.increment}>Increment</button>
			<button onClick={counterStore.decrement}>Decrement</button>
		</div>
	);
});
useSignals HookThe useSignals hook is the most performant option. It bridges fluidstate state with @preact/signals, allowing you to update parts of your UI without re-rendering the entire component. This requires @preact/signals to be installed.
You can import useSignals from fluidstate-preact/signals.
// file: counter-signals.tsx
import { useSignals } from "fluidstate-preact/signals";
import { counterStore } from "./counter-store";

export const Counter = () => {
	// `get` is a function that creates a Preact signal for a given piece of state.
	const get = useSignals();

	return (
		<div>
			{/* The component itself only renders once. Only the text nodes update. */}
			<h1>Counter: {get(() => counterStore.count)}</h1>
			<button onClick={counterStore.increment}>Increment</button>
			<button onClick={counterStore.decrement}>Decrement</button>
		</div>
	);
};
createReactiveSetupFor larger applications, createReactiveSetup helps create encapsulated, testable, and reusable state modules. It generates a Provider, consumer hooks/HOCs, and a Context object for a specific slice of state.
Any reactions (e.g., for side effects) returned in a reactions array will be automatically cleaned up when the Provider unmounts.
1. Create the reactive setup
// file: user-profile-setup.ts
import {
	createReactive,
	Reaction,
	createReaction,
	cloneInert,
} from "fluidstate";
import { createReactiveSetup } from "fluidstate-preact";

export type UserProfileSetupProps = { initialName: string };
export type UserProfileData = { name: string; email: null | string };
export type UserProfileActions = {
	updateName: (newName: string) => void;
	setEmail: (email: string) => void;
};
export type UserProfileState = {
	data: UserProfileData;
	actions: UserProfileActions;
	reactions: Reaction[];
};

// Generate and rename the setup utilities for clarity.
export const {
	ReactiveProvider: UserProfileProvider,
	useReactiveState: useUserProfileState,
	withReactiveState: withUserProfileState,
	MockProvider: MockUserProfileProvider,
	StateContext: UserProfileContext, // Export the context for use with `useSignals`
} = createReactiveSetup((props: UserProfileSetupProps): UserProfileState => {
	const data = createReactive<UserProfileData>({
		name: props.initialName,
		email: null,
	});
	const actions = createReactive<UserProfileActions>({
		updateName(newName: string) {
			data.name = newName;
		},
		setEmail(email: string) {
			data.email = email;
		},
	});
	const syncProfile = createReaction(() => {
		fetch(`api/syncProfile`, {
			method: "POST",
			body: JSON.stringify(cloneInert(data)),
		});
	});
	return { data, actions, reactions: [syncProfile] };
});
2. Provide the state
// file: app.tsx
import { UserProfileProvider } from "./user-profile-setup";
import { UserProfileEditor } from "./user-profile-editor";
import { UserProfileDisplay } from "./user-profile-display";

export const App = () => (
	<UserProfileProvider setupProps={{ initialName: "John Doe" }}>
		<div>
			<h1>User Management</h1>
			<UserProfileEditor />
			<hr />
			<UserProfileDisplay />
		</div>
	</UserProfileProvider>
);
3. Consume the state
You can now consume state using the hook, HOC, or useSignals.
Using the useReactiveState hook:
// file: user-profile-editor.tsx
import { useUserProfileState } from "./user-profile-setup";

export const UserProfileEditor = () => {
	const { name, email, updateName, setEmail } = useUserProfileState(
		(state) => ({
			name: state.data.name,
			email: state.data.email,
			updateName: state.actions.updateName,
			setEmail: state.actions.setEmail,
		})
	);
	// ... component logic
};
Using useSignals for maximum performance:
// file: user-profile-display.tsx
import { useSignals } from "fluidstate-preact/signals";
import { UserProfileContext } from "./user-profile-setup";

export const UserProfileDisplay = () => {
	// Pass the context to `useSignals` to connect to the provider state.
	const get = useSignals(UserProfileContext);
	return (
		<div>
			<h2>Current Profile</h2>
			<p>
				<strong>Name:</strong> {get((state) => state.data.name)}
			</p>
			<p>
				<strong>Email:</strong> {get((state) => state.data.email ?? "Not set")}
			</p>
		</div>
	);
};
useReactive<T>(getState: () => T, dependencyArray?: ReadonlyArray<unknown>): TA Preact hook that subscribes a component to reactive state changes, causing a re-render when dependencies change.
withReactive<P>(Component: FunctionComponent<P>): FunctionComponent<P>A HOC that makes a functional component reactive. It will re-render whenever any reactive state it accesses changes.
useSignals<CV>(Context?: Context<CV>): (fn: (value: CV) => T) => Signal<T>A hook that returns a function to create Preact signals from fluidstate data.
Context: Optional. A Preact Context object (like one from createReactiveSetup) to source the state from. If omitted, it works with the state passed from the component.get(fn) takes a selector and returns a memoized @preact/signal signal for the selected value.createReactiveSetup<SetupProps, State>(createState)A factory that creates a set of utilities for encapsulated state management.
It returns a ReactiveSetup object with:
ReactiveProvider: A Provider component that accepts setupProps.useReactiveState: A hook to consume the state.withReactiveState: A HOC to inject the state via a state prop.StateContext: The Preact Context object used by the Provider. Pass this to useSignals to connect to the provided state.MockProvider: A provider for testing that accepts a value prop with mock state.createState: The original createState function, which can be useful for testing the state logic itself.To keep the library modular and dependencies optional, features are exposed via different entry points:
fluidstate-preact: Core Preact bindings.
useReactivewithReactivecreateReactiveSetupfluidstate-preact/signals: The useSignals hook that uses @preact/signals.
useSignalsfluidstate-preact/reactive-layer: The standalone reactive layer backed by @preact/signals-core.
getReactiveLayerFAQs
Library for using fine-grained reactivity state management library fluidstate in Preact
We found that fluidstate-preact demonstrated a healthy version release cadence and project activity because the last version was released less than a year ago. It has 1 open source maintainer collaborating on the project.
Did you know?

Socket for GitHub automatically highlights issues in each pull request and monitors the health of all your open source dependencies. Discover the contents of your packages and block harmful activity before you install or update your dependencies.

Product
Socket’s new Tier 1 Reachability filters out up to 80% of irrelevant CVEs, so security teams can focus on the vulnerabilities that matter.

Research
/Security News
Ongoing npm supply chain attack spreads to DuckDB: multiple packages compromised with the same wallet-drainer malware.

Security News
The MCP Steering Committee has launched the official MCP Registry in preview, a central hub for discovering and publishing MCP servers.