Product
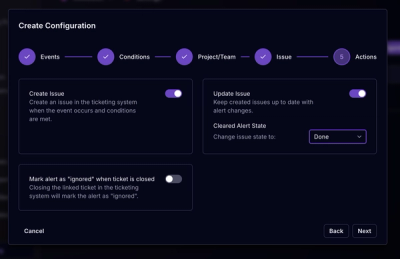
Socket for Jira Is Now Available
Socket for Jira lets teams turn alerts into Jira tickets with manual creation, automated ticketing rules, and two-way sync.
By Jeppe Hasseriis - Apr 20, 2026
influxdb-v2
Advanced tools
A light-weight library to write datas to InfluxDB v2 and query it.
It is created with simple goals in mind: be simple, efficient and easy to use.
If you like it, please star it! 🥰
Note that
InfluxDB-v2is compatible with InfluxDB v2 only. It does NOT work with InfluxDB v1.
InfluxDB-v2 is sponsored by Stackhero.
If you are looking for powerful managed services, you should seriously consider Stackhero 🤓
With NPM: npm install --save influxdb-v2
With Yarn: yarn add influxdb-v2
const Influxdb = require('influxdb-v2');

(async () => {

  const influxdb = new Influxdb({
    host: 'influxdb.example.com',
    token: 'myInfluxdbToken'
  });

  await influxdb.write(
    {
      org: 'myOrganization',
      bucket: 'myBucket'
    },
    [{
      measurement: 'web',
      fields: {
        load: 12.34
      }
    }]
  );

  const result = await influxdb.query(
    { org: 'myOrganization' },
    { query: 'from(bucket: "myBucket") |> range(start: -1h)' }
  );
  console.log(result);

})().catch(error => {
  console.error('\n🐞 An error occurred!', error);
  process.exit(1);
});
Import the library and initialize it:
const Influxdb = require('influxdb-v2');

const influxdb = new Influxdb({
  host: '', // [Required] your server IP or domain name, like `influxdb.example.com`
  // protocol: 'https', // `http` or `https`, default to `https`
  // port: 443, // if different than 80 (for http) or 443 (for https). Probably 8086 or 9999.
  token: '' // [Required] your InfluxDB token. You can create one in InfluxDB console in "Settings"/"Tokens"/"Generate".
  // fetchOptions: {} // Option passed to node-fetch
});
You can write datas to InfluxDB simply like this:
influxdb.write(
  {
    org: '', // [Required] your organization. You can set `orgID` if you prefer to use the ID
    bucket: '', // [Required] your bucket
  },
  [{
    measurement: '', // [Required] your measurement
    fields: {
      load: 12.34 // a field named "load" as an example, with a value of 12.34
    }
  }]
);
By default, the time recorded in InfluxDB is the time when you sent the request. This is probably not what you want to do. You can add a timestamp like this:
influxdb.write(
  {
    org: '', // [Required] your organization. You can set `orgID` if you prefer to use the ID
    bucket: '', // [Required] your bucket
    precision: 'ms' // precision of timestamp. Can be `ns` (nanoseconds), `us` (microseconds), `ms` (milliseconds) or `s` (seconds). The default is `ns`
  },
  [{
    measurement: '', // [Required] your measurement
    fields: {
      load: 12.34 // a field named "load" as an example, with a value of 12.34
    },
    timestamp: Date.now() // the timestamp in milliseconds, as defined in `precision`
  }]
);
You can add tags and multiple fields like this:
influxdb.write(
  {
    org: '', // [Required] your organization
    bucket: '', // [Required] your bucket
  },
  [{
    measurement: 'host', // [Required] your measurement

    // Define tags
    tags: {
      deviceId: 'gyh43',
      version: '1.2.3',
      location: 'factory-1'
    },

    // Define fields
    fields: {
      load: 12.34, // a field named "load" as an example, with a value of 12.34
      cpu: 42, // another name "cpu"
      battery: 65 // etc...
    }
  }]
);
And finally, you can send multiple datas at a same time:
influxdb.write(
  {
    org: '', // [Required] your organization. You can set `orgID` if you prefer to use the ID
    bucket: '', // [Required] your bucket
    precision: 's' // timestamp in seconds
  },
  [
    {
      measurement: '', // [Required] your measurement
      fields: {
        load: 12.34
      },
      timestamp: 1569513823
    },
    {
      measurement: '', // [Required] your measurement
      fields: {
        load: 23.45
      },
      timestamp: 1569513838
    }
  ]
);
You can write flux queries simply like this:
const result = await influxdb.query(
  {
    org: '', // [Required] your organization. You can set `orgID` if you prefer to use the ID
  },
  {
    query: 'from(bucket: "myBucket") |> range(start: -1h)' // [Required] your flux query
  }
);

console.log(result);
/*
[
  [
    { result: '_result',
      table: '0',
      _start: 2019-09-26T16:36:48.868Z,
      _stop: 2019-09-26T16:37:48.868Z,
      _time: 2019-09-26T16:37:47.795Z,
      _value: 12.34,
      _field: 'fieldname1',
      _measurement: 'myMeasurement',
      tagname1: 'myTagvalue1',
      tagname2: 'myTagvalue2'
    }
  ],
  [
    { result: '_result',
      table: '1',
      _start: 2019-09-26T16:36:48.868Z,
      _stop: 2019-09-26T16:37:48.868Z,
      _time: 2019-09-26T16:37:47.795Z,
      _value: 23.45,
      _field: 'fieldname2',
      _measurement: 'myMeasurement',
      tagname1: 'myTagvalue1',
      tagname2: 'myTagvalue2'
    }
  ]
]
*/
By default InfluxDB-v2 will parse the result of queries.
If you prefer to get the RAW result (CSV), just set the parameter csv to true.
const result = await influxdb.query(
  {
    org: '', // [Required] your organization. You can set `orgID` if you prefer to use the ID
    csv: true // get the plain text (CSV) result
  },
  {
    query: 'from(bucket: "myBucket") |> range(start: -1h)' // [Required] your flux query
  }
);

console.log(result); // plain text (CSV) result
/*
,result,table,_start,_stop,_time,_value,_field,_measurement,tagname1,tagname2
,_result,0,2019-09-26T16:36:48.868439105Z,2019-09-26T16:37:48.868439105Z,2019-09-26T16:37:47.795Z,12.34,fieldname1,myMeasurement,myTagvalue1,myTagvalue2

,result,table,_start,_stop,_time,_value,_field,_measurement,tagname1,tagname2
,_result,1,2019-09-26T16:36:48.868439105Z,2019-09-26T16:37:48.868439105Z,2019-09-26T16:37:47.795Z,23.45,fieldname2,myMeasurement,myTagvalue1,myTagvalue2


*/
influxdb-v2 uses fetch to communicate with InfluxDB API.
You can pass options to fetch using fetchOptions in the constructor.
You can use a defined CA certificate like this:
const https = require('https');

const influxdb = new Influxdb({
  host: '',
  token: '',
  fetchOptions: {
    agent: new https.Agent({
      ca: [ fs.readFileSync('yourCaFile.ca') ],
    })
  }
});
You can ignore certificate checks too. ⚠️ It is not recommended at all and expose your to MITM attacks!
const https = require('https');

const influxdb = new Influxdb({
  host: '',
  token: '',
  fetchOptions: {
    agent: new https.Agent({
      rejectUnauthorized: false
    })
  }
});
FAQs
A light-weight library to write datas to InfluxDB v2 and query it.
We found that influxdb-v2 demonstrated a not healthy version release cadence and project activity because the last version was released a year ago. It has 1 open source maintainer collaborating on the project.
Did you know?

Socket for GitHub automatically highlights issues in each pull request and monitors the health of all your open source dependencies. Discover the contents of your packages and block harmful activity before you install or update your dependencies.
Product
Socket for Jira lets teams turn alerts into Jira tickets with manual creation, automated ticketing rules, and two-way sync.

Company News
Socket won two 2026 Reppy Awards from RepVue, ranking in the top 5% of all sales orgs. AE Alexandra Lister shares what it's like to grow a sales career here.

Security News
NIST will stop enriching most CVEs under a new risk-based model, narrowing the NVD's scope as vulnerability submissions continue to surge.