Product
Socket for Jira Is Now Available
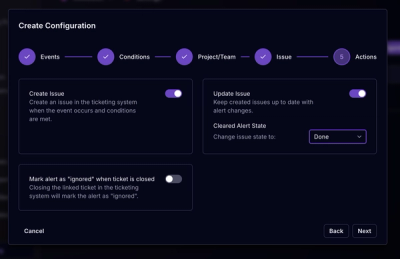
Socket for Jira lets teams turn alerts into Jira tickets with manual creation, automated ticketing rules, and two-way sync.
By Jeppe Hasseriis - Apr 20, 2026
js-cloudimage-360-view
Advanced tools
![]()
A powerful JavaScript library for creating interactive 360-degree product views


![]()
View Demo · React CodeSandbox · Vanilla CodeSandbox · Report Bug
JS Cloudimage 360 View enables you to create stunning, interactive 360-degree product views for your website. Perfect for e-commerce platforms, virtual tours, and product showcases, it provides an immersive viewing experience that lets users explore products from every angle.
| Feature | Description |
|---|---|
| 360° Rotation | Smooth horizontal and vertical rotation with customizable speed |
| 2D Grid Mode | True two-axis viewing for images organized as a horizontal/vertical matrix |
| Touch & Drag | Intuitive mouse and touch controls with inertia/momentum |
| Pinch-to-Zoom | Natural pinch gesture zooming on mobile devices |
| Autoplay | Automatic rotation with configurable behavior and direction |
| Zoom | Double-click, Ctrl+scroll, or pinch-to-zoom with pan controls |
| Fullscreen | Immersive fullscreen mode with ESC key support |
| Hotspots | Interactive markers with tooltips for highlighting features |
| Keyboard Navigation | Arrow key support for accessibility |
| Lazy Loading | Optimized loading for better performance |
| Responsive | Works on all screen sizes with Cloudimage CDN integration |
| Theming | CSS variables for easy customization |
| Event Callbacks | Hook into viewer lifecycle and user interactions |
Add the library via CDN and create your first 360 viewer in seconds:
<!-- Add the library (CSS is auto-injected) -->
<script src="https://scaleflex.cloudimg.io/v7/plugins/js-cloudimage-360-view/4.9.5/js-cloudimage-360-view.min.js?vh=32f739&func=proxy"></script>
<!-- Create a container with data attributes -->
<div
class="cloudimage-360"
data-folder="https://scaleflex.cloudimg.io/v7/demo/360-car/"
data-filename-x="car-{index}.jpg"
data-amount-x="36"
></div>
<!-- Initialize -->
<script>
const viewer = new window.CI360();
viewer.initAll();
</script>
<script src="https://scaleflex.cloudimg.io/v7/plugins/js-cloudimage-360-view/4.9.5/js-cloudimage-360-view.min.js?vh=32f739&func=proxy"></script>
Note: CSS is automatically injected by the script - no separate stylesheet needed.
# npm
npm install js-cloudimage-360-view

# yarn
yarn add js-cloudimage-360-view

# pnpm
pnpm add js-cloudimage-360-view
Then import in your JavaScript:
import CI360 from 'js-cloudimage-360-view';
import 'js-cloudimage-360-view/css';
The simplest way to create a 360 viewer using HTML data attributes:
<div
  id="my-360-viewer"
  class="cloudimage-360"
  data-folder="https://your-domain.com/images/"
  data-filename-x="{index}.jpg"
  data-amount-x="36"
  data-autoplay
  data-fullscreen
  data-zoom-max="3"
></div>

<script>
  const viewer = new CI360();
  viewer.initAll(); // Initializes all elements with class "cloudimage-360"
</script>
For more control, initialize with a JavaScript configuration object:
const viewer = new CI360();

const container = document.getElementById('product-viewer');

const config = {
  folder: 'https://your-domain.com/images/',
  filenameX: 'product-{index}.jpg',
  amountX: 36,
  autoplay: true,
  speed: 100,
  dragSpeed: 150,
  fullscreen: true,
  zoomMax: 3,
  inertia: true,

  // Event callbacks
  onReady: () => console.log('Viewer ready!'),
  onSpin: (e) => console.log(`Frame: ${e.activeImageX + 1}/${e.amountX}`),
};

viewer.init(container, config);
Support 360° rotation on both axes for full product exploration:
const config = {
  folder: 'https://your-domain.com/images/',
  filenameX: 'product-x-{index}.jpg',
  filenameY: 'product-y-{index}.jpg',
  amountX: 36,
  amountY: 18,
  autoplayBehavior: 'spin-xy', // Options: 'spin-x', 'spin-y', 'spin-xy', 'spin-yx'
};
For products photographed at multiple horizontal and vertical angles, grid mode provides true two-axis viewing. Instead of independent X/Y strips, the displayed image is determined by both axes simultaneously — dragging horizontally changes X, vertically changes Y, and diagonal drags update both.
Grid mode is auto-detected when filenameGrid or imageListGrid is provided.
Using a filename pattern:
CI360.init(document.getElementById('viewer'), {
  folder: 'https://your-domain.com/images/',
  filenameGrid: 'product_{indexY}_{indexX}.jpg',
  amountX: 24,        // horizontal angles
  amountY: 4,         // vertical angles
  indexZeroBase: 3,    // zero-pad to 3 digits: 001, 002, ...
  stopAtEdgesY: true,  // prevent Y from looping
});
Placeholders {indexX} and {indexY} are replaced with 1-based indices (respecting indexZeroBase for zero-padding). Images are stored internally as a flat array with the formula imagesGrid[y * amountX + x].
Using an explicit image list:
CI360.init(document.getElementById('viewer'), {
  imageListGrid: [
    // y=0 row (all X frames at first vertical angle)
    'img_001_001.jpg', 'img_001_002.jpg', /* ... */
    // y=1 row
    'img_002_001.jpg', 'img_002_002.jpg', /* ... */
  ],
  amountX: 24,
  amountY: 4,
});
Autoplay works with all four behaviors: spin-x (horizontal only), spin-y (vertical only), spin-xy (row-scan: X advances each tick, Y advances when X wraps), and spin-yx (column-scan).
Per-axis edge stopping — use stopAtEdgesX and stopAtEdgesY to control looping independently. This is useful when one axis has full 360° coverage but the other has limited angles:
{
  stopAtEdgesY: true,  // Y has only 4 angles, don't loop
  // X loops freely (default)
}
React:
<CI360Viewer
  folder="https://your-domain.com/images/"
  filenameGrid="product_{indexY}_{indexX}.jpg"
  amountX={24}
  amountY={4}
  indexZeroBase={3}
  stopAtEdgesY
/>
The library provides a React wrapper for seamless integration with React and Next.js applications.
npm install js-cloudimage-360-view
import { CI360Viewer } from 'js-cloudimage-360-view/react';
import 'js-cloudimage-360-view/css';

function ProductView() {
  return (
    <CI360Viewer
      folder="https://example.com/images/"
      filenameX="product-{index}.jpg"
      amountX={36}
      autoplay
      fullscreen
      aspectRatio="16/9"
      style={{ width: '100%', maxWidth: 800 }}
    />
  );
}
Use a ref to control the viewer programmatically:
import { useRef } from 'react';
import { CI360Viewer, CI360ViewerRef } from 'js-cloudimage-360-view/react';
import 'js-cloudimage-360-view/css';

function ProductView() {
  const viewerRef = useRef<CI360ViewerRef>(null);

  return (
    <>
      <CI360Viewer
        ref={viewerRef}
        folder="https://example.com/images/"
        filenameX="{index}.jpg"
        amountX={36}
        onSpin={(e) => console.log(`Frame: ${e.activeImageX}`)}
      />
      <button onClick={() => viewerRef.current?.play()}>Play</button>
      <button onClick={() => viewerRef.current?.stop()}>Stop</button>
      <button onClick={() => viewerRef.current?.goToFrame(17)}>Go to Frame 17</button>
    </>
  );
}
| Method | Description |
|---|---|
play() | Start autoplay |
stop() | Stop autoplay |
moveLeft(steps?) | Move left by specified frames (default: 1) |
moveRight(steps?) | Move right by specified frames (default: 1) |
moveTop(steps?) | Move up on Y-axis (default: 1) |
moveBottom(steps?) | Move down on Y-axis (default: 1) |
zoomIn() | Toggle zoom in |
zoomOut() | Zoom out |
goToFrame(frame, hotspotId?) | Animate to specific frame |
getViewer() | Get underlying viewer instance |
import { CI360Viewer, Hotspot } from 'js-cloudimage-360-view/react';

const hotspots: Hotspot[] = [
  {
    id: 'feature-1',
    label: 'Engine',
    orientation: 'x',
    containerSize: [1200, 800],
    positions: { 0: { x: 500, y: 300 } },
    content: '<div>Engine details</div>',
  },
];

function ProductView() {
  return (
    <CI360Viewer
      folder="https://example.com/images/"
      filenameX="{index}.jpg"
      amountX={36}
      hotspots={hotspots}
    />
  );
}
For Next.js applications, use dynamic import to disable server-side rendering:
import dynamic from 'next/dynamic';
import 'js-cloudimage-360-view/css';

const CI360Viewer = dynamic(
  () => import('js-cloudimage-360-view/react').then(mod => mod.CI360Viewer),
  { ssr: false }
);

export default function ProductPage() {
  return (
    <CI360Viewer
      folder="https://example.com/images/"
      filenameX="{index}.jpg"
      amountX={36}
    />
  );
}
For advanced use cases, you can use the useCI360 hook directly:
import { useRef } from 'react';
import { useCI360 } from 'js-cloudimage-360-view/react';

function CustomViewer() {
  const containerRef = useRef<HTMLDivElement>(null);
  const { viewer, isReady } = useCI360(containerRef, {
    folder: 'https://example.com/images/',
    filenameX: '{index}.jpg',
    amountX: 36,
    onReady: () => console.log('Viewer ready!'),
  });

  return (
    <div>
      <div ref={containerRef} style={{ width: '100%', maxWidth: 800, aspectRatio: '16/9' }} />
      {isReady && <p>Viewer is ready!</p>}
    </div>
  );
}
The React wrapper is fully typed. Import types as needed:
import type {
  CI360ViewerProps,
  CI360ViewerRef,
  CI360Config,
  SpinEventData,
  Hotspot,
} from 'js-cloudimage-360-view/react';
All options can be set via JavaScript config or HTML data attributes.
| Option | Data Attribute | Default | Description |
|---|---|---|---|
folder | data-folder | '/' | Path to the folder containing images |
filenameX | data-filename-x | 'image-{index}.jpg' | Filename pattern for X-axis images. Use {index} as placeholder |
filenameY | data-filename-y | null | Filename pattern for Y-axis images |
imageListX | data-image-list-x | null | Array of image URLs for X-axis (alternative to folder/filename) |
imageListY | data-image-list-y | null | Array of image URLs for Y-axis |
filenameGrid | data-filename-grid | null | Filename pattern for 2D grid mode. Uses {indexX} and {indexY} placeholders |
imageListGrid | data-image-list-grid | null | Array of image URLs for 2D grid (flat or 2D array, Y-outer X-inner order) |
amountX | data-amount-x | 0 | Total number of X-axis images |
amountY | data-amount-y | 0 | Total number of Y-axis images |
indexZeroBase | data-index-zero-base | 0 | Starting index for image filenames |
| Option | Data Attribute | Default | Description |
|---|---|---|---|
autoplay | data-autoplay | false | Enable automatic rotation |
autoplayBehavior | data-autoplay-behavior | 'spin-x' | Autoplay pattern: 'spin-x', 'spin-y', 'spin-xy', 'spin-yx' |
autoplayReverse | data-autoplay-reverse | false | Reverse autoplay direction |
playOnce | data-play-once | false | Stop after one complete rotation |
speed | data-speed | 80 | Autoplay speed (ms between frames) |
inertia | data-inertia | false | Enable momentum after drag release |
| Option | Data Attribute | Default | Description |
|---|---|---|---|
draggable | data-draggable | true | Enable mouse drag rotation |
swipeable | data-swipeable | true | Enable touch swipe rotation |
dragSpeed | data-drag-speed | 150 | Drag sensitivity |
dragReverse | data-drag-reverse | false | Reverse drag direction |
keys | data-keys | false | Enable keyboard arrow navigation |
keysReverse | data-keys-reverse | false | Reverse keyboard direction |
stopAtEdges | data-stop-at-edges | false | Stop rotation at first/last frame (both axes) |
stopAtEdgesX | data-stop-at-edges-x | null | Stop X-axis at edges. Overrides stopAtEdges for X when set |
stopAtEdgesY | data-stop-at-edges-y | null | Stop Y-axis at edges. Overrides stopAtEdges for Y when set |
pinchZoom | data-pinch-zoom | true | Enable pinch-to-zoom on touch devices |
| Option | Data Attribute | Default | Description |
|---|---|---|---|
aspectRatio | data-aspect-ratio | null | Aspect ratio for the container (e.g., "16/9", "4/3", "1/1") |
fullscreen | data-fullscreen | false | Show fullscreen button |
zoomMax | data-zoom-max | 5 | Maximum zoom level (1-10) |
zoomStep | data-zoom-step | 0.5 | Zoom increment per step |
zoomControls | data-zoom-controls | true | Show zoom control buttons (zoom in, zoom out, reset) |
zoomControlsPosition | data-zoom-controls-position | 'bottom-right' | Position of zoom controls toolbar. Values: 'top-left', 'top-center', 'top-right', 'bottom-left', 'bottom-center', 'bottom-right' |
scrollHint | data-scroll-hint | true | Show "Ctrl + scroll to zoom" hint on scroll |
bottomCircle | data-bottom-circle | false | Show 360° progress indicator |
bottomCircleOffset | data-bottom-circle-offset | 5 | Progress indicator offset (px) |
initialIconShown | data-initial-icon | true | Show 360° icon on load |
initOnClick | data-init-on-click | false | If true, images load only after the user clicks on the viewer. Shows a first-frame preview with a click overlay. Useful for grids with multiple 360 views |
lazyload | data-lazyload | true | Enable lazy loading |
hints | data-hints | true | Show interaction hints on load |
theme | data-theme | null | Color theme: 'light' or 'dark' |
hotspotTrigger | data-hotspot-trigger | 'hover' | Hotspot trigger mode: 'hover' or 'click' |
hotspotTimelineOnClick | data-hotspot-timeline-on-click | true | Show hotspot popup when clicking timeline dot |
markerTheme | data-marker-theme | null | Hotspot marker theme: 'default', 'inverted', or 'brand' |
brandColor | data-brand-color | null | Brand accent color for 'brand' marker theme (e.g. '#ff6600') |
| Option | Data Attribute | Default | Description |
|---|---|---|---|
ciToken | data-responsive | null | Cloudimage token for responsive images |
ciFilters | data-filters | null | Cloudimage filters |
ciTransformation | data-transformation | null | Cloudimage transformations |
Hook into viewer events for custom functionality. Callbacks are only available via JavaScript configuration.
| Callback | Event Data | Description |
|---|---|---|
onReady | { viewerId } | Viewer initialized and ready |
onLoad | { viewerId, imagesX, imagesY } | All images loaded |
onSpin | { viewerId, direction, activeImageX, activeImageY, amountX, amountY } | Each rotation frame |
onAutoplayStart | { viewerId } | Autoplay started |
onAutoplayStop | { viewerId } | Autoplay stopped |
onDragStart | { viewerId } | User started dragging |
onDragEnd | { viewerId } | User stopped dragging |
onZoomIn | { viewerId, zoomLevel } | Pointer zoom activated |
onZoomOut | { viewerId } | Pointer zoom deactivated |
onFullscreenOpen | { viewerId } | Fullscreen mode opened |
onFullscreenClose | { viewerId } | Fullscreen mode closed |
const config = {
  folder: 'https://example.com/images/',
  filenameX: '{index}.jpg',
  amountX: 36,

  onReady: (e) => {
    console.log(`Viewer ${e.viewerId} is ready`);
  },

  onSpin: (e) => {
    // Update custom progress indicator
    const progress = ((e.activeImageX + 1) / e.amountX * 100).toFixed(0);
    document.getElementById('progress').textContent = `${progress}%`;
  },

  onFullscreenOpen: () => {
    // Pause background video when entering fullscreen
    document.getElementById('bg-video')?.pause();
  },
};
Add interactive markers to highlight product features.
const hotspots = [
  {
    id: 'feature-1',
    orientation: 'x',
    containerSize: [1200, 800], // Reference container size for positioning
    positions: {
      0: { x: 500, y: 300 },
      1: { x: 520, y: 300 },
      2: { x: 540, y: null }, // null inherits from previous frame
      3: { x: 560, y: null },
      // ... positions for frames where hotspot is visible
    },
    content: '<div class="tooltip"><strong>Premium Feature</strong><p>Description here</p></div>',
    onClick: () => {
      console.log('Hotspot clicked!');
    },
  },
];

const config = {
  folder: 'https://example.com/images/',
  filenameX: '{index}.jpg',
  amountX: 36,
  hotspots: hotspots,
};
| Property | Required | Description |
|---|---|---|
id | Yes | Unique identifier |
orientation | Yes | 'x' or 'y' axis |
containerSize | Yes | [width, height] reference dimensions |
positions | Yes | Object mapping frame index to { x, y } coordinates |
content | No | HTML content for the tooltip |
label | No | Short label for the hotspot (used in timeline tooltips) |
onClick | No | Click handler function |
keepOpen | No | If true, the popover stays open until explicitly closed |
className | No | Custom CSS class(es) to add to the hotspot element |
markerTheme | No | Per-hotspot theme override: 'default', 'inverted', or 'brand' |
navigateTo | No | Scene ID to navigate to on click (turns hotspot into a navigation pin) |
arrowDirection | No | Rotation angle (degrees) for the navigation arrow icon. Only applies when navigateTo is set |
When hotspots are configured, a timeline navigation bar automatically appears below the viewer. This timeline shows:
label, hovering over its dot shows a tooltipClicking a dot animates the viewer to that hotspot's position and optionally shows its popup.
Tooltips display the hotspot's label property when hovering over a timeline dot:
const hotspots = [
  {
    id: 'engine',
    label: 'Engine Bay',  // This text appears in the tooltip
    orientation: 'x',
    containerSize: [1200, 800],
    positions: { 0: { x: 500, y: 300 }, /* ... */ },
    content: '<div>Full hotspot content here</div>',
  },
];
Tooltip behavior:
| Option | Default | Description |
|---|---|---|
hotspotTimelineOnClick | true | Show hotspot popup when clicking a timeline dot |
const config = {
  hotspots: [...],
  hotspotTimelineOnClick: true,  // Show popup on click (default)
  // or
  hotspotTimelineOnClick: false, // Only navigate, don't show popup
};
Customize the timeline appearance with CSS variables:
:root {
  /* Timeline track */
  --ci360-timeline-height: 6px;
  --ci360-timeline-track-bg: rgba(0, 0, 0, 0.12);

  /* Hotspot dots */
  --ci360-timeline-dot-size: 18px;
  --ci360-timeline-dot-color: var(--ci360-hotspot-color);
  --ci360-timeline-dot-border: 2px solid #fff;

  /* Position indicator */
  --ci360-timeline-indicator-size: 12px;
  --ci360-timeline-indicator-color: #333333;

  /* Tooltip styling (matches theme) */
  --ci360-timeline-tooltip-bg: rgba(255, 255, 255, 0.95);
  --ci360-timeline-tooltip-color: #333333;
}

/* Dark theme uses dark tooltip */
.ci360-theme-dark {
  --ci360-timeline-tooltip-bg: rgba(40, 40, 45, 0.95);
  --ci360-timeline-tooltip-color: #e0e0e0;
}
Custom tooltip styling example:
/* Increase tooltip font size */
.cloudimage-360-hotspot-timeline-tooltip {
  font-size: 14px;
  padding: 8px 16px;
}

/* Brand-colored tooltip */
.my-viewer {
  --ci360-timeline-tooltip-bg: #2563eb;
  --ci360-timeline-tooltip-color: #ffffff;
}
Control the visual appearance of hotspot markers at the viewer level or per-hotspot.
Viewer-level theme applies to all hotspots:
const config = {
  hotspots: [...],
  markerTheme: 'inverted', // 'default', 'inverted', or 'brand'
  brandColor: '#ff6600',   // Used when markerTheme is 'brand'
};
Per-hotspot theme overrides the viewer-level theme for individual markers:
const hotspots = [
  {
    id: 'highlight',
    markerTheme: 'brand', // Override for this hotspot only
    positions: { 0: { x: 500, y: 300 } },
    content: '<div>Highlighted feature</div>',
    // ...
  },
  {
    id: 'subtle',
    markerTheme: 'inverted', // Different override
    positions: { 5: { x: 200, y: 150 } },
    content: '<div>Subtle marker</div>',
    // ...
  },
];
| Theme | Description |
|---|---|
'default' | Light marker on light backgrounds (default) |
'inverted' | Dark marker that blends with dark backgrounds |
'brand' | Uses brandColor as the marker accent color |
All themes adapt automatically to the theme: 'dark' setting.
Hotspots with a navigateTo property become navigation pins that link between scenes:
const hotspots = [
  {
    id: 'go-to-interior',
    navigateTo: 'interior-scene',
    label: 'View Interior',
    arrowDirection: 90, // Point downward (default is right)
    positions: { 10: { x: 600, y: 400 } },
    // ...
  },
];

const config = {
  hotspots,
  onNavigate: (sceneId) => {
    // Handle scene transition
    console.log(`Navigate to: ${sceneId}`);
  },
};
Navigation hotspots display a directional arrow icon. Use arrowDirection to rotate the arrow (in degrees, default 0 points right).
The viewer displays helpful hints at the bottom showing users how to interact with the 360° view. Hints are automatically generated based on enabled features and hide after the first interaction.
const config = {
  // Auto-detect hints based on enabled features (default)
  hints: true,

  // Disable hints
  hints: false,

  // Custom hints array
  hints: ['drag', 'dblclick', 'keys'],
};
| Type | Desktop | Mobile | Description |
|---|---|---|---|
drag | ✓ | - | "Drag to rotate" |
swipe | - | ✓ | "Swipe to rotate" |
dblclick | ✓ | - | "Double-click to zoom" |
pinch | - | ✓ | "Pinch to zoom" (when pinchZoom enabled) |
keys | ✓ | - | "Use arrow keys" (when keys enabled) |
Apply a theme by setting the theme option or using the ci360-theme-dark class:
// Via config
const config = {
  theme: 'dark', // or 'light'
  // ...other options
};

// Or via HTML
<div class="cloudimage-360 ci360-theme-dark" ...></div>
The easiest way to customize the viewer appearance:
:root {
  /* Buttons */
  --ci360-button-bg: #f0f0f0;
  --ci360-button-bg-hover: #e0e0e0;
  --ci360-button-size: 40px;
  --ci360-button-border-radius: 6px;
  --ci360-button-shadow: 0 2px 4px rgba(0, 0, 0, 0.1);

  /* Icons */
  --ci360-icon-color: #37414b;
  --ci360-icon-color-hover: #1a1f24;
  --ci360-icon-size: 20px;

  /* 360° Indicator */
  --ci360-initial-icon-bg: rgba(255, 255, 255, 0.9);
  --ci360-initial-icon-color: #505050;
  --ci360-initial-icon-size: 80px;
  --ci360-initial-icon-shadow: 0 4px 20px rgba(0, 0, 0, 0.15);

  /* Loading Spinner */
  --ci360-spinner-color: #fff;
  --ci360-spinner-accent: #a3a3a3;
  --ci360-spinner-size: 30px;

  /* Fullscreen */
  --ci360-fullscreen-bg: #fff;

  /* Zoom Controls */
  --ci360-zoom-controls-bg: rgba(255, 255, 255, 0.9);
  --ci360-zoom-controls-bg-hover: rgba(255, 255, 255, 1);
  --ci360-zoom-controls-color: #505050;
  --ci360-zoom-controls-color-hover: #333333;
  --ci360-zoom-controls-border-radius: 8px;
  --ci360-zoom-controls-shadow: 0 2px 8px rgba(0, 0, 0, 0.15);

  /* Scroll Hint */
  --ci360-scroll-hint-bg: rgba(0, 0, 0, 0.7);
  --ci360-scroll-hint-color: #ffffff;
  --ci360-scroll-hint-border-radius: 20px;

  /* Hotspots */
  --ci360-hotspot-color: #00aaff;
  --ci360-hotspot-border: 1px solid #fff;
  --ci360-hotspot-size: 18px;

  /* Tooltips */
  --ci360-popper-bg: rgba(255, 255, 255, 0.95);
  --ci360-popper-color: #333;
  --ci360-popper-shadow: 0 4px 16px rgba(0, 0, 0, 0.15);
  --ci360-popper-border-radius: 6px;

  /* Hints Overlay */
  --ci360-hints-bg: rgba(0, 0, 0, 0.75);
  --ci360-hints-color: #ffffff;
  --ci360-hints-font-size: 14px;
  --ci360-hints-border-radius: 12px;

  /* Bottom Circle Indicator */
  --ci360-circle-color-start: rgba(0, 0, 0, 0.05);
  --ci360-circle-color-mid: rgba(0, 0, 0, 0.3);
  --ci360-circle-color-end: rgba(0, 0, 0, 0.05);
  --ci360-circle-dot-color: rgba(0, 0, 0, 0.4);

  /* Other */
  --ci360-focus-color: #0066cc;
  --ci360-overlay-bg: rgba(255, 255, 255, 1);
}
If you prefer to customize beyond the built-in dark theme:
.my-dark-viewer {
  --ci360-button-bg: rgba(30, 30, 35, 0.9);
  --ci360-button-bg-hover: rgba(45, 45, 50, 0.95);
  --ci360-icon-color: #e0e0e0;
  --ci360-icon-color-hover: #ffffff;
  --ci360-fullscreen-bg: #1a1a1f;
  --ci360-initial-icon-bg: rgba(30, 30, 35, 0.9);
  --ci360-initial-icon-color: #e0e0e0;
  --ci360-popper-bg: rgba(40, 40, 45, 0.95);
  --ci360-popper-color: #e0e0e0;
  --ci360-hints-bg: rgba(255, 255, 255, 0.12);
  --ci360-circle-color-mid: rgba(255, 255, 255, 0.25);
  --ci360-circle-dot-color: rgba(255, 255, 255, 0.4);
  --ci360-overlay-bg: rgba(26, 26, 31, 1);
}
#my-special-viewer {
  --ci360-button-bg: #4a90d9;
  --ci360-icon-color: #ffffff;
  --ci360-hotspot-color: #ff6b6b;
}
| Class | Description |
|---|---|
.cloudimage-360 | Main container |
.cloudimage-360-inner-box | Inner container |
.cloudimage-360-button | Control buttons |
.cloudimage-360-icons-container | Button container |
.cloudimage-initial-icon | 360° indicator icon |
.cloudimage-360-view-360-circle | Bottom progress indicator |
.cloudimage-loading-spinner | Loading spinner |
.cloudimage-360-fullscreen-modal | Fullscreen container |
.cloudimage-360-zoom-controls | Zoom controls toolbar |
.cloudimage-360-hotspot | Hotspot marker |
.cloudimage-360-popper | Hotspot tooltip |
.cloudimage-360-hints-overlay | Hints overlay container |
.cloudimage-360-hints-container | Hints content box |
.cloudimage-360-hotspot-timeline | Hotspot timeline container |
.cloudimage-360-hotspot-timeline-track | Timeline track |
.cloudimage-360-hotspot-timeline-dot | Timeline hotspot dot |
.cloudimage-360-hotspot-timeline-indicator | Timeline position indicator |
.cloudimage-360-hotspot-timeline-tooltip | Timeline dot tooltip (appears on hover) |
.ci360-theme-dark | Dark theme class |
const viewer = new CI360();

// Initialize all viewers with class "cloudimage-360"
viewer.initAll();

// Initialize a specific container
viewer.init(containerElement, config);

// Get a viewer by its container ID
const view = viewer.getViewById('my-viewer');

// Get all viewer instances
const allViews = viewer.getViews();

// Update a viewer's configuration
viewer.updateView('my-viewer', { speed: 50, autoplay: true });
const view = viewer.getViewById('my-viewer');

// Playback control
view.play();                    // Start autoplay
view.stopAutoplay();            // Stop autoplay

// Rotation (stopAtEdges: boolean, steps: number)
view.moveLeft(false, 5);        // Rotate left by 5 frames
view.moveRight(false, 5);       // Rotate right by 5 frames
view.moveTop(false, 1);         // Rotate up by 1 frame (Y-axis)
view.moveBottom(false, 1);      // Rotate down by 1 frame (Y-axis)

// Navigation
view.animateToFrame(36);        // Animate to frame 36
view.animateToFrame(10, 'hotspot-1'); // Go to frame and show hotspot

// UI control
view.hideAllIcons();            // Hide all overlay icons

// State
view.activeImageX;              // Current X-axis frame (0-indexed)
view.activeImageY;              // Current Y-axis frame (0-indexed)
view.amountX;                   // Total X-axis frames
view.amountY;                   // Total Y-axis frames

// Cleanup
view.destroy();                 // Destroy the viewer
Enhance performance with Cloudimage CDN for responsive, optimized images.
const config = {
  folder: 'https://your-domain.com/images/',
  filenameX: '{index}.jpg',
  amountX: 36,
  ciToken: 'your-cloudimage-token', // or use data-responsive attribute
};
| Browser | Version |
|---|---|
| Chrome | 69+ |
| Firefox | 105+ |
| Safari | 16.4+ |
| Edge | 79+ |
| iOS Safari | 16.4+ |
| Android Chrome | 69+ |
Note: This library uses OffscreenCanvas for optimal performance, which requires the browser versions listed above.
Mobile browsers (especially Safari) have strict memory limits that can cause tab crashes when loading many high-resolution images. The library includes built-in optimizations for mobile that are automatically enabled:
| Setting | Desktop | Mobile | Notes |
|---|---|---|---|
amountX | 60-100+ | 30-40 max | Each image uses ~4MB GPU memory |
zoomMax | 3-5 | 2-3 | Higher zoom loads more pixels |
The library automatically detects mobile devices, but you can also adjust your configuration:
const isMobile = /Android|webOS|iPhone|iPad|iPod|BlackBerry|IEMobile|Opera Mini/i.test(
  navigator.userAgent
);

const viewer = new CI360();
viewer.init(container, {
  folder: 'https://example.com/images/',
  filenameX: '{index}.jpg',
  amountX: isMobile ? 36 : 72,           // Fewer images on mobile
  zoomMax: isMobile ? 2 : 5,             // Lower zoom on mobile
});
Memory management is automatically enabled on mobile. For desktop or manual control:
const viewer = new CI360();
viewer.initAll();

// Manually enable (already auto-enabled on mobile)
viewer.enableMemoryManagement();

// Disable if needed
viewer.disableMemoryManagement();
This uses IntersectionObserver to:
Version 4 introduces significant improvements in performance, customization, and developer experience. This guide helps you upgrade from v3.
For CDN users, CSS is now auto-injected (same as v3):
<!-- v4: Just include the script -->
<script src=".../js-cloudimage-360-view.min.js"></script>
For npm/bundler users, import CSS separately:
import CI360 from 'js-cloudimage-360-view';
import 'js-cloudimage-360-view/css';
// v3
window.CI360.init();
window.CI360.add('my-viewer');
window.CI360.update('my-viewer', true);
window.CI360.destroy();

// v4
const viewer = new CI360();
viewer.initAll();                           // Initialize all
viewer.init(container, config);             // Initialize specific container
viewer.updateView('my-viewer', newConfig);  // Update with new config
viewer.getViewById('my-viewer').destroy();  // Destroy specific viewer
v4 uses OffscreenCanvas for performance, requiring newer browsers:
| Browser | v3 | v4 |
|---|---|---|
| Safari | 12+ | 16.4+ |
| iOS Safari | 12+ | 16.4+ |
| Firefox | 55+ | 105+ |
| Chrome | 60+ | 69+ |
The following options have been removed in v4:
| v3 Option | v4 Alternative |
|---|---|
data-box-shadow | Use CSS: .cloudimage-360 { box-shadow: ... } |
data-ratio | Container automatically maintains aspect ratio |
data-lazy-selector | Use data-lazyload (boolean) |
data-hide-360-logo | Use data-initial-icon (boolean, inverted) |
data-logo-src | Custom logos not supported; use CSS to hide |
data-image-info | Removed |
data-request-responsive-images | Removed |
data-disable-drag | Use data-draggable (inverted: draggable="false") |
data-spin-reverse | Use data-drag-reverse and data-autoplay-reverse |
Hotspot properties have been simplified:
// v3 - Multiple specific properties
const hotspot = {
  id: 'feature-1',
  title: 'Feature Title',
  description: 'Description text',
  url: 'https://example.com',
  newTab: true,
  moreDetailsUrl: 'https://example.com/details',
  moreDetailsTitle: 'Learn More',
  popupSelector: '#custom-popup',
  arrow: true,
  placement: 'top',
  offset: [0, 10],
  positions: { 0: { x: 100, y: 200 } },
};

// v4 - Flexible HTML content
const hotspot = {
  id: 'feature-1',
  orientation: 'x',
  containerSize: [1200, 800],
  positions: { 0: { x: 100, y: 200 } },
  content: `
    <div class="my-tooltip">
      <h3>Feature Title</h3>
      <p>Description text</p>
      <a href="https://example.com" target="_blank">Learn More</a>
    </div>
  `,
  onClick: () => console.log('Clicked!'),
};
| v3 Property | v4 Alternative |
|---|---|
title, description | Use content with HTML |
url, newTab | Include <a> tag in content |
moreDetailsUrl, moreDetailsTitle | Include in content HTML |
popupSelector | Use content with your HTML |
arrow, placement, offset | Popper.js handles positioning automatically |
open | Removed; hotspots open on click/hover |
Take advantage of these new capabilities:
:root {
  --ci360-button-bg: #f0f0f0;
  --ci360-icon-color: #333;
  --ci360-hotspot-color: #00aaff;
}
<div class="cloudimage-360 ci360-theme-dark" ...></div>
const config = {
  onReady: (e) => console.log('Ready'),
  onSpin: (e) => console.log(`Frame: ${e.activeImageX}`),
  onFullscreenOpen: () => console.log('Fullscreen'),
};
const config = {
  hints: true,  // Auto-detect hints
  // or
  hints: ['drag', 'dblclick', 'keys'],  // Custom hints
};
const config = {
  pinchZoom: true,  // Enabled by default
};
new CI360()data-disable-drag with data-draggable="false"data-spin-reverse with data-drag-reversedata-hide-360-logo with data-initial-icon="false"content instead of individual propertiesWe welcome contributions! Here's how you can help:
git clone https://github.com/Scaleflex/js-cloudimage-360-view.git
cd js-cloudimage-360-view
npm install
npm run dev
If this library helped your project, consider buying me a coffee!
This project is licensed under the MIT License.
Made with care by the Scaleflex team
FAQs
Unknown package
We found that js-cloudimage-360-view demonstrated a healthy version release cadence and project activity because the last version was released less than a year ago. It has 3 open source maintainers collaborating on the project.
Did you know?

Socket for GitHub automatically highlights issues in each pull request and monitors the health of all your open source dependencies. Discover the contents of your packages and block harmful activity before you install or update your dependencies.
Product
Socket for Jira lets teams turn alerts into Jira tickets with manual creation, automated ticketing rules, and two-way sync.

Company News
Socket won two 2026 Reppy Awards from RepVue, ranking in the top 5% of all sales orgs. AE Alexandra Lister shares what it's like to grow a sales career here.

Security News
NIST will stop enriching most CVEs under a new risk-based model, narrowing the NVD's scope as vulnerability submissions continue to surge.