Product
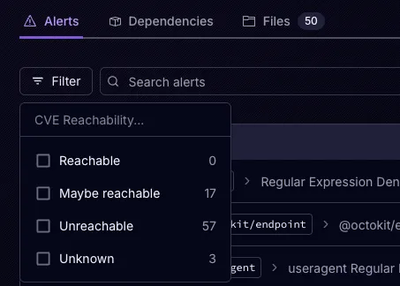
Announcing Precomputed Reachability Analysis in Socket
Socket’s precomputed reachability slashes false positives by flagging up to 80% of vulnerabilities as irrelevant, with no setup and instant results.
By Martin Torp - Jul 30, 2025
nuxt-telegram-miniapps
Advanced tools
This is an experiment in building a library of Telegram web application interface components with Tailwind CSS. All components inherit the design concept of Telegram for Android and partially Telegram for iOS, but do not try to match it exactly.
This is an experiment in building a library of Telegram web application interface components with Tailwind CSS. All components inherit the design concept of Telegram for Android and partially Telegram for iOS, but do not try to match it exactly.
⚠️ Please do not use this library in real projects until the first stable version is published. Breaking changes may occur without prior notice!
npm install -D nuxt-telegram-webapps
Note: This also installs required nuxt modules:
This component library is Nuxt Layer. To use it, just add the extends setting.
// nuxt.config.ts
export default defineNuxtConfig({
  extends: [
    'nuxt-telegram-miniapps',
  ]
})
Then create a page that is supposed to be a web application or place the web application components in the app.vue. It's recommended to place all components inside helper component TgContent.
<template>
  <TgContent>
    <TgSection>
      <TgCell title="Some title" />
    </TgSection>
  </TgContent>
</template>

A component within which you can place TgCell`s groups or any content block of a web application
| Name | Type | Description |
|---|---|---|
| title | string | The panel title |
| content | boolean | Adds paddings inside section, use if no cells inside |
| inset | boolean | Adds margins around the section (automatically on iOS and macOS) |
<!-- Section with cells -->
<TgSection title="Section title">
  <TgCell title="Cell 1" />
  <TgCell title="Cell 2" />
</TgSection>

<!-- Section with content -->
<TgSection title="Section title" content>
  <p>Some section content</p>
</TgSection>

This is the main component of the menu. It automatically sets paddings, icon positioning, colors and dividers.
| Name | Type | Description |
|---|---|---|
| title | string | Main text of the cell |
| description | string | Faded small text or hint |
| subtitle | string | Not faded small text, positioned before description |
| icon | string | Name of the icon (look: https://icones.js.org/) |
| line-clamp | string | Line clamp of the subtitle and description |
| color | string | Can be default, link, danger |
| icon-color | string | Name of the color from those in the Tailwind set, or any CSS value |
| border | boolean | Determines whether to show the border at the bottom |
| appendBorder | boolean | Whether to show a border to the left of append |
If the icon option is used, the icon will be displayed differently depending on the platform. On iOS and macOS the icon will be placed inside a colored square (don't forget to set icon-color), while on other platforms it will be displayed without a square and will inherit the system hint color.
If you want to control the display of the icon yourself, use the prepend slot and the TgIconBox component.
| Name | Description |
|---|---|
| default | You can add any content you want to the cell |
| prepend | Places the content to the left of the main content, usually there is an icon there |
| append | Places the content to the right of the main content |
<!-- Simple cell -->
<TgCell title="Some title" description="Some description" />

<!-- Cell with content -->
<TgCell>
  <p>Some content inside the cell</p>
</TgCell>

<!-- Cell with slots -->
<TgCell title="Some title" description="Some description">
  <template #icon>
    <TgIconBox icon="material-symbols:qr-code" />
  </template>
  <template #right>
    <TgButton size="sm">Button</TgButton>
  </template>
</TgCell>
This is just button, not something special 💁♂️ It is used to trigger some actions
| Name | Type | Description |
|---|---|---|
| color | string | May be primary or danger |
| type | string | May be button, submit or reset |
| to | string | Vue-Router route location |
| href | string | External link |
| disabled | boolean | Disabled state |
| rel | string | Rel attribute |
| target | string | Target attribute |
| size | string | May be sm, md, lg or xl |
| text | boolean | Set true if you want to make button look like link |
| icon | string | The name of the icon (look: https://icones.js.org/) |
A component to display an icon inside a circle or rectangle with rounded corners. The icon can be replaced by text
| Name | Type | Description |
|---|---|---|
| icon | string | The name of the icon (look: https://icones.js.org/) |
| text | string | Text to display instead of an icon |
| round | boolean | Display a circle or rectangle box |
| size | string | May be sm, md, lg or xl |
| color | string | Name of the color from those in the Tailwind set, or any CSS value |
| backgroundColor | string | Icon box (background) color |
You can place the TgIconBox in the icon slot of the TgCell component:
<TgCell title="Some title" description="Some description">
  <template #icon>
    <TgIconBox icon="material-symbols:qr-code" />
  </template>
</TgCell>
Just input without borders
| Name | Type | Description |
|---|---|---|
| v-model:value | string | Input text |
| placeholder | string | Placeholder text |
<TgSection title="Section title" content>
  <TgInput v-model:value="input" />
</TgSection>
If you want to test the appearance on different platforms, use the usePlatform compsable in the app.vue file or in the miniapp page by passing the 'ios' or 'android' parameter to it and reloading the page. This is for testing and debugging purposes and may change in the future.
FAQs
This is an experiment in building a library of Telegram web application interface components with Tailwind CSS. All components inherit the design concept of Telegram for Android and partially Telegram for iOS, but do not try to match it exactly.
The npm package nuxt-telegram-miniapps receives a total of 1 weekly downloads. As such, nuxt-telegram-miniapps popularity was classified as not popular.
We found that nuxt-telegram-miniapps demonstrated a healthy version release cadence and project activity because the last version was released less than a year ago. It has 0 open source maintainers collaborating on the project.
Did you know?

Socket for GitHub automatically highlights issues in each pull request and monitors the health of all your open source dependencies. Discover the contents of your packages and block harmful activity before you install or update your dependencies.
Product
Socket’s precomputed reachability slashes false positives by flagging up to 80% of vulnerabilities as irrelevant, with no setup and instant results.
Product
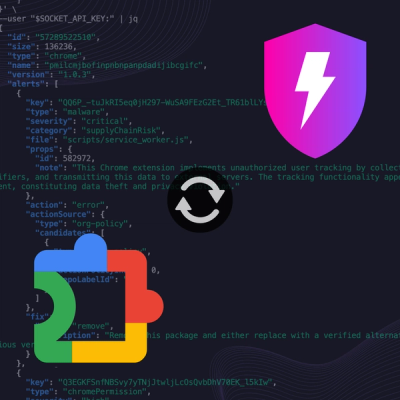
Socket is launching experimental protection for Chrome extensions, scanning for malware and risky permissions to prevent silent supply chain attacks.

Product
Add secure dependency scanning to Claude Desktop with Socket MCP, a one-click extension that keeps your coding conversations safe from malicious packages.