Product
Socket for Jira Is Now Available
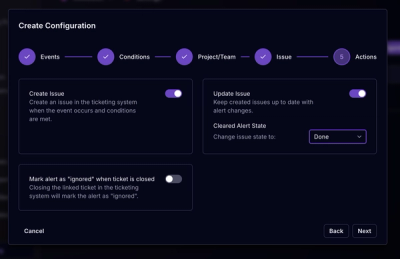
Socket for Jira lets teams turn alerts into Jira tickets with manual creation, automated ticketing rules, and two-way sync.
By Jeppe Hasseriis - Apr 20, 2026
openid-client
Advanced tools
OAuth 2 / OpenID Connect Client API for JavaScript Runtimes
openid-client simplifies integration with authorization servers by providing easy-to-use APIs for the most common authentication and authorization flows, including OAuth 2 and OpenID Connect. It is designed for JavaScript runtimes like Node.js, Browsers, Deno, Cloudflare Workers, and more.
The following features are currently in scope and implemented in this software:

If you want to quickly add authentication to JavaScript apps, feel free to check out Auth0's JavaScript SDK and free plan. Create an Auth0 account; it's free!

Filip Skokan has certified that this software conforms to the Basic, FAPI 1.0, and FAPI 2.0 Relying Party Conformance Profiles of the OpenID Connect™ protocol.
Support from the community to continue maintaining and improving this module is welcome. If you find the module useful, please consider supporting the project by becoming a sponsor.
openid-client is distributed via npmjs.com, jsr.io, and github.com.
example ESM import1
import * as client from 'openid-client'
let server!: URL // Authorization Server's Issuer Identifier
let clientId!: string // Client identifier at the Authorization Server
let clientSecret!: string // Client Secret

let config: client.Configuration = await client.discovery(
  server,
  clientId,
  clientSecret,
)
Authorization Code flow is for obtaining Access Tokens (and optionally Refresh Tokens) to use with third party APIs.
When you want to have your end-users authorize or authenticate you need to send them to the authorization server's authorization_endpoint. Consult the web framework of your choice on how to redirect but here's how
to get the authorization endpoint's URL with parameters already encoded in the query to redirect
to.
/**
 * Value used in the authorization request as the redirect_uri parameter, this
 * is typically pre-registered at the Authorization Server.
 */
let redirect_uri!: string
let scope!: string // Scope of the access request
/**
 * PKCE: The following MUST be generated for every redirect to the
 * authorization_endpoint. You must store the code_verifier and state in the
 * end-user session such that it can be recovered as the user gets redirected
 * from the authorization server back to your application.
 */
let code_verifier: string = client.randomPKCECodeVerifier()
let code_challenge: string =
  await client.calculatePKCECodeChallenge(code_verifier)
let state!: string

let parameters: Record<string, string> = {
  redirect_uri,
  scope,
  code_challenge,
  code_challenge_method: 'S256',
}

if (!config.serverMetadata().supportsPKCE()) {
  /**
   * We cannot be sure the server supports PKCE so we're going to use state too.
   * Use of PKCE is backwards compatible even if the AS doesn't support it which
   * is why we're using it regardless. Like PKCE, random state must be generated
   * for every redirect to the authorization_endpoint.
   */
  state = client.randomState()
  parameters.state = state
}

let redirectTo: URL = client.buildAuthorizationUrl(config, parameters)

// now redirect the user to redirectTo.href
console.log('redirecting to', redirectTo.href)
When end-users are redirected back to the redirect_uri your application consumes the callback and
passes in PKCE code_verifier to include it in the authorization code grant token exchange.
let getCurrentUrl!: (...args: any) => URL

let tokens: client.TokenEndpointResponse = await client.authorizationCodeGrant(
  config,
  getCurrentUrl(),
  {
    pkceCodeVerifier: code_verifier,
    expectedState: state,
  },
)

console.log('Token Endpoint Response', tokens)
You can then fetch a protected resource response
let protectedResourceResponse: Response = await client.fetchProtectedResource(
  config,
  tokens.access_token,
  new URL('https://rs.example.com/api'),
  'GET',
)

console.log(
  'Protected Resource Response',
  await protectedResourceResponse.json(),
)
let scope!: string // Scope of the access request

let response = await client.initiateDeviceAuthorization(config, { scope })

console.log('User Code:', response.user_code)
console.log('Verification URI:', response.verification_uri)
console.log('Verification URI (complete):', response.verification_uri_complete)
You will display the instructions to the end-user and have them directed at verification_uri or
verification_uri_complete, afterwards you can start polling for the Device Access Token Response.
let tokens: client.TokenEndpointResponse =
  await client.pollDeviceAuthorizationGrant(config, response)

console.log('Token Endpoint Response', tokens)
This will poll in a regular interval and only resolve with tokens once the end-user authenticates.
let scope!: string // Scope of the access request
/**
 * One of login_hint, id_token_hint, or login_hint_token parameters must be
 * provided in CIBA
 */
let login_hint!: string

let response = await client.initiateBackchannelAuthentication(config, {
  scope,
  login_hint,
})

/**
 * OPTIONAL: If your client is configured with Ping Mode you'd invoke the
 * following after getting the CIBA Ping Callback (its implementation is
 * framework specific and therefore out of scope for openid-client)
 */

let tokens: client.TokenEndpointResponse =
  await client.pollBackchannelAuthenticationGrant(config, response)

console.log('Token Endpoint Response', tokens)
This will poll in a regular interval and only resolve with tokens once the end-user authenticates.
Client Credentials flow is for obtaining Access Tokens to use with third party APIs on behalf of your application, rather than an end-user which was the case in previous examples.
let scope!: string // Scope of the access request
let resource!: string // Resource Indicator of the Resource Server the access token is for

let tokens: client.TokenEndpointResponse = await lib.clientCredentialsGrant(
  config,
  { scope, resource },
)

console.log('Token Endpoint Response', tokens)
The supported JavaScript runtimes include those that support the utilized Web API globals and standard built-in objects. These are (but are not limited to):
| Version | Security Fixes 🔑 | Other Bug Fixes 🐞 | New Features ⭐ | Runtime and Module type |
|---|---|---|---|---|
| v6.x | Security Policy | ✅ | ✅ | Universal3 ESM1 |
| v5.x | Security Policy | ❌ | ❌ | Node.js CJS + ESM |
Passport is a widely used authentication middleware for Node.js. It supports a wide range of strategies, including OpenID Connect. Compared to openid-client, Passport provides a more general authentication solution that can be extended with various strategies for different authentication mechanisms.
oidc-provider is a Node.js library that allows developers to implement their own OpenID Connect Provider. It is different from openid-client, which is designed to be used as a client for existing providers. oidc-provider is more suitable for those who want to create an identity provider rather than connect to one.
FAQs
OAuth 2 / OpenID Connect Client API for JavaScript Runtimes
The npm package openid-client receives a total of 6,563,019 weekly downloads. As such, openid-client popularity was classified as popular.
We found that openid-client demonstrated a healthy version release cadence and project activity because the last version was released less than a year ago. It has 1 open source maintainer collaborating on the project.
Did you know?

Socket for GitHub automatically highlights issues in each pull request and monitors the health of all your open source dependencies. Discover the contents of your packages and block harmful activity before you install or update your dependencies.
Product
Socket for Jira lets teams turn alerts into Jira tickets with manual creation, automated ticketing rules, and two-way sync.

Company News
Socket won two 2026 Reppy Awards from RepVue, ranking in the top 5% of all sales orgs. AE Alexandra Lister shares what it's like to grow a sales career here.

Security News
NIST will stop enriching most CVEs under a new risk-based model, narrowing the NVD's scope as vulnerability submissions continue to surge.