pimatic-homeduino
Plugin for using various 433 Mhz devices and sensors with a connected Arduino with
homeduino sketch or directly with capable hardware like the Raspberry Pi.
This plugins supports all 433 MHz devices with rfcontroljs
protocol implementations.
Drivers
The plugin can be used with two different hardware combinations:
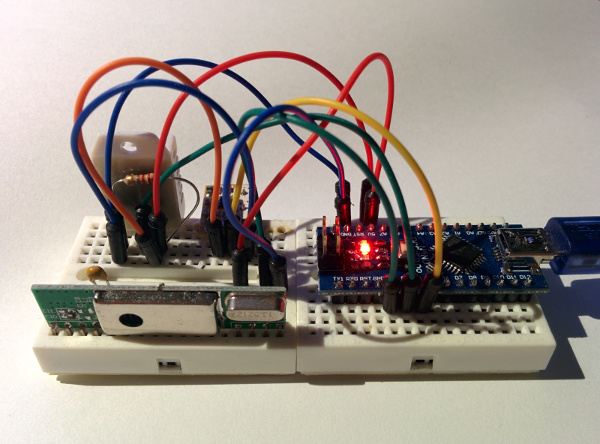
- A. Computer with connected Arduino (with homeduino sketch) and 433 MHz transmitter and receiver (recommended)
- B. Raspberry Pi (or Banana Pi or Hummingboard) with 433 MHz transmitter and receiver
A.Connected Arduino (recommended)
You can load the plugin by editing your config.json to include:
{
"plugin": "homeduino",
"driver": "serialport",
"driverOptions": {
"serialDevice": "/dev/ttyUSB0",
"baudrate": 115200
},
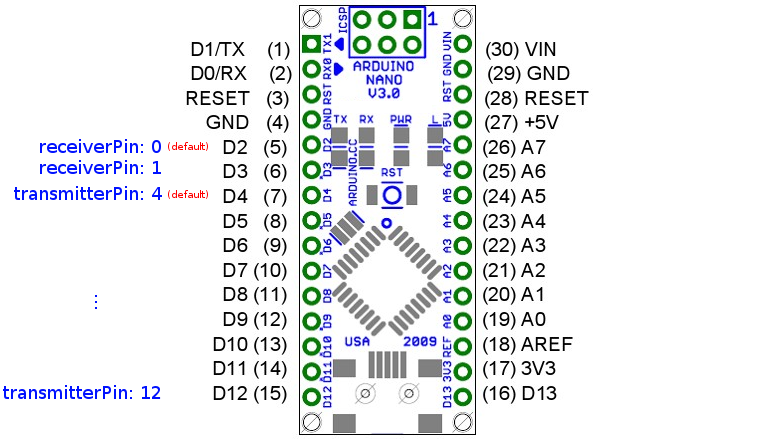
"receiverPin": 0,
"transmitterPin": 4,
"dstSearchAddressPin": 12
}
in the plugins section. For all configuration options see homeduino-config-schema
The pin numbers are Arduino pin numbers. The receiverPin must be either 0 (INT0) or 1 (INT1).
The transmitterPin must be a digital pin between 2 (D2) and 13 (D13).
B. Raspberry Pi with ATTiny45 / 85 Prefilter
You can load the plugin by editing your config.json to include:
{
  "plugin": "homeduino",
  "driver": "gpio",
  "driverOptions": {},
  "receiverPin": 0,
  "transmitterPin": 4
}
in the plugins section. For all configuration options see homeduino-config-schema
The pin numbers are wiringPi pin numbers.
Devices
Devices must be added manually to the device section of your pimatic config.
A list with all supported protocols and protocol-options can be found here.
RF Actors
RF Actors like the "HomeduinoRFSwitch" can be controlled or send to outlets with multiple protocols.
Just add more protocols to the protocols array. You can also set if a protocol
is used for sending or receiving. Default is true for both.
In some cases the target receiver don´t recognize the transmission. To improve this you can change
the amount of message repeats. By default this is set to seven.
Switch example:
A "HomeduinoRFSwitch" can only use switch protocols.
{
  "id": "rfswitch",
  "name": "RFSwitch",
  "class": "HomeduinoRFSwitch",
  "protocols": [{
    "name": "switch1",
    "options": {
      "id": 42,
      "unit": 0
    }
  }]
}
Multi protocol switch example:
    {
      "id": "switchmp",
      "name": "Multi Switch",
      "class": "HomeduinoRFSwitch",
      "protocols": [
        {
          "name": "switch1",
          "options": {
            "id": 9509718,
            "unit": 0
          },
          "send": true,
          "receive": true,
          "rfrepeats": 4
        },
        {
          "name": "switch1",
          "options": {
            "id": 9509718,
            "unit": 1
          },
          "send": false,
          "receive": true,
          "rfrepeats": 9
        }
      ]
    }
Buttons Device example:
A "HomeduinoRFButtonsDevice" can use switch and command protocols.
{
  "id": "homeduino-buttons",
  "name": "Buttons",
  "class": "HomeduinoRFButtonsDevice",
  "buttons": [
    {
      "id": "test-button",
      "text": "test",
      "protocols": [{
        "name": "switch1",
        "options": {
          "unit": 0,
          "id": 42,
          "state": true
        }
      }]
    }
  ]
}
Dimmer device example:
The "HomeduinoRFDimmer" can only use dimmer protocols. The equivalent to dimmer1 is the switch1
protocol.
{
  "id": "dimmer",
  "name": "Dimmer",
  "class": "HomeduinoRFDimmer",
  "protocols": [
    {
      "name": "dimmer1",
      "options": {
        "id": 7654321,
        "unit": 0
      },
      "send": true,
      "receive": true
    }
  ]
},
Shutter sensor example:
Can use switch protocols.
{
  "id": "homeduino-contact",
  "name": "Shutter Controller",
  "class": "HomeduinoRFShutter",
  "protocols": [{
    "name": "switch1",
    "options": {
      "unit": 0,
      "id": 42
    }
  }]
}
RF Sensors
RF Sensors receiving data from any kind of external sensor over 433Mhz messages.
Weather station sensor example:
This is the basic sensor with only temperature and humidity
{
  "id": "rftemperature",
  "name": "Temperature",
  "class": "HomeduinoRFTemperature",
  "protocols": [{
    "name": "weather2",
    "options": {
      "id": 42,
      "channel": 1
    }
  }]
}
For weather stations like the Alecto WS-4500 you should use the weather station device
{
  "id": "weatherstation",
  "name": "Weather Data",
  "class": "HomeduinoRFWeatherStation",
  "protocols": [
    {
      "name": "weather5",
      "options": {
        "id": 120
      }
    }
  ],
  "values": [
    "rain",
    "temperature",
    "humidity"
  ]
},
It supports different values to display
rain, temperature, humidity, windGust, windDirection, avgAirspeed, lowBattery and battery.
The order of the listed values define the order of the displayed values.
"lowBattery" is an boolean value and "battery" is an percentage value from 0 to 100.
Most protocols supports only an "lowBattery" value.
Has your sensor a known offset for an value, then you can add a preprocessing to correct the values.
For the "HomeduinoRFTemperature" these are
(The following is an example)
  "processingTemp": "$value + 10",
  "processingHum": "$value * 0.5",
And for the "HomeduinoRFWeatherStation" these are
  "processingTemp": "($value - 1.2) * 0.9",
  "processingHum": "$value",
  "processingWindGust": "$value",
  "processingAvgAirspeed": "$value",
  "processingWindDirection": "$value + 45",
  "processingRain": "$value",
PIR sensor example:
{
  "id": "homeduino-pir",
  "name": "PIR",
  "class": "HomeduinoRFPir",
  "protocols": [{
    "name": "pir1",
    "options": {
      "unit": 0,
      "id": 17
    }
  }],
  "resetTime": 6000
}
Contact sensor example:
{
  "id": "homeduino-contact",
  "name": "Contact",
  "class": "HomeduinoRFContactSensor",
  "protocols": [{
    "name": "contact1",
    "options": {
      "unit": 0,
      "id": 42
    }
  }]
}
Some contacts only emit an event on open. For this you can set autoReset to true:
{
  "id": "door-contact",
  "name": "door-Contact",
  "class": "HomeduinoRFContactSensor",
  "protocols": [
    {
      "name": "contact2",
      "options": {
        "id": 43690
      }
    }
  ],
  "autoReset": true,
  "resetTime": 3000
}
Generic RF Sensor with Arduino sender
{
  "id": "homeduino-generic-sensor",
  "name": "RFGenericSensor",
  "class": "HomeduinoRFGenericSensor",
  "protocols": [{
    "name": "generic",
    "options": {
      "id": 42
    }
  }],
  "attributes": [
    {
      "name": "temperature",
      "type": 3,
      "decimals": 2,
      "baseValue": 0,
      "unit": "°C",
      "label": "Temperature"
    }
  ]
}
Local Sensors
Local sensors are connected to the arduino. This can be a simple read of an digital pin or an bus
sensor like the DS18B20
DHT11/22 sensor example:
{
  "id": "homeduino-temperature",
  "name": "DHT",
  "class": "HomeduinoDHTSensor",
  "type": 22,
  "pin": 13
}
DST Dallas DS18B20 sensor example:
{
  "id": "homeduino-temperature-dst",
  "name": "DST",
  "class": "HomeduinoDSTSensor",
  "pin": 12,
  "address" : "104AE9B50008000E",
  "interval" : 10000
}
AnalogSensor example:
An AnalogSensor can read analog pins of the Arduino and display there value.
An optional preprocessing can be applied. Pin numbering starts at 14 (A0)
for the first analog pin.
{
  "id": "homeduino-analog-sensor",
  "name": "AnalogSensor",
  "class": "HomeduinoAnalogSensor",
  "attributes": [
    {
      "name": "voltage",
      "unit": "V",
      "label": "Voltage",
      "pin": 14,
      "interval": 50000,
      "processing": "($value / 1023) * 5"
    }
  ]
}
The analog value is between 0 and 1023 and can be preprocessed by an expression. In this example
the value is scale to a value between 0 and 5.
ContactSensor example:
An ContactSensor can read digital pins of the Arduino and display the
state of it.
{
  "id": "homeduino-contact-sensor",
  "name": "ContactSensor",
  "class": "HomeduinoContactSensor",
  "pin": 9,
  "interval": 10000,
  "inverted": true
}
The pin must be set. Interval and inverted are optional.
They are set by default to interval = 10000 and inverted = false.
PIR sensor example:
A PIR sensor can read digital pins of the Arduino and display the
presence state of it.
{
  "id": "homeduino-pir",
  "name": "PIR",
  "class": "HomeduinoPir",
  "pin": 9,
  "interval": 10000,
  "inverted": true
}
The pin must be set. Interval and inverted are optional.
They are set by default to interval = 10000 and inverted = false.
Local Actor
A local actor is an output on the Arduino like an digital pin or a PWM.
Pin switch example:
The "HomeduinoSwitch" can toggle the state of an pin on the arduino.
{
  "id": "pin-switch",
  "name": "Pin Switch",
  "class": "HomeduinoSwitch",
  "inverted": false,
  "pin": 13
}
AnalogDimmer example:
The AnalogDimmer activates one of the PWM channels on the Arduino. At the moment only the
following pins are allowed 3,5,6,9,10,11. The Dimmer maps an value from 0-100 to 0-255.
The PWM frequency is about 490Hz.
{
  "id": "analogDimmer1",
  "name": "analogDimmer",
  "class": "HomeduinoAnalogDimmer",
  "pin": 9
}