Product
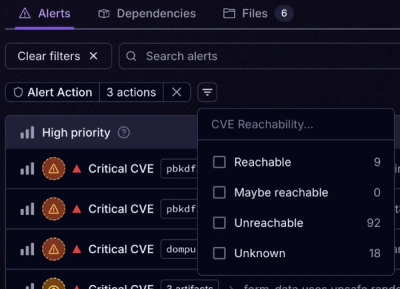
Introducing Tier 1 Reachability: Precision CVE Triage for Enterprise Teams
Socket’s new Tier 1 Reachability filters out up to 80% of irrelevant CVEs, so security teams can focus on the vulnerabilities that matter.
Convert images to pure CSS. Even animated GIFs!
Install Pixely with NPM:
npm install pixely
If you're only interested in the CLI functionality, you may wish to install globally.
You can import Pixely into your project and instantiate it with:
var { Pixely } = require('pixely');
A new Pixely instance accepts four arguments:
Once instantiated, you can run the conversion process with the make() method.
var pixely = new Pixely('path/or/url/to/image', 'path/to/output/folder', 2, 2);
pixely.make();
If you need more fine-grain control over when specific steps in the process occur, the class is broken up into five main methods:
pixely.getImage().then(() => { // read the image file (returns a promise)
	pixely.buildHtml(); // build the HTML string
	pixely.buildCss(); // build the CSS string
	pixely.exportHtml(); // save the HTML string to the configured filepath
	pixely.exportCss(); // save the CSS string to the configured filepath
});
Once installed, you should be able to use Pixely from the command line using the pixely command:
pixely 'path/or/url/to/image'
By default, Pixely will output the HTML and CSS files to /output/index.<html|css>. You can change the output folder with the --folder option:
pixely 'path/or/url/to/image' --folder=path/to/output/folder
pixely 'path/or/url/to/image' -f path/to/output/folder
Also by default, Pixely will generate CSS for a 1-second animation if the image is an animated GIF. You can alter the animation time in the CSS directly, or you can define an animation time (in seconds) with the --duration option:
pixely 'path/or/url/to/image' --duration=4
pixely 'path/or/url/to/image' -d 4
Also by default, Pixely will scale the image to a 1-to-1 scale (1 image pixel = 1 CSS pixel). You can change the scale by setting the font-size attribute of the wrapper div in the CSS directly, or you can specify your own scale with the --scale option (whole numbers are recommended):
pixely 'path/or/url/to/image' --scale=2
pixely 'path/or/url/to/image' -s 2
Pixely first reads a given image file to determine whether it is a static or animated image. From there it arranges the pixel information into a series of 'frames' (or a single frame if the image is static). Finally, it takes these frames and constructs a grid of pixels using the box-shadow method explained here by CSS-Tricks..
FAQs
Convert images to pure CSS. Even animated GIFs!
We found that pixely demonstrated a not healthy version release cadence and project activity because the last version was released a year ago. It has 1 open source maintainer collaborating on the project.
Did you know?

Socket for GitHub automatically highlights issues in each pull request and monitors the health of all your open source dependencies. Discover the contents of your packages and block harmful activity before you install or update your dependencies.

Product
Socket’s new Tier 1 Reachability filters out up to 80% of irrelevant CVEs, so security teams can focus on the vulnerabilities that matter.

Research
/Security News
Ongoing npm supply chain attack spreads to DuckDB: multiple packages compromised with the same wallet-drainer malware.

Security News
The MCP Steering Committee has launched the official MCP Registry in preview, a central hub for discovering and publishing MCP servers.